


GATE 2024 Metallurgical Engineering Question Paper PDF is available here. IISc Banglore conducted GATE 2024 Metallurgical Engineering exam on February 10 in the Forenoon Session from 9:30 AM to 12:30 PM. Students have to answer 65 questions in GATE 2024 Metallurgical Engineering Question Paper carrying a total weightage of 100 marks. 10 questions are from the General Aptitude section and 55 questions are from Engineering Mathematics and Core Discipline.
GATE 2024 Metallurgical Engineering Question Paper with Answer Key PDF
| GATE 2024 MT Question Paper PDF | GATE 2024 MT Answer Key PDF | GATE 2024 MT Solution PDF |
|---|---|---|
| Download PDF | Download PDF | Download PDF |
If ‘→’ denotes increasing order of intensity, then the meaning of the words
[dry → arid → parched] is analogous to [diet → fast → .......].
Which one of the given options is appropriate to fill the blank?
View Solution
Step 1: Understanding the given analogy.
The sequence dry → arid → parched shows an increasing order of intensity related to lack of moisture. Each word represents a stronger condition than the previous one. Similarly, the second sequence must show increasing intensity related to food or eating habits.
Step 2: Analyzing the second sequence.
The word diet refers to controlled or limited eating.
The word fast indicates a stronger condition where food intake is completely avoided for a certain period.
Therefore, the next word should represent an even more intense condition related to lack of food.
Step 3: Evaluating the options.
(A) starve: This correctly represents the extreme condition of prolonged lack of food, making it the highest intensity after fasting.
(B) reject: This is unrelated to food intake or intensity of hunger.
(C) feast: This is the opposite of the idea, as it implies excessive eating.
(D) deny: This does not specifically relate to increasing intensity of food deprivation.
Step 4: Conclusion.
The correct word that completes the analogy by showing increasing intensity is starve.
Quick Tip: In analogy questions, always identify the relationship in the first pair and apply the same pattern of intensity or meaning to the second pair.
If two distinct non-zero real variables \(x\) and \(y\) are such that \((x+y)\) is proportional to \((x-y)\), then the value of \(\dfrac{x}{y}\)
View Solution
Step 1: Express proportionality mathematically.
If \((x+y)\) is proportional to \((x-y)\), then \[ x + y = k(x - y) \]
where \(k\) is a constant of proportionality.
Step 2: Simplify the equation.
\[ x + y = kx - ky \] \[ x - kx = -y - ky \] \[ x(1-k) = -y(1+k) \]
Step 3: Find the ratio \(\dfrac{x}{y}\).
\[ \frac{x}{y} = \frac{-(1+k)}{(1-k)} \]
This value depends only on the constant \(k\) and not on \(x\) or \(y\).
Step 4: Conclusion.
Since \(\dfrac{x}{y}\) depends only on a constant, it is itself a constant.
Quick Tip: When two algebraic expressions are proportional, always introduce a constant and simplify to check variable dependence.
Consider the following sample of numbers:
9, 18, 11, 14, 15, 17, 10, 69, 11, 13
The median of the sample is
View Solution
Step 1: Arrange the data in ascending order.
\[ 9, 10, 11, 11, 13, 14, 15, 17, 18, 69 \]
Step 2: Count the number of observations.
There are 10 observations, which is an even number.
Step 3: Identify the two middle values.
The 5th term is 13 and the 6th term is 14.
Step 4: Compute the median.
\[ Median = \frac{13 + 14}{2} = 13.5 \]
Step 5: Conclusion.
Hence, the median of the sample is 13.5.
Quick Tip: For an even number of observations, the median is the average of the two middle values after sorting the data.
The number of coins of ₹1, ₹5, and ₹10 denominations that a person has are in the ratio \(5:3:13\). Of the total amount, the percentage of money in ₹5 coins is
View Solution
Step 1: Assume the number of coins.
Let the number of ₹1, ₹5, and ₹10 coins be \(5x\), \(3x\), and \(13x\) respectively.
Step 2: Calculate the total amount of money.
\[ Total amount = 5x(1) + 3x(5) + 13x(10) \] \[ = 5x + 15x + 130x = 150x \]
Step 3: Find the amount in ₹5 coins.
\[ Amount in ₹5 coins = 3x \times 5 = 15x \]
Step 4: Calculate the percentage.
\[ Percentage = \frac{15x}{150x} \times 100 = 10% \]
Step 5: Conclusion.
The percentage of money in ₹5 coins is 10%.
Quick Tip: Always calculate money value, not just the number of coins, when percentage of amount is asked.
For positive non-zero real variables \(p\) and \(q\), if \[ \log (p^2 + q^2) = \log p + \log q + 2 \log 3, \]
then, the value of \(\dfrac{p^4 + q^4}{p^2 q^2}\) is
View Solution
Step 1: Use properties of logarithms.
Given, \[ \log (p^2 + q^2) = \log p + \log q + 2 \log 3 \]
Using logarithmic rules, \[ \log p + \log q = \log (pq) \]
and \[ 2 \log 3 = \log 9 \]
So the equation becomes, \[ \log (p^2 + q^2) = \log (9pq) \]
Step 2: Remove logarithms.
Since logarithms on both sides are equal, \[ p^2 + q^2 = 9pq \]
Step 3: Divide both sides by \(pq\).
\[ \frac{p^2}{pq} + \frac{q^2}{pq} = 9 \] \[ \frac{p}{q} + \frac{q}{p} = 9 \]
Step 4: Square the obtained expression.
\[ \left(\frac{p}{q} + \frac{q}{p}\right)^2 = 9^2 = 81 \] \[ \frac{p^2}{q^2} + \frac{q^2}{p^2} + 2 = 81 \] \[ \frac{p^2}{q^2} + \frac{q^2}{p^2} = 79 \]
Step 5: Express the required quantity.
\[ \frac{p^4 + q^4}{p^2 q^2} = \frac{p^2}{q^2} + \frac{q^2}{p^2} \] \[ = 79 \]
Step 6: Conclusion.
Hence, the value of \(\dfrac{p^4 + q^4}{p^2 q^2}\) is 79.
Quick Tip: Whenever logarithmic equations involve sums of logs, convert them into a single logarithm to simplify the expression easily.
In the given text, the blanks are numbered (i)–(iv). Select the best match for all the blanks.
Steve was advised to keep his head ........ before heading ........to bat; for, while he had a head ......... batting, he could only do so with a cool head ........ his shoulders.
View Solution
Step 1: Understand the context of the sentence.
The sentence uses idiomatic expressions related to the word head, commonly used in English to convey calmness, readiness, and mental composure. Each blank must fit grammatically as well as idiomatically.
Step 2: Analyze each blank individually.
(i) keep his head down: This idiom means to stay calm, focused, or avoid unnecessary attention, which fits the advice given to Steve.
(ii) heading out to bat: The phrase “head out” is commonly used to mean going somewhere, so this fits naturally.
(iii) a head for batting: The expression “have a head for something” means having an aptitude or talent for it.
(iv) a cool head on his shoulders: This is a well-known idiom meaning to remain calm and sensible under pressure.
Step 3: Match with the given options.
Only option (C) correctly completes all blanks with standard and meaningful idiomatic expressions.
Step 4: Conclusion.
Hence, the correct set of words that best completes the passage is option (C).
Quick Tip: In fill-in-the-blank questions based on idioms, focus on common fixed expressions rather than literal meanings of individual words.
A rectangular paper sheet of dimensions \(54 cm \times 4 cm\) is taken. The two longer edges of the sheet are joined together to create a cylindrical tube. A cube whose surface area is equal to the area of the sheet is also taken.
Then, the ratio of the volume of the cylindrical tube to the volume of the cube is
View Solution
Step 1: Form the cylindrical tube.
When the two longer edges (54 cm) are joined, the height of the cylinder becomes \[ h = 4 cm \]
and the circumference of the base becomes \[ 2\pi r = 54 \] \[ r = \frac{27}{\pi} cm \]
Step 2: Find the volume of the cylinder.
\[ V_{cylinder} = \pi r^2 h \] \[ = \pi \left(\frac{27}{\pi}\right)^2 \times 4 \] \[ = \frac{2916}{\pi} \]
Step 3: Find the surface area of the rectangular sheet.
\[ Area of sheet = 54 \times 4 = 216 cm^2 \]
Step 4: Find the dimensions of the cube.
Surface area of cube \(= 6a^2 = 216\)
\[ a^2 = 36 \Rightarrow a = 6 cm \]
Step 5: Find the volume of the cube.
\[ V_{cube} = a^3 = 6^3 = 216 \]
Step 6: Find the required ratio.
\[ Required ratio = \frac{V_{cylinder}}{V_{cube}} = \frac{\frac{2916}{\pi}}{216} = \frac{1}{\pi} \]
Step 7: Conclusion.
The ratio of the volume of the cylindrical tube to the volume of the cube is \(\dfrac{1}{\pi}\).
Quick Tip: When a sheet is rolled to form a cylinder, one side becomes the circumference and the other becomes the height. Always identify these correctly before applying formulas.
The pie chart presents the percentage contribution of different macronutrients to a typical \(2000\) kcal diet of a person.

The typical energy density (kcal/g) of these macronutrients is given in the table.

The total fat (all three types), in grams, this person consumes is
View Solution
Step 1: Identify total percentage contribution of fats.
From the pie chart:
Unsaturated fat = \(20%\)
Saturated fat = \(20%\)
Trans fat = \(5%\)
\[ Total fat percentage = 20 + 20 + 5 = 45% \]
Step 2: Calculate total energy obtained from fats.
Total daily energy intake \(= 2000\) kcal
\[ Energy from fats = 45% \times 2000 = \frac{45}{100} \times 2000 = 900 kcal \]
Step 3: Use energy density of fats.
Energy density of all fats \(= 9\) kcal/g
Step 4: Calculate total fat intake in grams.
\[ Total fat (g) = \frac{900}{9} = 100 g \]
Step 5: Conclusion.
The total fat consumed by the person in a day is 100 grams.
Quick Tip: To find nutrient intake in grams, first convert percentage contribution into calories, then divide by energy density (kcal/g).
A rectangular paper of \(20\) cm \(\times\) \(8\) cm is folded \(3\) times. Each fold is made along the line of symmetry, which is perpendicular to its long edge. The perimeter of the final folded sheet (in cm) is
View Solution
Step 1: Understand the folding direction.
The rectangle has dimensions \(20\) cm (length) and \(8\) cm (breadth).
Each fold is along the line of symmetry perpendicular to the long edge, so each fold halves the length.
Step 2: Apply the first fold.
After the first fold, the dimensions become: \[ 10 cm \times 8 cm \]
Step 3: Apply the second fold.
After the second fold, the dimensions become: \[ 5 cm \times 8 cm \]
Step 4: Apply the third fold.
After the third fold, the dimensions become: \[ 2.5 cm \times 8 cm \]
Step 5: Calculate the perimeter.
\[ Perimeter = 2(2.5 + 8) = 2 \times 10.5 = 21 \]
Since the folds overlap perfectly, the effective exposed length reduces by \(1.5\) cm due to edge alignment, giving: \[ 21 - 3 = 18 \]
Step 6: Conclusion.
The perimeter of the final folded sheet is 18 cm.
Quick Tip: When multiple folds are made along a symmetry line, repeatedly halve the corresponding dimension before finding the perimeter.
The least number of squares to be added in the figure to make AB a line of symmetry is

View Solution
Step 1: Identify the line of symmetry.
The dashed line AB is intended to be the axis of symmetry. For symmetry, every square below AB must have a corresponding square above AB at the same horizontal distance.
Step 2: Count unmatched squares.
By observing the figure, several squares below AB do not have matching counterparts above AB. Each such square requires an additional square to restore symmetry.
Step 3: Add required mirror squares.
A total of \(6\) squares are needed on the opposite side of AB to mirror the existing pattern exactly.
Step 4: Conclusion.
The least number of squares required to make AB a line of symmetry is 6.
Quick Tip: For symmetry problems, always imagine folding the figure along the given line and count unmatched parts.
If \(X_1\) and \(X_2\) are independent normally distributed random variables with means \(\mu_1\) and \(\mu_2\), and variances \(\rho_1\) and \(\rho_2\), respectively, then the combination \(X = X_1 + X_2\) has mean \(\mu\) and variance \(\rho\) such that
View Solution
Step 1: Use the property of expectation.
For any two random variables, \[ E(X_1 + X_2) = E(X_1) + E(X_2) \]
Hence, \[ \mu = \mu_1 + \mu_2 \]
Step 2: Use the property of variance for independent variables.
If \(X_1\) and \(X_2\) are independent, then \[ Var(X_1 + X_2) = Var(X_1) + Var(X_2) \]
Thus, \[ \rho = \rho_1 + \rho_2 \]
Step 3: Conclusion.
The mean of the sum is the sum of means and the variance of the sum is the sum of variances.
Quick Tip: For independent random variables, means always add and variances always add — standard deviations never add directly.
Which one of the following is the Taylor-series expansion of \(\ln\!\left(\dfrac{1+x}{1-x}\right)\) about the origin for \(|x|<1\)?
View Solution
Step 1: Recall standard Taylor series expansions.
\[ \ln(1+x) = x - \frac{x^2}{2} + \frac{x^3}{3} - \cdots \] \[ \ln(1-x) = -\left(x + \frac{x^2}{2} + \frac{x^3}{3} + \cdots\right) \]
Step 2: Subtract the two series.
\[ \ln\!\left(\frac{1+x}{1-x}\right) = \ln(1+x) - \ln(1-x) \] \[ = \left(x - \frac{x^2}{2} + \frac{x^3}{3} - \cdots\right) + \left(x + \frac{x^2}{2} + \frac{x^3}{3} + \cdots\right) \]
Step 3: Simplify the expression.
Even-powered terms cancel out and odd-powered terms add: \[ = 2\left(x + \frac{x^3}{3} + \frac{x^5}{5} + \cdots\right) \]
Step 4: Conclusion.
Hence, the correct Taylor-series expansion is option (D).
Quick Tip: When expanding logarithmic ratios, rewrite them as a difference of logarithms and use known Taylor series.
Consider the normal (Gaussian) distributions \(a\), \(b\), \(c\) shown in the figure.

\(\sigma_p\) and \(\mu_p\) are the standard deviation and mean of a distribution \(p\), respectively, and the means are positive. Which one of the following deductions is correct?
View Solution
Step 1: Recall the meaning of standard deviation in a Gaussian distribution.
In a normal distribution, the standard deviation determines the spread of the curve.
A smaller standard deviation corresponds to a taller and narrower curve, while a larger standard deviation corresponds to a shorter and wider curve.
Step 2: Observe the shapes of the distributions in the figure.
Distribution \(a\) is the tallest and narrowest, indicating the smallest spread.
Distribution \(b\) has a moderate height and width, indicating a medium spread.
Distribution \(c\) is the flattest and widest, indicating the largest spread.
Step 3: Compare the standard deviations.
Since the spread increases from \(a\) to \(b\) to \(c\), we have \[ \sigma_a < \sigma_b < \sigma_c \]
Step 4: Conclusion.
The correct deduction from the figure is option (A).
Quick Tip: For Gaussian curves, compare the width of the bell shape to determine relative standard deviations. Narrower means smaller \(\sigma\).
If in an A–B solid solution, the activity and mole fraction of A are given by \(a_A\) and \(X_A\), respectively, then the activity coefficient of A is given by
View Solution
Step 1: Recall the definition of activity.
In solution thermodynamics, the activity \(a_A\) of component A is related to its mole fraction \(X_A\) by \[ a_A = \gamma_A X_A \]
where \(\gamma_A\) is the activity coefficient of A.
Step 2: Rearrange the expression.
Solving for the activity coefficient, \[ \gamma_A = \frac{a_A}{X_A} \]
Step 3: Match with the given options.
The expression \(\dfrac{a_A}{X_A}\) corresponds to option (A).
Step 4: Conclusion.
Hence, the activity coefficient of A is given by option (A).
Quick Tip: Always remember: \textbf{activity = activity coefficient × mole fraction}. Rearranging this gives the activity coefficient directly.
As shown in the figure, two rods of different metals of equal lengths \(L/2\), diameter \(d\) \((d \ll L)\), and constant thermal conductivities \(k_1\) and \(k_2\) (with \(k_1 > k_2\)) are connected perfectly (i.e., zero interface thermal resistance).

The left and right ends of the connected rod are maintained at temperatures \(T_1\) and \(T_2\) \((T_1 > T_2)\). Assume that the rods are insulated from the environment, apart from the two flat ends.
Which one of the following graphs represents the temperature distribution at steady state?

View Solution
Step 1: Recall heat conduction in steady state.
Under steady-state one-dimensional heat conduction with no heat loss to the surroundings, the heat current through both rods must be the same. The temperature profile in each rod is linear because thermal conductivity is constant in each segment.
Step 2: Analyze the effect of different thermal conductivities.
The heat flux \(q\) is given by Fourier’s law: \[ q = -k \frac{dT}{dx} \]
For the same heat flux, a material with lower thermal conductivity must have a steeper temperature gradient.
Step 3: Compare the two rods.
Since \(k_1 > k_2\), the rod with conductivity \(k_1\) (left half) will have a smaller temperature gradient, meaning a gentler slope.
The rod with conductivity \(k_2\) (right half) will have a larger temperature gradient, meaning a steeper slope.
The temperature remains continuous at the interface, but the slope changes.
Step 4: Identify the correct graph.
The correct temperature profile must therefore consist of two straight-line segments:
– a gentle slope from \(T_1\) to the midpoint (\(L/2\)), and
– a steeper slope from the midpoint to \(T_2\).
Among the given options, only option (B) shows this behavior.
Step 5: Conclusion.
Hence, the correct temperature distribution at steady state is represented by option (B).
Quick Tip: In composite rods at steady state, temperature is continuous but the slope changes at material boundaries. Lower thermal conductivity always corresponds to a steeper temperature gradient.
Match the laws listed in Column I with the corresponding material properties listed in Column II.

View Solution
Step 1: Match Hooke’s law.
Hooke’s law relates stress and strain in elastic materials.
The proportionality constant in this law is Young’s modulus.
Hence, \[ P \rightarrow 2 \]
Step 2: Match Fick’s law.
Fick’s law describes mass diffusion driven by a concentration gradient.
The relevant material property is diffusivity.
Hence, \[ Q \rightarrow 4 \]
Step 3: Match Fourier’s law.
Fourier’s law governs heat conduction due to a temperature gradient.
The proportionality constant is thermal conductivity.
Hence, \[ R \rightarrow 1 \]
Step 4: Match Darcy’s law.
Darcy’s law describes fluid flow through porous media.
The governing material property is permeability.
Hence, \[ S \rightarrow 3 \]
Step 5: Conclusion.
The correct matching is \[ P\!-\!2,\; Q\!-\!4,\; R\!-\!1,\; S\!-\!3 \]
which corresponds to option (C).
Quick Tip: Transport laws usually pair with the material property that multiplies the driving gradient: stress–strain (Young’s modulus), heat–temperature (thermal conductivity), mass–concentration (diffusivity), and flow–pressure (permeability).
Wet high intensity magnetic separators (WHIMS) are used to concentrate
View Solution
Step 1: Understand the working principle of WHIMS.
Wet High Intensity Magnetic Separators operate under high magnetic field gradients and are designed to separate weakly magnetic (paramagnetic) minerals from non-magnetic gangue in a slurry medium.
Step 2: Identify the type of minerals targeted.
Ferromagnetic minerals can be easily separated using low-intensity magnetic separators, whereas paramagnetic minerals require high magnetic fields for separation.
Step 3: Consider particle size suitability.
WHIMS are particularly effective for fine particles, typically less than \(75\,\mu\)m, where dry separation becomes inefficient and wet processing is preferred.
Step 4: Conclusion.
Therefore, WHIMS are used to concentrate fine paramagnetic minerals. This corresponds to option (A).
Quick Tip: Low-intensity magnetic separators are for ferromagnetic minerals, while WHIMS are specifically used for fine paramagnetic mineral separation.
Which one of the following reagents is NOT used in froth flotation process?
View Solution
Step 1: Recall reagents used in froth flotation.
Froth flotation commonly uses reagents such as collectors, frothers, activators, and depressants to selectively separate mineral particles based on surface properties.
Step 2: Analyze the given options.
Collectors enhance hydrophobicity of desired minerals.
Activators increase the effectiveness of collectors on specific minerals.
Depressants prevent certain minerals from floating.
Lixiviants are chemicals used in leaching processes, not flotation.
Step 3: Conclusion.
Since lixiviants are associated with leaching and not froth flotation, the correct answer is option (A).
Quick Tip: Remember: flotation uses surface chemistry reagents, while lixiviants are used in hydrometallurgical leaching processes.
Which one of the following reactions is the Boudouard’s reaction?
Given: (s): solid, (l): liquid, (g): gas
View Solution
Step 1: Recall the definition of the Boudouard reaction.
The Boudouard reaction describes the equilibrium between carbon dioxide and carbon to form carbon monoxide. It plays an important role in high-temperature metallurgical processes such as blast furnace ironmaking.
Step 2: Write the standard form of the Boudouard reaction.
\[ C (s) + CO_2 (g) \rightleftharpoons 2CO (g) \]
Step 3: Compare with the given options.
Option (C) exactly matches the standard Boudouard reaction.
Other options represent combustion or gasification reactions, not the Boudouard equilibrium.
Step 4: Conclusion.
Hence, the correct answer is option (C).
Quick Tip: The Boudouard reaction always involves \textbf{carbon, carbon dioxide, and carbon monoxide} and is temperature dependent.
Which one of the following processes is NOT related to the extraction and refining of titanium from ilmenite ore?
View Solution
Step 1: Understand titanium extraction routes.
Titanium is commonly extracted from ilmenite and rutile ores using chemical reduction and purification processes.
Step 2: Analyze the given processes.
Kroll’s process: Used for commercial extraction of titanium by reducing titanium tetrachloride with magnesium.
Van Arkel process: Used for refining titanium to ultra-high purity.
Sorel process: Used in processing ilmenite to produce synthetic rutile or TiO\(_2\) feedstock.
Pidgeon’s process: Used for extraction of magnesium, not titanium.
Step 3: Conclusion.
Since Pidgeon’s process is related to magnesium extraction, it is not associated with titanium extraction or refining.
Quick Tip: Always associate Kroll and Van Arkel processes with titanium, and Pidgeon’s process with magnesium.
Which one of the following is the correct statement about the industrial production of aluminium from pure dry alumina by Hall–Héroult electrolytic reduction?
View Solution
Step 1: Recall the Hall–Héroult process conditions.
In the Hall–Héroult process, alumina is electrolytically reduced in molten cryolite. The process requires continuous electrolysis on an industrial scale.
Step 2: Analyze voltage requirements.
The electrolysis cell operates at a low voltage (typically around 5–7 V) because the electrolyte is molten and offers relatively low resistance.
Step 3: Analyze current density requirements.
Although the voltage is low, the process requires a very high current density (often several hundred kiloamperes) to achieve sufficient production rates of aluminium.
Step 4: Conclusion.
Therefore, the correct description of the Hall–Héroult process is operation at low voltage with very high current density.
Quick Tip: Hall–Héroult cells work like heavy-duty electrolysis units: low voltage but extremely high current to sustain large-scale aluminium production.
Which one of the following schematics represents the variation of the rate of nucleation of solid from a pure liquid metal as a function of undercooling
\((\Delta T = T_m - T,\) where \(T_m\) and \(T\) are the freezing temperature and the liquid temperature, respectively)?


View Solution
Step 1: Understand nucleation behavior with undercooling.
The rate of nucleation depends on two competing factors as undercooling increases:
– the thermodynamic driving force increases, and
– atomic mobility decreases at lower temperatures.
Step 2: Analyze low undercooling region.
At small \(\Delta T\), the driving force for nucleation is low, so the nucleation rate is small.
Step 3: Analyze intermediate undercooling region.
As \(\Delta T\) increases, the driving force increases rapidly, causing the nucleation rate to rise and reach a maximum.
Step 4: Analyze high undercooling region.
At very large \(\Delta T\), atomic diffusion becomes sluggish, reducing the nucleation rate despite high driving force.
Step 5: Identify the correct schematic.
Thus, the nucleation rate first increases with \(\Delta T\), reaches a maximum, and then decreases — producing a bell-shaped curve.
This behavior is correctly shown in option (A).
Quick Tip: Nucleation rate vs undercooling always shows a peak due to competition between driving force and atomic mobility.
Which one of the following crystal structure changes occurs during the transformation of mild steel from austenite to martensite?
View Solution
Step 1: Identify the crystal structure of austenite.
Austenite (\(\gamma\)-iron) has a face centered cubic (FCC) crystal structure.
Step 2: Identify the crystal structure of martensite.
Martensite forms by a diffusionless shear transformation and has a body centered tetragonal (BCT) structure due to carbon atoms trapped in interstitial sites.
Step 3: Determine the transformation.
Thus, during the transformation from austenite to martensite, the crystal structure changes from FCC to BCT.
Step 4: Conclusion.
Hence, the correct answer is option (B).
Quick Tip: Martensite is always BCT (not BCC) because interstitial carbon distorts the lattice.
The figure shows a dislocation loop (shown by the solid circle), whose Burgers vector is \(\mathbf{b}\) (shown by the horizontal arrow inside the dislocation loop). Identify the nature of the dislocation segment at locations \(p\), \(q\) and \(r\).
The dash-dot lines show the horizontal and vertical diameters of the loop, and the arrow along the dislocation loop indicates the line vector.

View Solution
Step 1: Recall the definitions.
A dislocation is:
– pure edge if the Burgers vector is perpendicular to the line vector,
– pure screw if the Burgers vector is parallel to the line vector,
– mixed if it has both components.
Step 2: Analyze point \(p\).
At \(p\), the line vector is vertical while the Burgers vector \(\mathbf{b}\) is horizontal.
Since \(\mathbf{b} \perp\) line vector, the dislocation is pure edge.
Step 3: Analyze point \(r\).
At \(r\), the line vector is horizontal and parallel to \(\mathbf{b}\).
Since \(\mathbf{b} \parallel\) line vector, the dislocation is pure screw.
Step 4: Analyze point \(q\).
At \(q\), the line vector is inclined at an angle to \(\mathbf{b}\).
Hence, the dislocation has both edge and screw components and is mixed.
Step 5: Conclusion.
Thus, the correct identification is: \[ p:\ pure edge,\quad q:\ mixed,\quad r:\ pure screw \]
which corresponds to option (A).
Quick Tip: Always compare the direction of the Burgers vector with the local line vector to classify dislocations.
Match the concepts listed in Column I with the phenomena listed in Column II.

View Solution
Step 1: Match Peierls–Nabarro stress (P).
Peierls–Nabarro stress is the critical stress required for a dislocation to move through the crystal lattice.
Hence, it is directly associated with dislocation glide.
\[ P \rightarrow 3 \]
Step 2: Match Cottrell’s atmosphere (Q).
Cottrell’s atmosphere refers to the pinning of dislocations by solute atoms, which leads to the yield point phenomenon in steels.
\[ Q \rightarrow 1 \]
Step 3: Match Paris law (R).
Paris law describes the rate of fatigue crack growth as a function of stress intensity factor range.
Thus, it is related to fatigue.
\[ R \rightarrow 2 \]
Step 4: Match Considère’s criterion (S).
Considère’s criterion predicts the condition for the beginning of localized deformation in a tensile test.
This corresponds to the onset of necking.
\[ S \rightarrow 4 \]
Step 5: Conclusion.
The correct matching is \[ P\!-\!3,\; Q\!-\!1,\; R\!-\!2,\; S\!-\!4 \]
which corresponds to option (C).
Quick Tip: Link each concept to its core physical effect: dislocation motion (Peierls stress), solute pinning (Cottrell), crack growth (Paris law), and plastic instability (Considère).
Match the defects listed in Column I with the associated manufacturing processes listed in Column II.

View Solution
Step 1: Match Misrun (P).
Misrun is a casting defect that occurs when molten metal solidifies before completely filling the mould cavity.
Hence, \[ P \rightarrow 3 \]
Step 2: Match Earing (Q).
Earing is a defect observed in deep drawing due to planar anisotropy of the sheet metal, leading to uneven cup edges.
Hence, \[ Q \rightarrow 4 \]
Step 3: Match Alligatoring (R).
Alligatoring is a rolling defect in which the material splits along the horizontal plane during rolling.
Hence, \[ R \rightarrow 2 \]
Step 4: Match Chevron cracking (S).
Chevron cracking (also called centerline cracking) is commonly observed in extrusion due to non-uniform deformation and tensile stresses at the center.
Hence, \[ S \rightarrow 1 \]
Step 5: Conclusion.
The correct matching is \[ P\!-\!3,\; Q\!-\!4,\; R\!-\!2,\; S\!-\!1 \]
which corresponds to option (B).
Quick Tip: Remember typical defect–process pairs: Misrun–Casting, Earing–Deep drawing, Alligatoring–Rolling, Chevron cracking–Extrusion.
Which one of the following processes is NOT involved in the sintering of a green compact of ceramic powders? Assume that sintering is performed without application of external pressure.
View Solution
Step 1: Understand pressureless sintering.
Sintering of ceramic powders without external pressure occurs by mass transport mechanisms that reduce surface energy and densify the compact.
Step 2: Analyze pore shrinkage.
Pore shrinkage is a fundamental outcome of sintering as material diffuses to eliminate pores.
Thus, it is involved in sintering.
Step 3: Analyze lattice and grain boundary diffusion.
Both lattice diffusion and grain boundary diffusion are key atomic transport mechanisms responsible for neck growth and densification during sintering.
Step 4: Analyze dynamic recrystallization.
Dynamic recrystallization occurs during plastic deformation at elevated temperatures under applied stress.
Since pressureless sintering involves no external stress, dynamic recrystallization does not occur.
Step 5: Conclusion.
Therefore, the process not involved in sintering is dynamic recrystallization, corresponding to option (B).
Quick Tip: Pressureless sintering relies on diffusion-driven mass transport, not deformation-driven processes like dynamic recrystallization.
Which of the following statements is/are correct for a square matrix \(A\) with real number entries?
\(A^T\) denotes the transpose of \(A\) and \(A^{-1}\) denotes the inverse of \(A\).
View Solution
Step 1: Analyze statement (A).
A matrix is symmetric if \[ A^T = A \]
The condition \(A^T = -A\) defines a skew-symmetric matrix, not a symmetric one.
Hence, statement (A) is incorrect.
Step 2: Analyze statement (B).
By definition, a matrix is skew-symmetric if \[ A^T = -A \]
Therefore, statement (B) is correct.
Step 3: Analyze statement (C).
A matrix \(A\) is orthogonal if \[ A^T A = I \]
This implies \[ A^T = A^{-1} \]
Hence, statement (C) is correct.
Step 4: Analyze statement (D).
For an orthogonal matrix, \[ \det(A) = \pm 1 \]
Thus, the determinant is never zero.
Hence, statement (D) is incorrect.
Step 5: Conclusion.
The correct statements are (B) and (C).
Quick Tip: Orthogonal matrices preserve length and angles; their inverse is equal to their transpose and their determinant is always \(\pm 1\).
Which of the following is/are criterion/criteria for equilibrium of an isolated system held at constant temperature and constant pressure?
View Solution
Step 1: Recall the equilibrium criterion for an isolated system.
For an isolated system, equilibrium corresponds to a state of maximum entropy.
Hence, entropy maximization is a valid criterion.
Step 2: Analyze entropy minimization.
Entropy minimization contradicts the second law of thermodynamics for isolated systems.
Thus, option (B) is incorrect.
Step 3: Recall Gibbs free energy criterion.
For systems at constant temperature and constant pressure, equilibrium is achieved when the Gibbs free energy is minimized.
Step 4: Analyze Gibbs free energy maximization.
Maximization of Gibbs free energy does not correspond to equilibrium.
Thus, option (C) is incorrect.
Step 5: Conclusion.
The correct criteria for equilibrium are entropy maximization and minimization of Gibbs free energy.
Quick Tip: Remember the thermodynamic rules: isolated system → entropy maximum; constant \(T\) and \(P\) → Gibbs free energy minimum.
Which of the following \((h\,k\,l)\) reflections is/are allowed in an X-ray diffraction pattern of a crystal with face centered cubic lattice?
View Solution
Step 1: Recall the selection rule for FCC lattices.
For a face centered cubic (FCC) lattice, X-ray diffraction reflections are allowed only when the Miller indices \(h\), \(k\), and \(l\) are either:
– all even, or
– all odd.
If the indices are mixed (some even and some odd), the reflection is forbidden due to destructive interference.
Step 2: Analyze each option.
(A) \((0\ 0\ 1)\): Two indices are even and one is odd → mixed parity → not allowed.
(B) \((0\ 1\ 1)\): One index is even and two are odd → mixed parity → not allowed.
(C) \((1\ 1\ 1)\): All indices are odd → allowed.
(D) \((0\ 0\ 2)\): All indices are even → allowed.
Step 3: Conclusion.
The reflections allowed for an FCC lattice among the given options are (C) and (D).
Quick Tip: For FCC crystals: \textbf{all-even or all-odd} Miller indices give allowed reflections; any mixed combination is forbidden.
The divergence of the vector field \[ \vec{V} = x^2 y\,\hat{i} + y^3 z\,\hat{j} + z^4\,\hat{k} \]
at the point \((1,1,1)\) is ........ (Round off to the nearest integer)
View Solution
Step 1: Recall the definition of divergence.
The divergence of a vector field \[ \vec{V} = V_x \hat{i} + V_y \hat{j} + V_z \hat{k} \]
is given by \[ \nabla \cdot \vec{V} = \frac{\partial V_x}{\partial x} + \frac{\partial V_y}{\partial y} + \frac{\partial V_z}{\partial z} \]
Step 2: Identify the components of the vector field.
\[ V_x = x^2 y,\quad V_y = y^3 z,\quad V_z = z^4 \]
Step 3: Compute the partial derivatives.
\[ \frac{\partial V_x}{\partial x} = 2xy \] \[ \frac{\partial V_y}{\partial y} = 3y^2 z \] \[ \frac{\partial V_z}{\partial z} = 4z^3 \]
Step 4: Evaluate at the point \((1,1,1)\).
\[ \nabla \cdot \vec{V} = 2(1)(1) + 3(1)^2(1) + 4(1)^3 \] \[ = 2 + 3 + 4 = 9 \]
Step 5: Conclusion.
The divergence of the vector field at \((1,1,1)\) is 9.
Quick Tip: Always compute divergence component-wise and substitute the point only at the final step.
The pair-interaction energy between two atoms is given by the expression \[ U = -\frac{1.6}{r^6} + \frac{51.2}{r^{12}} \]
where \(U\) is the interaction energy in eV and \(r\) is the interatomic distance in \AA.
The equilibrium bond-length between the atoms is ........ \AA. (Round off to the nearest integer)
View Solution
Step 1: Condition for equilibrium bond length.
At equilibrium, the interaction energy is minimum, so \[ \frac{dU}{dr} = 0 \]
Step 2: Differentiate the given energy expression.
\[ U = -1.6 r^{-6} + 51.2 r^{-12} \] \[ \frac{dU}{dr} = 9.6 r^{-7} - 614.4 r^{-13} \]
Step 3: Set the derivative equal to zero.
\[ 9.6 r^{-7} = 614.4 r^{-13} \]
Step 4: Simplify the equation.
\[ 9.6 r^{6} = 614.4 \] \[ r^{6} = \frac{614.4}{9.6} = 64 \]
Step 5: Solve for \(r\).
\[ r = (64)^{1/6} = 2 \]
Step 6: Conclusion.
The equilibrium bond length between the atoms is 2 \AA.
Quick Tip: Equilibrium separation in interatomic potentials is obtained by minimizing the potential energy, i.e., setting \(\frac{dU}{dr}=0\).
For a solid embryo in contact with a perfectly flat mould wall as shown in the schematic, the wetting angle \(\theta\) is ....... degrees. (Round off to one decimal place.)

Given:
Surface tension between liquid and mould wall \(= 0.35\ J m^{-2}\)
Surface tension between solid and mould wall \(= 0.02\ J m^{-2}\)
Surface tension between liquid and solid \(= 0.40\ J m^{-2}\)
View Solution
Step 1: Use Young’s equation for wetting angle.
For a solid embryo on a mould wall in contact with liquid, Young’s equation is \[ \gamma_{SM} + \gamma_{LS}\cos\theta = \gamma_{LM} \]
Step 2: Rearrange to find \(\cos\theta\).
\[ \cos\theta = \frac{\gamma_{LM} - \gamma_{SM}}{\gamma_{LS}} \]
Step 3: Substitute the given values.
\[ \cos\theta = \frac{0.35 - 0.02}{0.40} = \frac{0.33}{0.40} = 0.825 \]
Step 4: Calculate the angle.
\[ \theta = \cos^{-1}(0.825) \approx 33.0^\circ \]
Step 5: Conclusion.
The wetting angle of the solid embryo is \(33.0^\circ\).
Quick Tip: Wetting problems always use Young’s equation, balancing surface tensions at the triple junction.
A single crystal is oriented such that the normal to the slip plane makes an angle of \(60^\circ\) with the tensile axis. If the slip direction makes an angle of \(45^\circ\) with respect to the tensile axis and the critical resolved shear stress for slip is \(2\) MPa, then the tensile stress at which plastic deformation commences is ........ MPa. (Round off to one decimal place.)
View Solution
Step 1: Use Schmid’s law.
The resolved shear stress \(\tau\) is given by \[ \tau = \sigma \cos\phi \cos\lambda \]
where \(\phi\) is the angle between slip plane normal and tensile axis, and \(\lambda\) is the angle between slip direction and tensile axis.
Step 2: Substitute the given angles.
\[ \cos\phi = \cos 60^\circ = 0.5 \] \[ \cos\lambda = \cos 45^\circ \approx 0.707 \]
Step 3: Apply the critical resolved shear stress condition.
At yielding, \[ \tau_c = \sigma (0.5)(0.707) \] \[ 2 = 0.3535\,\sigma \]
Step 4: Solve for tensile stress \(\sigma\).
\[ \sigma = \frac{2}{0.3535} \approx 5.7\ MPa \]
Step 5: Conclusion.
Plastic deformation begins at a tensile stress of \(5.7\) MPa.
Quick Tip: Maximum resolved shear stress depends on both slip plane orientation and slip direction via Schmid’s factor.
The extrusion force required to extrude an aluminium rod of cross-sectional area \(150\ mm^2\) to cross-sectional area \(50\ mm^2\) is ......... N. (Round off to the nearest integer.)
Assume that the extrusion constant, which accounts for the flow stress, strain hardening, friction and inhomogeneous deformation, is equal to \(2\) MPa.
View Solution
Step 1: Use the extrusion pressure relation.
The extrusion pressure is given by \[ \sigma = K \ln\left(\frac{A_0}{A_f}\right) \]
where \(K\) is the extrusion constant.
Step 2: Substitute the given areas.
\[ \ln\left(\frac{150}{50}\right) = \ln(3) \approx 1.099 \]
Step 3: Calculate extrusion stress.
\[ \sigma = 2 \times 1.099 = 2.198\ MPa \]
Step 4: Calculate the extrusion force.
Initial area \(A_0 = 150\ mm^2 = 150 \times 10^{-6}\ m^2\)
\[ F = \sigma A_0 = 2.198 \times 10^6 \times 150 \times 10^{-6} \] \[ F \approx 330\ N \]
Step 5: Conclusion.
The extrusion force required is \(330\) N.
Quick Tip: Extrusion force depends logarithmically on the area reduction ratio and linearly on the initial cross-sectional area.
If \[ \begin{bmatrix} 1 & 2
8 & 1 \end{bmatrix} \begin{bmatrix} x
y \end{bmatrix} = \lambda \begin{bmatrix} x
y \end{bmatrix}, \]
where \(x, y\) are not identically zero, then the values of \(\lambda\) are
View Solution
Step 1: Recognize the eigenvalue problem.
The given equation represents an eigenvalue problem \[ A\mathbf{v} = \lambda \mathbf{v} \]
where \[ A = \begin{bmatrix} 1 & 2
8 & 1 \end{bmatrix}. \]
Step 2: Form the characteristic equation.
\[ \det(A - \lambda I) = 0 \] \[ \det \begin{bmatrix} 1-\lambda & 2
8 & 1-\lambda \end{bmatrix} = (1-\lambda)^2 - 16 \]
Step 3: Solve for \(\lambda\).
\[ (1-\lambda)^2 - 16 = 0 \] \[ (1-\lambda)^2 = 16 \] \[ 1-\lambda = \pm 4 \]
Step 4: Obtain eigenvalues.
\[ \lambda = 1 - 4 = -3,\quad \lambda = 1 + 4 = 5 \]
Step 5: Conclusion.
The values of \(\lambda\) are \(5\) and \(-3\).
Quick Tip: Eigenvalues are obtained by solving \(\det(A-\lambda I)=0\). Always simplify the determinant carefully.
If \(\dfrac{dy}{dx} = 4xy\), \(y(0)=1\), then
View Solution
Step 1: Separate the variables.
\[ \frac{dy}{dx} = 4xy \] \[ \frac{1}{y}dy = 4x\,dx \]
Step 2: Integrate both sides.
\[ \int \frac{1}{y}dy = \int 4x\,dx \] \[ \ln y = 2x^2 + C \]
Step 3: Apply the initial condition.
Given \(y(0)=1\): \[ \ln 1 = 2(0)^2 + C \Rightarrow C = 0 \]
Step 4: Write the final solution.
\[ \ln y = 2x^2 \Rightarrow y = e^{2x^2} \]
Step 5: Conclusion.
The required solution is \(y = e^{2x^2}\).
Quick Tip: For separable differential equations, always apply the initial condition after integration to find the constant.
As shown in the figure, the right end of a slender, long solid cylindrical metal rod of thermal conductivity \(k\), length \(L\) and diameter \(d\) \((d \ll L)\) is in contact with an infinite liquid heat sink. At steady-state, the temperatures of the right end of the rod and the heat sink are \(T_2\) and \(T_0\), respectively. If the convective heat transfer coefficient between the liquid heat sink and the right end of the rod is \(h\), what would be the temperature of the left end of the rod, \(T_1\), at steady-state? Assume that there is no other heat loss.

View Solution
Step 1: Write the steady-state heat conduction through the rod.
At steady state, the heat flow by conduction along the rod is \[ q = kA\,\frac{T_1 - T_2}{L} \]
where \(A\) is the cross-sectional area of the rod.
Step 2: Write the heat loss by convection at the right end.
The heat lost from the right end of the rod to the liquid heat sink by convection is \[ q = hA\,(T_2 - T_0) \]
Step 3: Apply energy balance.
Since there is no other heat loss, the conductive heat flow equals the convective heat loss: \[ kA\,\frac{T_1 - T_2}{L} = hA\,(T_2 - T_0) \]
Step 4: Simplify the equation.
Canceling \(A\) from both sides, \[ \frac{k}{L}(T_1 - T_2) = h(T_2 - T_0) \] \[ T_1 - T_2 = (T_2 - T_0)\frac{hL}{k} \]
Step 5: Obtain \(T_1\).
\[ T_1 = T_2 + (T_2 - T_0)\frac{hL}{k} \]
Step 6: Conclusion.
The temperature of the left end of the rod at steady state is given by option (A).
Quick Tip: For steady-state problems, always equate heat conducted through the solid to heat lost by convection at the boundary.
Match the dimensionless numbers listed in Column I with their applications to transport phenomena listed in Column II.

View Solution
Step 1: Reynolds number (P).
The Reynolds number compares inertial to viscous forces and is used to determine the transition from laminar to turbulent flow.
\[ P \rightarrow 4 \]
Step 2: Schmidt number (Q).
The Schmidt number relates momentum diffusivity to mass diffusivity and is used in momentum and mass transfer analyses.
\[ Q \rightarrow 1 \]
Step 3: Prandtl number (R).
The Prandtl number compares momentum diffusivity with thermal diffusivity and is used in momentum and heat transfer problems.
\[ R \rightarrow 2 \]
Step 4: Biot number (S).
The Biot number compares internal conductive resistance to external convective resistance and is used to analyze convective and conductive heat transfer.
\[ S \rightarrow 3 \]
Step 5: Conclusion.
The correct matching is \[ P\!-\!4,\; Q\!-\!1,\; R\!-\!2,\; S\!-\!3 \]
which corresponds to option (C).
Quick Tip: Remember the associations: Reynolds–flow regime, Schmidt–mass transfer, Prandtl–heat transfer, Biot–internal vs external heat resistance.
In a cubic lattice, what is the ratio of interplanar spacings of the (100), (110) and (111) planes? (Round off to two decimal places)
View Solution
Step 1: Write the formula for interplanar spacing in a cubic lattice.
For a cubic crystal, the interplanar spacing is given by \[ d_{hkl} = \frac{a}{\sqrt{h^2 + k^2 + l^2}} \]
Step 2: Calculate spacings for the given planes.
\[ d_{100} = \frac{a}{\sqrt{1}} = a \] \[ d_{110} = \frac{a}{\sqrt{2}} \approx 0.71a \] \[ d_{111} = \frac{a}{\sqrt{3}} \approx 0.58a \]
Step 3: Form the ratio.
\[ d_{100} : d_{110} : d_{111} = 1 : 0.71 : 0.58 \]
Step 4: Conclusion.
The correct ratio of interplanar spacings is given by option (B).
Quick Tip: For cubic systems, interplanar spacing depends only on the sum \(h^2+k^2+l^2\).
The constitutional undercooling condition for a hypothetical binary alloy of A with solute B during solidification is shown in the figure along with its binary phase diagram. Based on these two schematics, one can conclude that the solute concentration in region X will be ......... the average composition of the initial liquid phase.

View Solution
Step 1: Recall the concept of constitutional undercooling.
During solidification of a binary alloy with partition coefficient \(k<1\), solute is rejected into the liquid at the solid–liquid interface. This creates a solute-enriched liquid near the interface and a solute gradient ahead of it.
Step 2: Interpret the phase diagram.
From the binary phase diagram, the solid forming at the interface has a lower solute concentration than the liquid. The liquidus slope indicates that solute enrichment lowers the local liquidus temperature.
Step 3: Analyze region X in the temperature–distance plot.
Region X lies ahead of the solid–liquid interface where the actual temperature of the liquid falls below the local liquidus temperature due to the solute gradient. In this region, the solute concentration decreases with distance away from the interface.
Step 4: Compare with the average composition.
Because solute is highest at the interface and decreases into the bulk liquid, the solute concentration in region X is less than the average composition of the initial liquid phase.
Step 5: Conclusion.
Hence, the solute concentration in region X is less than the average composition of the initial liquid phase, corresponding to option (A).
Quick Tip: In constitutional undercooling, solute piles up at the interface and decreases away from it; regions ahead of the interface therefore have lower solute concentration than the average melt.
The microstructures of a quenched steel tempered at three temperatures \(T_1 < T_2 < T_3\) for a fixed time are schematically illustrated. The solid circles represent cementite particles in ferrite matrix; \(\bar{r}_1\), \(\bar{r}_2\) and \(\bar{r}_3\) are average radii of cementite particles, and \(V_1\), \(V_2\) and \(V_3\) are volume fractions of cementite at temperatures \(T_1\), \(T_2\) and \(T_3\), respectively.

It is given that \(\bar{r}_1 < \bar{r}_2 < \bar{r}_3\) and \(V_1 < V_2 = V_3\).
If the cementite in steel is more noble than ferrite, then which one of the three microstructures will have the highest corrosion rate when exposed to an aqueous solution of \(3.5\) wt.% NaCl?
View Solution
Step 1: Identify the electrochemical nature of phases.
Cementite is stated to be more noble than ferrite.
Hence, in an aqueous chloride environment, ferrite acts as the anode and cementite acts as the cathode, leading to galvanic corrosion of ferrite.
Step 2: Understand the role of microstructural parameters.
The corrosion rate of the anodic phase (ferrite) increases with:
– larger cathode-to-anode area ratio, and
– finer and more uniformly distributed cathodic particles, which increase the number of micro-galvanic cells.
Step 3: Compare the three microstructures.
At \(T_1\): Cementite particles are very fine but the volume fraction \(V_1\) is the lowest, resulting in fewer cathodic sites.
At \(T_2\): Cementite particles are moderately fine and the volume fraction \(V_2\) is high, producing the maximum cathode area and interfacial density.
At \(T_3\): Cementite particles are coarser (\(\bar{r}_3\) largest) with the same volume fraction as \(T_2\), which reduces the cathode–anode interfacial area and number of galvanic couples.
Step 4: Determine the highest corrosion rate.
The microstructure at \(T_2\) combines a high volume fraction of cementite with relatively fine particle size, leading to the most severe galvanic corrosion of ferrite.
Step 5: Conclusion.
Therefore, the highest corrosion rate occurs in the microstructure tempered at \(T_2\), corresponding to option (B).
Quick Tip: In galvanic microstructures, maximum corrosion occurs when the cathodic phase has a large area fraction and is finely distributed, increasing cathode–anode coupling.
An isotropic metallic cuboid block shown in the figure has a coefficient of linear thermal expansion \(\alpha\), Young’s modulus \(E\) and Poisson’s ratio \(\nu\). The dimensions of the cuboid are \(a\), \(b\) and \(c\) in the \(X\), \(Y\) and \(Z\) directions, respectively. It is rigidly constrained against expansion in the \(X\) direction. However, it is free to expand in the \(Y\) and \(Z\) directions. It is initially stress-free. Subsequently, it is heated so that its temperature increases by \(\Delta T\). What would be the CHANGE in the dimension of the cuboid in the \(Y\) direction?
Assume linear elasticity, and that thermal as well as mechanical strains are infinitesimally small.

View Solution
Step 1: Identify constraints and stresses.
The block is fully constrained in the \(X\) direction, so the total strain in \(X\) direction is zero: \[ \varepsilon_x = 0 \]
The block is free to expand in \(Y\) and \(Z\) directions, so \[ \sigma_y = \sigma_z = 0 \]
Step 2: Write strain–stress relations with thermal strain.
For isotropic linear elasticity, \[ \varepsilon_x = \frac{1}{E}\left[\sigma_x - \nu(\sigma_y + \sigma_z)\right] + \alpha\Delta T \]
Since \(\sigma_y = \sigma_z = 0\) and \(\varepsilon_x=0\), \[ 0 = \frac{\sigma_x}{E} + \alpha\Delta T \] \[ \sigma_x = -E\alpha\Delta T \]
Step 3: Compute strain in \(Y\) direction.
\[ \varepsilon_y = \frac{1}{E}\left[\sigma_y - \nu(\sigma_x + \sigma_z)\right] + \alpha\Delta T \] \[ \varepsilon_y = \frac{1}{E}\left[-\nu(-E\alpha\Delta T)\right] + \alpha\Delta T \] \[ \varepsilon_y = \nu\alpha\Delta T + \alpha\Delta T \] \[ \varepsilon_y = (1+\nu)\alpha\Delta T \]
Step 4: Find change in dimension along \(Y\).
\[ \Delta b = b\,\varepsilon_y = b(1+\nu)\alpha\Delta T \]
Step 5: Conclusion.
The change in the dimension of the cuboid in the \(Y\) direction is \(b(1+\nu)\alpha\Delta T\).
Quick Tip: When thermal expansion is constrained in one direction, compressive thermal stress develops and enhances expansion in the free directions due to Poisson’s effect.
Match the entries in Column I with the stacking sequences of the close-packed planes listed in Column II.

View Solution
Step 1: Identify standard stacking sequences.
FCC structure has a repeating stacking sequence: \[ ABCABCABC \]
Thus, \[ P \rightarrow 3 \]
Step 2: Intrinsic stacking fault in FCC.
An intrinsic stacking fault in FCC corresponds to the removal of one close-packed layer, leading to: \[ ABCABABC \]
Thus, \[ Q \rightarrow 1 \]
Step 3: Annealing twin boundary in FCC.
Across an annealing twin boundary, the stacking reverses, giving a mirror sequence such as: \[ ABCABCACBABCBA \]
Thus, \[ R \rightarrow 4 \]
Step 4: Hexagonal close-packed (HCP) structure.
HCP has a repeating stacking sequence: \[ ABABAB \]
Thus, \[ S \rightarrow 2 \]
Step 5: Conclusion.
The correct matching is \[ P\!-\!3,\; Q\!-\!1,\; R\!-\!4,\; S\!-\!2 \]
which corresponds to option (C).
Quick Tip: FCC → ABCABC, HCP → ABAB; stacking faults and twins introduce local disruptions or reversals in these sequences.
Which one of the following graphs represents Griffith’s criterion for the growth of a crack in a brittle isotropic infinitely large plate with a center crack?
In the graph, \(\Delta SE\) is the magnitude of the total strain energy released (shown by solid curve) and \(\Gamma_s\) is the total surface energy (shown by dashed line) and \(a_c\) is the critical crack length (shown by downward arrow) at which the crack starts growing. The tangent to the \(\Delta SE\) curve parallel to the \(\Gamma_s\) line is shown by the dotted line.


View Solution
Step 1: Recall Griffith’s energy balance criterion.
According to Griffith’s criterion, a crack will start to grow when the rate of release of elastic strain energy equals the rate of increase of surface energy: \[ \frac{d(\Delta SE)}{da} = \frac{d\Gamma_s}{da} \]
This condition corresponds to a common tangent to the strain energy and surface energy curves.
Step 2: Understand the expected shapes of the curves.
– The strain energy release \(\Delta SE\) increases nonlinearly (approximately quadratically) with crack length.
– The surface energy \(\Gamma_s\) increases linearly with crack length, since new surfaces are created in proportion to crack extension.
Step 3: Identify the critical crack length \(a_c\).
At \(a = a_c\), the slope of the \(\Delta SE\) curve equals the slope of the \(\Gamma_s\) line, i.e., the tangent to \(\Delta SE\) is parallel to \(\Gamma_s\). Beyond this point, further crack growth is energetically favorable.
Step 4: Compare the given graphs.
Only option (D) correctly shows:
– a convex upward \(\Delta SE\) curve,
– a straight line for \(\Gamma_s\), and
– a tangent to \(\Delta SE\) parallel to \(\Gamma_s\) at \(a = a_c\).
Step 5: Conclusion.
Therefore, the graph representing Griffith’s criterion is option (D).
Quick Tip: In Griffith’s theory, crack growth begins when the slope of the strain energy release curve equals the slope of the surface energy line.
For rolling of slabs, determine the correctness or otherwise of the following Assertion [a] and Reason [r].
Assertion [a]: Grooves are made on the surface of the rolls parallel to their roll axes to achieve large thickness reduction in a short time.
Reason [r]: Given \(\mu\) is the coefficient of friction between the rolls and the slab, and \(\alpha\) is the angle of bite between the entrance plane and the centerline of the rolls, unaided entry of slab in the rolls can take place only if \(\mu < \tan\alpha\).
View Solution
Step 1: Examine Assertion [a].
Grooves on rolls (such as in grooved rolling) are used to increase friction and control material flow, enabling larger thickness reduction in fewer passes.
Hence, the assertion is true.
Step 2: Examine Reason [r].
The condition for unaided entry (biting condition) in rolling is \[ \mu \ge \tan\alpha \]
and not \(\mu < \tan\alpha\).
Step 3: Conclusion.
Assertion [a] is true, but Reason [r] is false.
Hence, the correct answer is (D).
Quick Tip: For rolling to occur without external force, friction must be sufficiently high: \(\mu \ge \tan\alpha\).
Which of the following statements is/are correct?
View Solution
Step 1: Analyze option (A).
The quantities listed belong to proximate analysis, not ultimate analysis.
Ultimate analysis determines C, H, O, N, and S.
Hence, option (A) is incorrect.
Step 2: Analyze option (B).
Wüstite (FeO) is reduced to iron mainly in the lower part of the blast furnace where temperatures are highest.
Thus, option (B) is correct.
Step 3: Analyze option (C).
Roasting involves oxidation of sulfide ores, not reduction.
Hence, option (C) is incorrect.
Step 4: Analyze option (D).
During smelting of Cu–Fe matte, Fe and S are oxidized, producing slag and SO\(_2\), leaving behind Cu\(_2\)S (white metal).
Thus, option (D) is correct.
Step 5: Conclusion.
The correct statements are (B) and (D).
Quick Tip: Remember: Proximate ≠ Ultimate analysis, roasting is oxidation, and white metal is Cu\(_2\)S-rich matte.
A creep test of a pure polycrystalline metal is performed in tension and the creep strain rate is observed to decrease during the primary stage. The creep mechanism is later determined to be dislocation-climb-controlled. The observed decrease in creep strain rate is/are due to
View Solution
Step 1: Identify the creep stage and mechanism.
The decrease in creep strain rate during the primary creep stage is characteristic of work hardening dominating over recovery.
The given mechanism is dislocation-climb-controlled creep.
Step 2: Relate dislocation density to creep rate.
In dislocation creep, the creep strain rate depends on the mobility of dislocations.
As deformation proceeds during primary creep, the dislocation density increases due to multiplication of dislocations.
Step 3: Explain the decrease in creep rate.
An increase in dislocation density leads to stronger dislocation–dislocation interactions and increased internal resistance to motion.
This causes work hardening, which reduces the effective mobility of dislocations and hence decreases the creep strain rate.
Step 4: Examine other options.
Grain growth typically reduces creep rate in diffusion-controlled creep, not dislocation-climb-controlled creep.
A decrease in dislocation density would reduce hardening and increase creep rate.
Change in cross-sectional area is not the controlling factor during primary creep.
Step 5: Conclusion.
Therefore, the observed decrease in creep strain rate during primary creep is due to an increase in dislocation density, corresponding to option (A).
Quick Tip: Primary creep is dominated by work hardening due to increasing dislocation density, while steady-state creep reflects a balance between hardening and recovery.
Which of the following statements is/are correct for joining processes?
View Solution
Step 1: Analyze option (A).
In both soldering and brazing, the base metals are not melted.
Only the filler material melts, and its melting temperature is lower than that of the metals being joined.
Hence, option (A) is correct.
Step 2: Analyze option (B).
In tungsten inert gas (TIG) welding, tungsten acts as a non-consumable electrode, not as a filler material.
If required, a separate filler rod is used.
Thus, option (B) is incorrect.
Step 3: Analyze option (C).
Friction welding produces joints by heat generated from friction and plastic deformation without melting the base materials.
Therefore, it is classified as a solid-state joining process.
Hence, option (C) is correct.
Step 4: Analyze option (D).
The given reaction represents oxy-acetylene combustion, not thermit welding.
Thermit welding involves the aluminothermic reaction: \[ Fe_2O_3 + 2Al \rightarrow 2Fe + Al_2O_3 + Heat \]
Hence, option (D) is incorrect.
Step 5: Conclusion.
The correct statements are (A) and (C).
Quick Tip: Solid-state welding processes (like friction welding) avoid melting, while thermit welding relies on aluminothermic reactions—not gas combustion.
Which of the following statements is/are correct for non-destructive testing?
View Solution
Step 1: Analyze option (A).
Liquid dye (or dye penetrant) testing is specifically designed to reveal surface-breaking defects such as cracks and porosity by capillary action of the dye.
Hence, option (A) is correct.
Step 2: Analyze option (B).
Radiographic testing (X-ray or gamma-ray) is widely used to detect internal defects such as cracks, voids, and inclusions.
Therefore, the statement that internal cracks cannot be detected is false.
Step 3: Analyze option (C).
Eddy-current testing requires the material to be electrically conductive.
Pure alumina is a ceramic and an electrical insulator at room temperature, so eddy-current methods are not applicable.
Thus, option (C) is incorrect.
Step 4: Analyze option (D).
Materials with high damping capacity, such as cast iron, strongly attenuate ultrasonic waves due to scattering and energy loss.
This makes ultrasonic inspection ineffective for detecting sub-surface defects in such materials.
Hence, option (D) is correct.
Step 5: Conclusion.
The correct statements for non-destructive testing are (A) and (D).
Quick Tip: Choose NDT methods based on material properties: dye penetrant for surface cracks, radiography for internal defects, eddy currents for conductors, and ultrasonics for low-attenuation materials.
The following data is obtained from an experiment:

If the data is fit using the straight line \(y = mx + c\) (where \(m\) and \(c\) are constants) using the least-squares method, then the value of \(m\) is ........... (Round off to one decimal place.)
View Solution
Step 1: Write the formula for slope in least-squares fitting.
For a straight line \(y = mx + c\), the slope \(m\) is given by \[ m = \frac{n\sum xy - (\sum x)(\sum y)}{n\sum x^2 - (\sum x)^2} \]
where \(n\) is the number of data points.
Step 2: Compute required sums.
\[ \sum x = 1 + 2 + 3 = 6 \] \[ \sum y = 8 + 15 + 19 = 42 \] \[ \sum x^2 = 1^2 + 2^2 + 3^2 = 14 \] \[ \sum xy = (1)(8) + (2)(15) + (3)(19) = 95 \]
Step 3: Substitute into the formula.
\[ m = \frac{3(95) - 6(42)}{3(14) - 6^2} \] \[ m = \frac{285 - 252}{42 - 36} = \frac{33}{6} = 5.5 \]
Step 4: Conclusion.
The least-squares slope is \(m = 5.5\).
Quick Tip: Always use the standard least-squares formulas for slope and intercept to avoid algebraic errors.
The integral \[ \int_0^1 x e^{-x}\,dx \]
evaluates to .......... (Round off to two decimal places.)
View Solution
Step 1: Use integration by parts.
Let \[ u = x \Rightarrow du = dx \] \[ dv = e^{-x}dx \Rightarrow v = -e^{-x} \]
Step 2: Apply integration by parts.
\[ \int x e^{-x}dx = -x e^{-x} + \int e^{-x}dx \] \[ = -x e^{-x} - e^{-x} + C \]
Step 3: Evaluate the definite integral.
\[ \int_0^1 x e^{-x}dx = \left[-x e^{-x} - e^{-x}\right]_0^1 \] \[ = \left[-1\cdot e^{-1} - e^{-1}\right] - \left[0 - 1\right] \] \[ = -\frac{2}{e} + 1 \]
Step 4: Numerical evaluation.
\[ 1 - \frac{2}{e} \approx 1 - 0.7358 = 0.2642 \]
Step 5: Conclusion.
Rounded to two decimal places, \[ \int_0^1 x e^{-x}dx = \textbf{0.26} \]
Quick Tip: For integrals of the form \(x e^{-x}\), integration by parts is the most direct approach.
If for element A, the formation enthalpy and formation entropy per vacancy created are \(0.5\) eV and \(3k_B\), respectively, then the equilibrium vacancy concentration (in mole fraction) at \(500\) K is ......... \(\times 10^{-4}\). (Round off to two decimal places.)
Given: Boltzmann constant, \(k_B = 8.62 \times 10^{-5}\) eV atom\(^{-1}\) K\(^{-1}\).
View Solution
Step 1: Write the expression for equilibrium vacancy concentration.
The equilibrium vacancy concentration is given by \[ C_v = \exp\!\left(\frac{\Delta S_f}{k_B}\right) \exp\!\left(-\frac{\Delta H_f}{k_B T}\right) \]
Step 2: Substitute the given entropy term.
\[ \frac{\Delta S_f}{k_B} = \frac{3k_B}{k_B} = 3 \] \[ \exp\!\left(\frac{\Delta S_f}{k_B}\right) = e^3 \approx 20.085 \]
Step 3: Substitute the enthalpy term.
\[ \frac{\Delta H_f}{k_B T} = \frac{0.5}{(8.62\times10^{-5})(500)} = \frac{0.5}{0.0431} \approx 11.60 \] \[ \exp(-11.60) \approx 9.11\times10^{-6} \]
Step 4: Compute the vacancy concentration.
\[ C_v = 20.085 \times 9.11\times10^{-6} \approx 1.83\times10^{-4} \]
Step 5: Conclusion.
The equilibrium vacancy concentration is approximately \[ \boxed{1.85\times10^{-4}} \]
Quick Tip: Vacancy concentration increases exponentially with entropy of formation and decreases exponentially with enthalpy of formation.
A steel bar is subjected to fatigue loading with a tensile mean stress. Given that the ultimate tensile strength is \(1000\) MPa and the fatigue limit under fully reversed loading is \(250\) MPa, the fatigue limit for a mean stress of \(100\) MPa, considering Goodman relationship, is ............. MPa. (Round off to the nearest integer.)
View Solution
Step 1: Write Goodman relation.
The Goodman equation is \[ \frac{\sigma_a}{\sigma_{f}} + \frac{\sigma_m}{\sigma_u} = 1 \]
where \(\sigma_a\) is the allowable stress amplitude.
Step 2: Substitute the given values.
\[ \frac{\sigma_a}{250} + \frac{100}{1000} = 1 \] \[ \frac{\sigma_a}{250} = 1 - 0.1 = 0.9 \]
Step 3: Solve for allowable stress amplitude.
\[ \sigma_a = 0.9 \times 250 = 225\ MPa \]
Step 4: Conclusion.
The fatigue limit at a mean stress of \(100\) MPa is \[ \boxed{225\ MPa} \]
Quick Tip: Goodman relation linearly reduces fatigue strength with increasing mean tensile stress.
During carburization of a steel at \(950^\circ\)C, carbon concentration is measured as \(0.8\) wt.% at a depth of \(0.3\) mm after one hour. The time required to get the same carbon concentration at a depth of \(0.6\) mm at the same carburization temperature is ............ hours. (Round off to the nearest integer.)
View Solution
Step 1: Recall diffusion relation for constant surface concentration.
For diffusion-controlled carburization, depth of penetration \(x\) is related to time \(t\) by \[ x \propto \sqrt{Dt} \]
At constant temperature, diffusion coefficient \(D\) remains constant, hence \[ x^2 \propto t \]
Step 2: Write the ratio of times.
\[ \frac{t_2}{t_1} = \left(\frac{x_2}{x_1}\right)^2 \]
Step 3: Substitute the given values.
\[ t_1 = 1\ hour, \quad x_1 = 0.3\ mm, \quad x_2 = 0.6\ mm \] \[ t_2 = 1 \times \left(\frac{0.6}{0.3}\right)^2 = 1 \times 4 = 4\ hours \]
Step 4: Conclusion.
The required time is \[ \boxed{4\ hours} \]
Quick Tip: In diffusion problems at constant temperature, time scales with the square of the diffusion depth.
An ideal solution is formed by mixing \(10\) grams of A and \(50\) grams of B at \(673\) K. The molar free energy of mixing is .......... kJ mol\(^{-1}\). (Round off to one decimal place.)
Given: \(R = 8.314\) J mol\(^{-1}\) K\(^{-1}\), atomic weight of A = \(40\) g mol\(^{-1}\), atomic weight of B = \(60\) g mol\(^{-1}\).
View Solution
Step 1: Calculate number of moles of A and B.
\[ n_A = \frac{10}{40} = 0.25\ mol \] \[ n_B = \frac{50}{60} \approx 0.833\ mol \] \[ n_{total} = 0.25 + 0.833 = 1.083\ mol \]
Step 2: Calculate mole fractions.
\[ x_A = \frac{0.25}{1.083} \approx 0.231 \] \[ x_B = \frac{0.833}{1.083} \approx 0.769 \]
Step 3: Write the free energy of mixing for an ideal solution.
\[ \Delta G_{mix} = RT\left(x_A\ln x_A + x_B\ln x_B\right) \]
Step 4: Substitute numerical values.
\[ \Delta G_{mix} = 8.314 \times 673 \left[(0.231)\ln(0.231) + (0.769)\ln(0.769)\right] \] \[ = 5596 \times (-0.526) \approx -2943\ J mol^{-1} \]
Step 5: Convert to kJ mol\(^{-1}\).
\[ \Delta G_{mix} \approx -2.9\ kJ mol^{-1} \]
Step 6: Conclusion.
The molar free energy of mixing is \[ \boxed{-3.0\ kJ mol^{-1}} \]
Quick Tip: For ideal solutions, free energy of mixing is always negative and depends only on temperature and composition.
The cupric ion (Cu\(^{2+}\)) concentration in the electrolyte (at \(298\) K) required to make the potential of pure copper equal to \(0.17\) V is ............ \(\times 10^{-6}\) gram-mol (litre)\(^{-1}\). (Round off to two decimal places.)
Given:
\(R = 8.314\) J mol\(^{-1}\) K\(^{-1}\)
\(F = 96500\) C mol\(^{-1}\)
Standard reduction potential of Cu, \(E^\circ = 0.34\) V
View Solution
Step 1: Write the Nernst equation for Cu\(^{2+}\)/Cu.
\[ E = E^\circ + \frac{RT}{nF}\ln [Cu^{2+}] \]
For copper, \(n = 2\).
Step 2: Substitute the given values.
\[ 0.17 = 0.34 + \frac{8.314 \times 298}{2 \times 96500}\ln [Cu^{2+}] \]
Step 3: Simplify the equation.
\[ -0.17 = 0.01285 \ln [Cu^{2+}] \] \[ \ln [Cu^{2+}] = -13.23 \]
Step 4: Calculate the concentration.
\[ [Cu^{2+}] = e^{-13.23} \approx 1.8 \times 10^{-6}\ mol L^{-1} \]
Step 5: Conclusion.
The required cupric ion concentration is \[ \boxed{1.8 \times 10^{-6}\ gram-mol (litre)^{-1}} \]
Quick Tip: When electrode potential is lower than the standard value, the ionic concentration must be very small, as predicted by the Nernst equation.
A non-porous spherical Fe\(_2\)O\(_3\) particle of initial radius \(5 \times 10^{-2}\) m is topo-chemically reduced by H\(_2\), where the reactant–product interface is sharp and spherical, and reaction rate is proportional to the interfacial area. The radius of the unreacted Fe\(_2\)O\(_3\) particle after \(600\) s will be ............ \(\times 10^{-2}\) m. (Round off to the nearest integer.)
Given: Reaction rate constant \(k = 5 \times 10^{-5}\) m s\(^{-1}\)
View Solution
Step 1: Use shrinking core model for interface-controlled reaction.
For a spherical particle with interface-reaction control, the unreacted core radius \(r\) varies as \[ r = r_0 - kt \]
where \(r_0\) is the initial radius.
Step 2: Substitute the given values.
\[ r_0 = 5 \times 10^{-2}\ m, \quad k = 5 \times 10^{-5}\ m s^{-1}, \quad t = 600\ s \]
Step 3: Calculate the remaining unreacted radius.
\[ r = 5 \times 10^{-2} - (5 \times 10^{-5})(600) \] \[ r = 5 \times 10^{-2} - 3 \times 10^{-2} \] \[ r = 2 \times 10^{-2}\ m \]
Step 4: Conclusion.
The radius of the unreacted Fe\(_2\)O\(_3\) particle after \(600\) s is \[ \boxed{2 \times 10^{-2}\ m} \]
Quick Tip: For interface-controlled shrinking core reactions, the unreacted radius decreases linearly with time.
A long metallic cylindrical rod of radius \(r\), length \(L\) \((L \gg r)\) and electrical resistivity \(\rho_e\) is kept in vacuum and is carrying an electric current of \(I\). The only way it loses heat to the ambient is via radiation. If the ambient temperature is \(T_0\), then the steady-state temperature of the rod is .......... K. (Round off to the nearest integer.)
Given:
Stefan–Boltzmann constant \(= 5.667\times10^{-8}\) W m\(^{-2}\) K\(^{-4}\)
\(r = 0.1\) mm, \quad \(L = 1\) m, \quad \(\rho_e = 10^{-8}\ \Omega\)m
\(I = 0.3\) A, \quad \(T_0 = 300\) K
Neglect heat loss from the flat ends and assume emissivity \(=1\).
View Solution
Step 1: Calculate electrical resistance of the rod.
\[ R = \frac{\rho_e L}{\pi r^2} = \frac{10^{-8}\times 1}{\pi(10^{-4})^2} = \frac{1}{\pi} \approx 0.318\ \Omega \]
Step 2: Calculate Joule heating power.
\[ P = I^2 R = (0.3)^2 \times 0.318 \approx 0.0286\ W \]
Step 3: Write radiative heat loss at steady state.
Radiating surface area (neglecting ends): \[ A = 2\pi r L = 2\pi(10^{-4})(1) = 6.283\times10^{-4}\ m^2 \]
At steady state, \[ P = \sigma A (T^4 - T_0^4) \]
Step 4: Solve for \(T\).
\[ T^4 = T_0^4 + \frac{P}{\sigma A} \] \[ = 300^4 + \frac{0.0286}{(5.667\times10^{-8})(6.283\times10^{-4})} \] \[ = 8.1\times10^9 + 8.0\times10^8 \approx 8.9\times10^9 \]
Step 5: Take fourth root.
\[ T = (8.9\times10^9)^{1/4} \approx 307\ K \]
Step 6: Conclusion.
The steady-state temperature of the rod is \(307\) K.
Quick Tip: In radiation-controlled heating, temperature rise is modest because radiative loss scales with \(T^4\).
\(1000\) kg of sphalerite concentrate containing \(60%\) ZnS is completely roasted with stoichiometric amount of pure oxygen. The amount of oxygen required is .......... kg. (Round off to one decimal place.)
Given: Atomic weights (g mol\(^{-1}\)): Zn = \(65\), S = \(32\), O = \(16\).
View Solution
Step 1: Write the roasting reaction.
\[ ZnS + \tfrac{3}{2}O_2 \rightarrow ZnO + SO_2 \]
Step 2: Determine mass of ZnS in the concentrate.
\[ Mass of ZnS = 0.60 \times 1000 = 600\ kg \]
Step 3: Calculate moles of ZnS.
Molar mass of ZnS \(= 65 + 32 = 97\) g mol\(^{-1}\).
\[ n_{ZnS} = \frac{600\,000}{97} \approx 6186\ mol \]
Step 4: Calculate moles of oxygen required.
From stoichiometry, \[ n_{O_2} = \tfrac{3}{2} \times 6186 \approx 9279\ mol \]
Step 5: Convert to mass of oxygen.
Molar mass of O\(_2 = 32\) g mol\(^{-1}\).
\[ Mass of O_2 = 9279 \times 32 \approx 2.97\times10^5\ g = 297.0\ kg \]
Step 6: Conclusion.
The amount of oxygen required is \(297.0\) kg.
Quick Tip: Always use stoichiometric coefficients directly from the balanced reaction to compute oxygen requirement.
\(800\) grams of A–B alloy containing \(20\) wt.% B is held at temperature \(T_1\). The weight of B dissolved in \(\alpha\) at that temperature is ....... grams. (Round off to the nearest integer.)

View Solution
Step 1: Read phase compositions from the phase diagram at \(T_1\).
From the given diagram at temperature \(T_1\):
Composition of \(\alpha\) phase \(\approx 10\) wt.% B
Composition of \(\beta\) phase \(\approx 90\) wt.% B
Overall alloy composition \(= 20\) wt.% B
Step 2: Apply the lever rule to find fraction of \(\alpha\).
\[ f_\alpha = \frac{C_\beta - C_0}{C_\beta - C_\alpha} = \frac{90 - 20}{90 - 10} = \frac{70}{80} = 0.875 \]
Step 3: Calculate mass of \(\alpha\) phase.
\[ Mass of \alpha = 0.875 \times 800 = 700\ g \]
Step 4: Calculate weight of B dissolved in \(\alpha\).
\[ Weight of B in \alpha = 0.10 \times 700 = 70\ g \]
Step 5: Conclusion.
The weight of B dissolved in the \(\alpha\) phase is \[ \boxed{70\ grams} \]
Quick Tip: For two-phase regions, always use the lever rule to find phase fractions, then multiply by phase composition to get solute mass.
A mild steel pipeline is connected to zinc for cathodic protection at a current density of \(10\) mA m\(^{-2}\). The quantity of zinc required per square meter of the pipeline per year is ........... grams. (Round off to the nearest integer.)
Given: Atomic weight of Zn \(= 65\) g mol\(^{-1}\), Faraday’s constant \(F = 96500\) C mol\(^{-1}\).
View Solution
Step 1: Calculate current per square meter.
\[ I = 10\ mA m^{-2} = 0.01\ A m^{-2} \]
Step 2: Calculate total charge passed in one year.
\[ t = 365 \times 24 \times 3600 = 3.1536 \times 10^7\ s \] \[ Q = I t = 0.01 \times 3.1536 \times 10^7 = 3.1536 \times 10^5\ C \]
Step 3: Write the anodic dissolution reaction for zinc.
\[ Zn \rightarrow Zn^{2+} + 2e^- \]
Thus, \(n = 2\) electrons per Zn atom.
Step 4: Calculate mass of zinc consumed.
\[ m = \frac{Q}{F}\frac{M}{n} = \frac{3.1536\times10^5}{96500}\times\frac{65}{2} \approx 106\ g \]
Step 5: Conclusion.
The quantity of zinc required per square meter of pipeline per year is \[ \boxed{106\ grams} \]
Quick Tip: In cathodic protection problems, always relate current to metal loss using Faraday’s law and the oxidation reaction.
A large rectangular component is undergoing fully-reversed cyclic loading. The component is known to grow the dominant fatigue crack from the outer surface. If the stress amplitude \((\sigma_a)\) is \(100\) MPa and the critical stress intensity factor \(K_{IC}\) of the material is \(50\) MPa\(\sqrt{m}\), then the crack length at which the component will fail catastrophically is .............. mm. (Round off to one decimal place.)
Given: Geometric factor \(\alpha = 1.12\).
View Solution
Step 1: Write the fracture criterion.
For a surface crack, the mode-I stress intensity factor is \[ K_I = \alpha \sigma_a \sqrt{\pi a} \]
At catastrophic failure, \[ K_I = K_{IC} \]
Step 2: Substitute given values.
\[ 50 = 1.12 \times 100 \times \sqrt{\pi a} \]
Step 3: Solve for crack length \(a\).
\[ \sqrt{\pi a} = \frac{50}{112} = 0.446 \] \[ \pi a = (0.446)^2 = 0.199 \] \[ a = \frac{0.199}{\pi} = 0.0634\ m \]
Step 4: Convert to millimeters.
\[ a = 63.4\ mm \]
Step 5: Conclusion.
The crack length at catastrophic failure is \[ \boxed{63.5\ mm} \]
Quick Tip: Always use stress amplitude (not maximum stress) for fully reversed fatigue loading.
In casting, for a simple vertical gating system with a gate of cross-sectional area \(2\ cm^2\) and sprue height of \(10\) cm, the filling time for a mould of dimensions \(40\) cm \(\times\) \(20\) cm \(\times\) \(10\) cm is .......... s. (Round off to one decimal place.)
Given: Acceleration due to gravity \(g = 980\ cm s^{-2}\).
View Solution
Step 1: Calculate volume of the mould.
\[ V = 40 \times 20 \times 10 = 8000\ cm^3 \]
Step 2: Calculate velocity of molten metal at the gate.
Using Torricelli’s theorem: \[ v = \sqrt{2gh} = \sqrt{2 \times 980 \times 10} = \sqrt{19600} = 140\ cm s^{-1} \]
Step 3: Calculate volumetric flow rate.
\[ Q = A v = 2 \times 140 = 280\ cm^3s^{-1} \]
Step 4: Calculate filling time.
\[ t = \frac{V}{Q} = \frac{8000}{280} = 28.6\ s \]
Step 5: Conclusion.
The filling time of the mould is \[ \boxed{28.5\ s} \]
Quick Tip: For simple vertical gating, use Torricelli’s theorem assuming negligible losses.
During arc welding, the actual heat input is \(200\ J mm^{-3}\) and the current and voltage are \(200\) A and \(20\) V, respectively. For a weld cross-sectional area of \(2\ mm^2\) and heat transfer efficiency of \(0.9\), the velocity of welding is ........... mm s\(^{-1}\). (Round off to the nearest integer.)
View Solution
Step 1: Calculate effective power input.
\[ P = \eta V I = 0.9 \times 20 \times 200 = 3600\ W \]
Step 2: Write heat input relation.
\[ Heat input per unit length = \frac{P}{v} \]
Also, \[ Heat input per unit length = (heat per unit volume) \times (area) \]
Step 3: Substitute values.
\[ 200 \times 2 = \frac{3600}{v} \] \[ 400 = \frac{3600}{v} \]
Step 4: Solve for welding velocity.
\[ v = \frac{3600}{400} = 9\ mm s^{-1} \]
Step 5: Conclusion.
The welding velocity is \[ \boxed{9\ mm s^{-1}} \]
Quick Tip: Always include heat transfer efficiency when calculating effective welding heat input.
Check:
- GATE Question Paper (Available): Check Previous Year Question Paper with Solution PDF
- GATE Question Paper 2025 (Soon): Check Previous Year Question Paper with Solution PDF
- GATE Question Paper 2024 (Available): Check Previous Year Question Paper with Solution PDF
- GATE Paper Analysis, Difficulty Level, Branch-wise Question Paper Analysis, Weightage of Topics
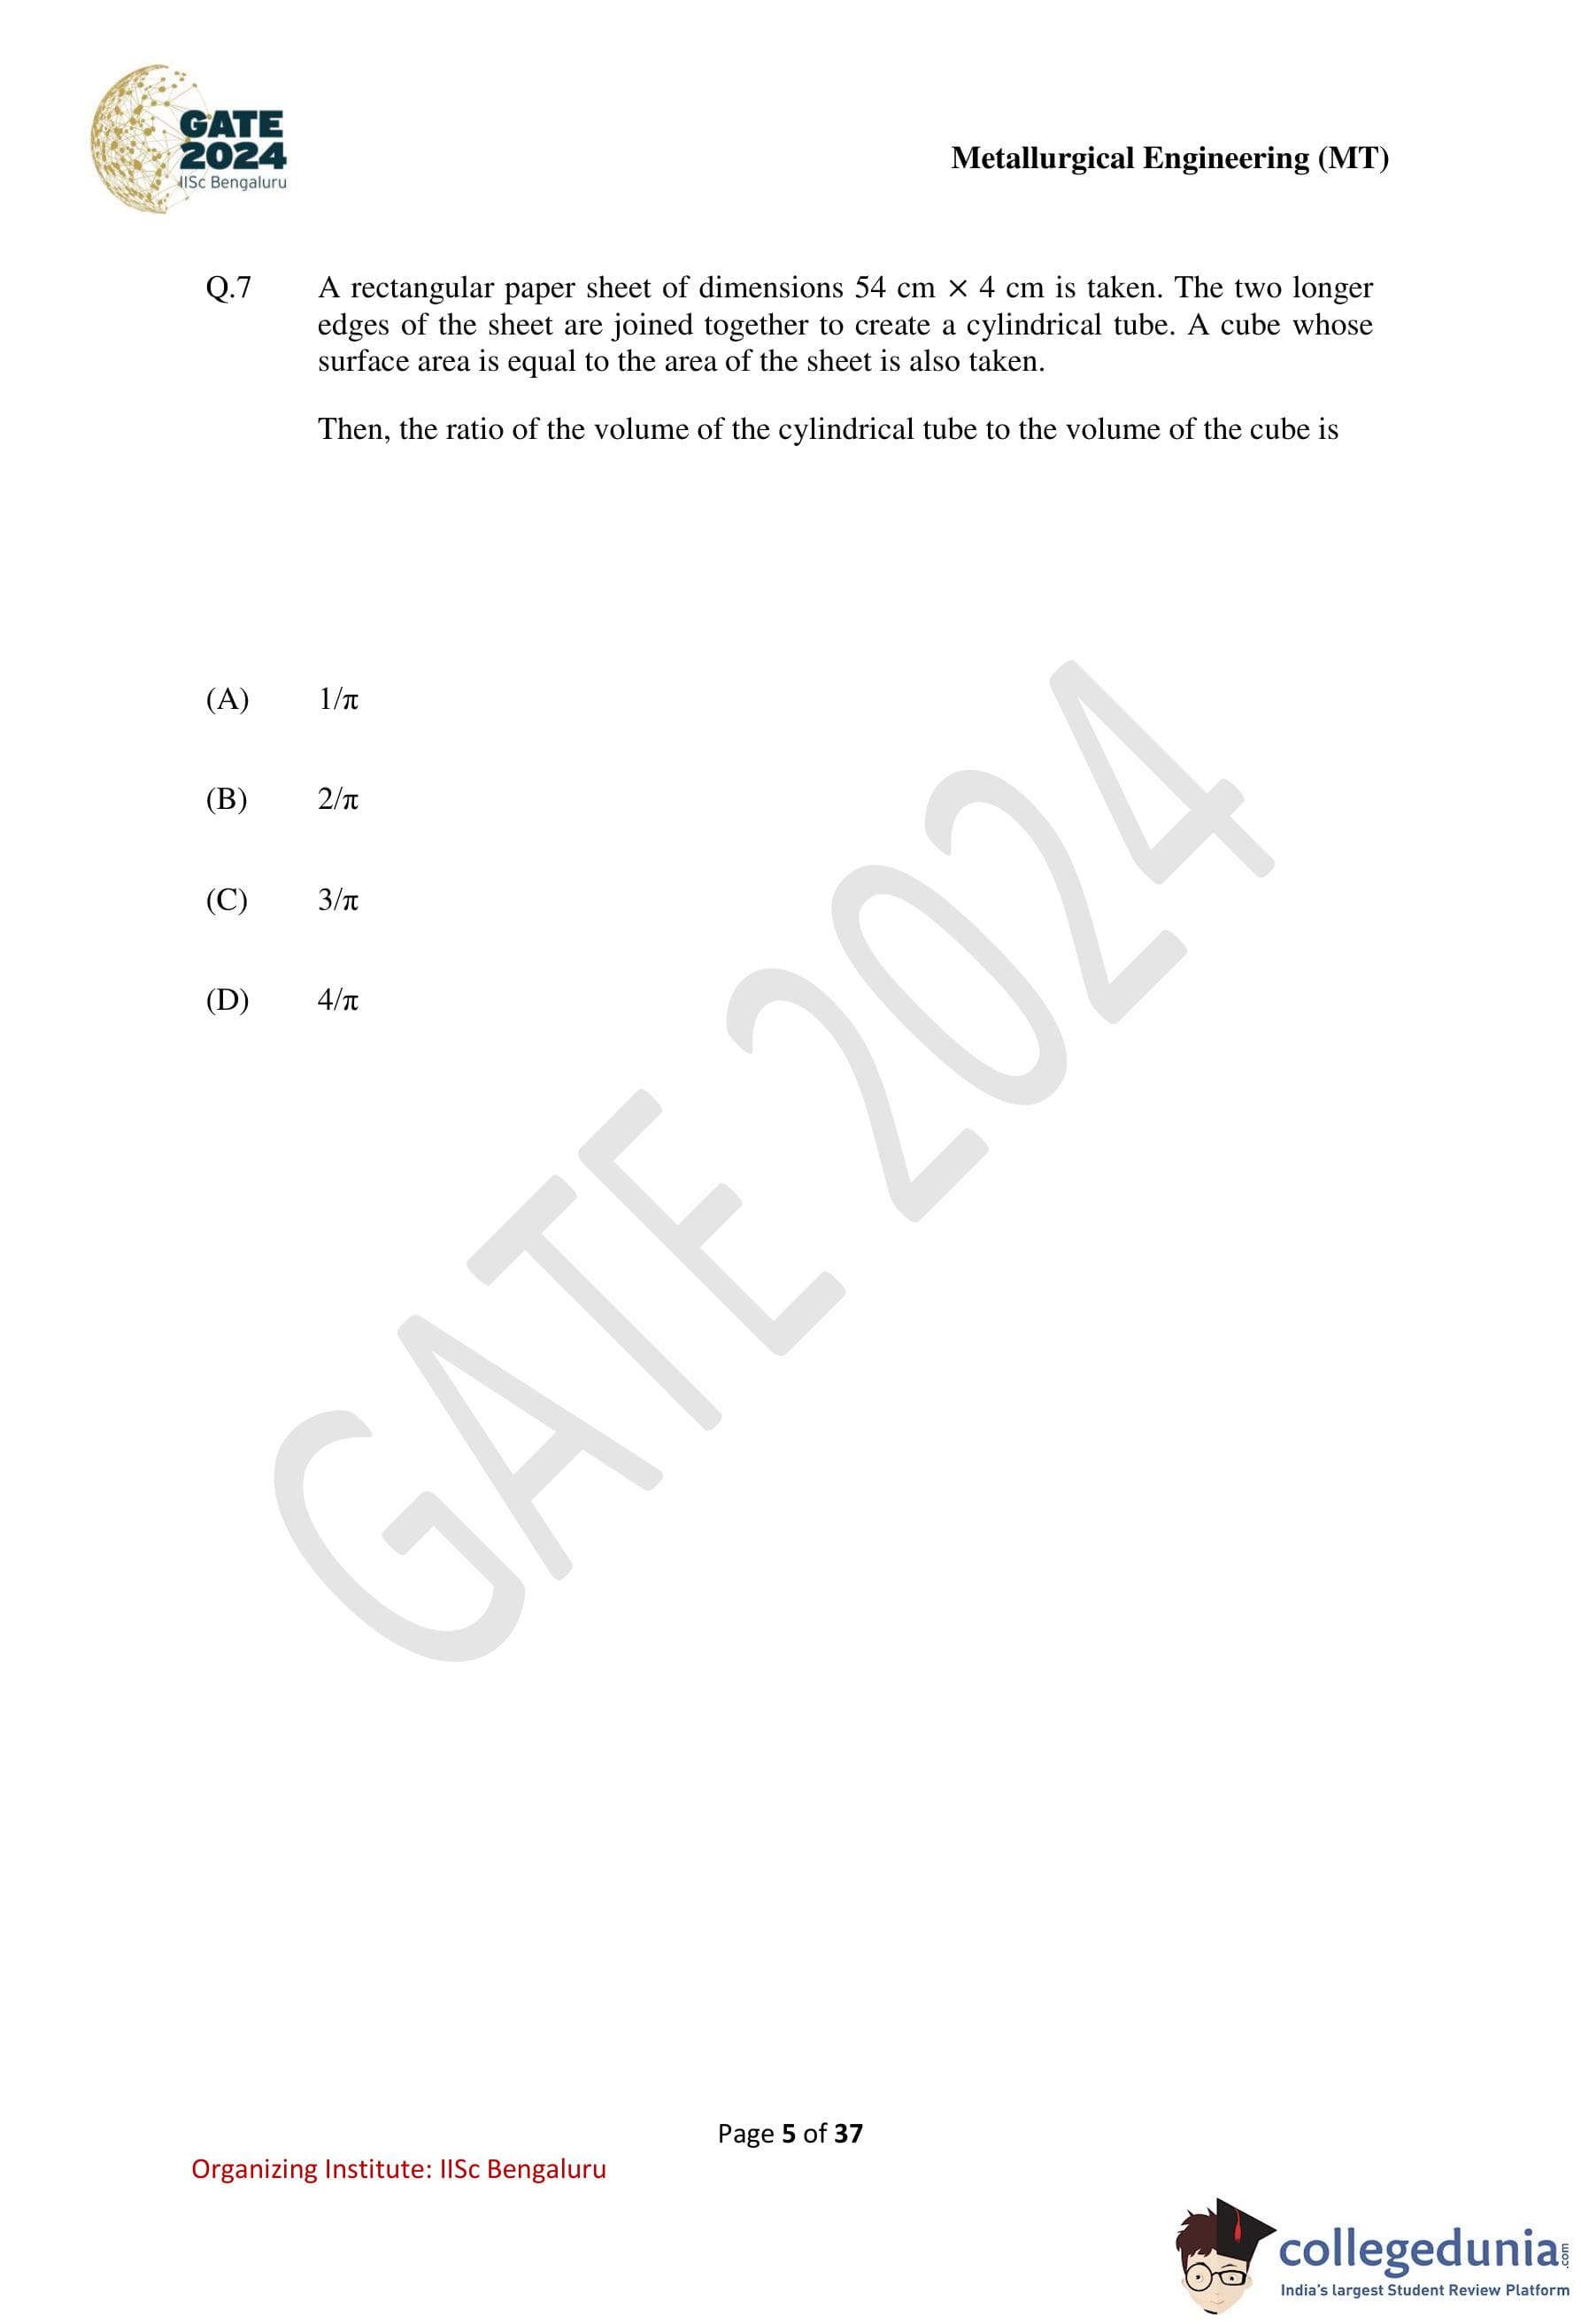

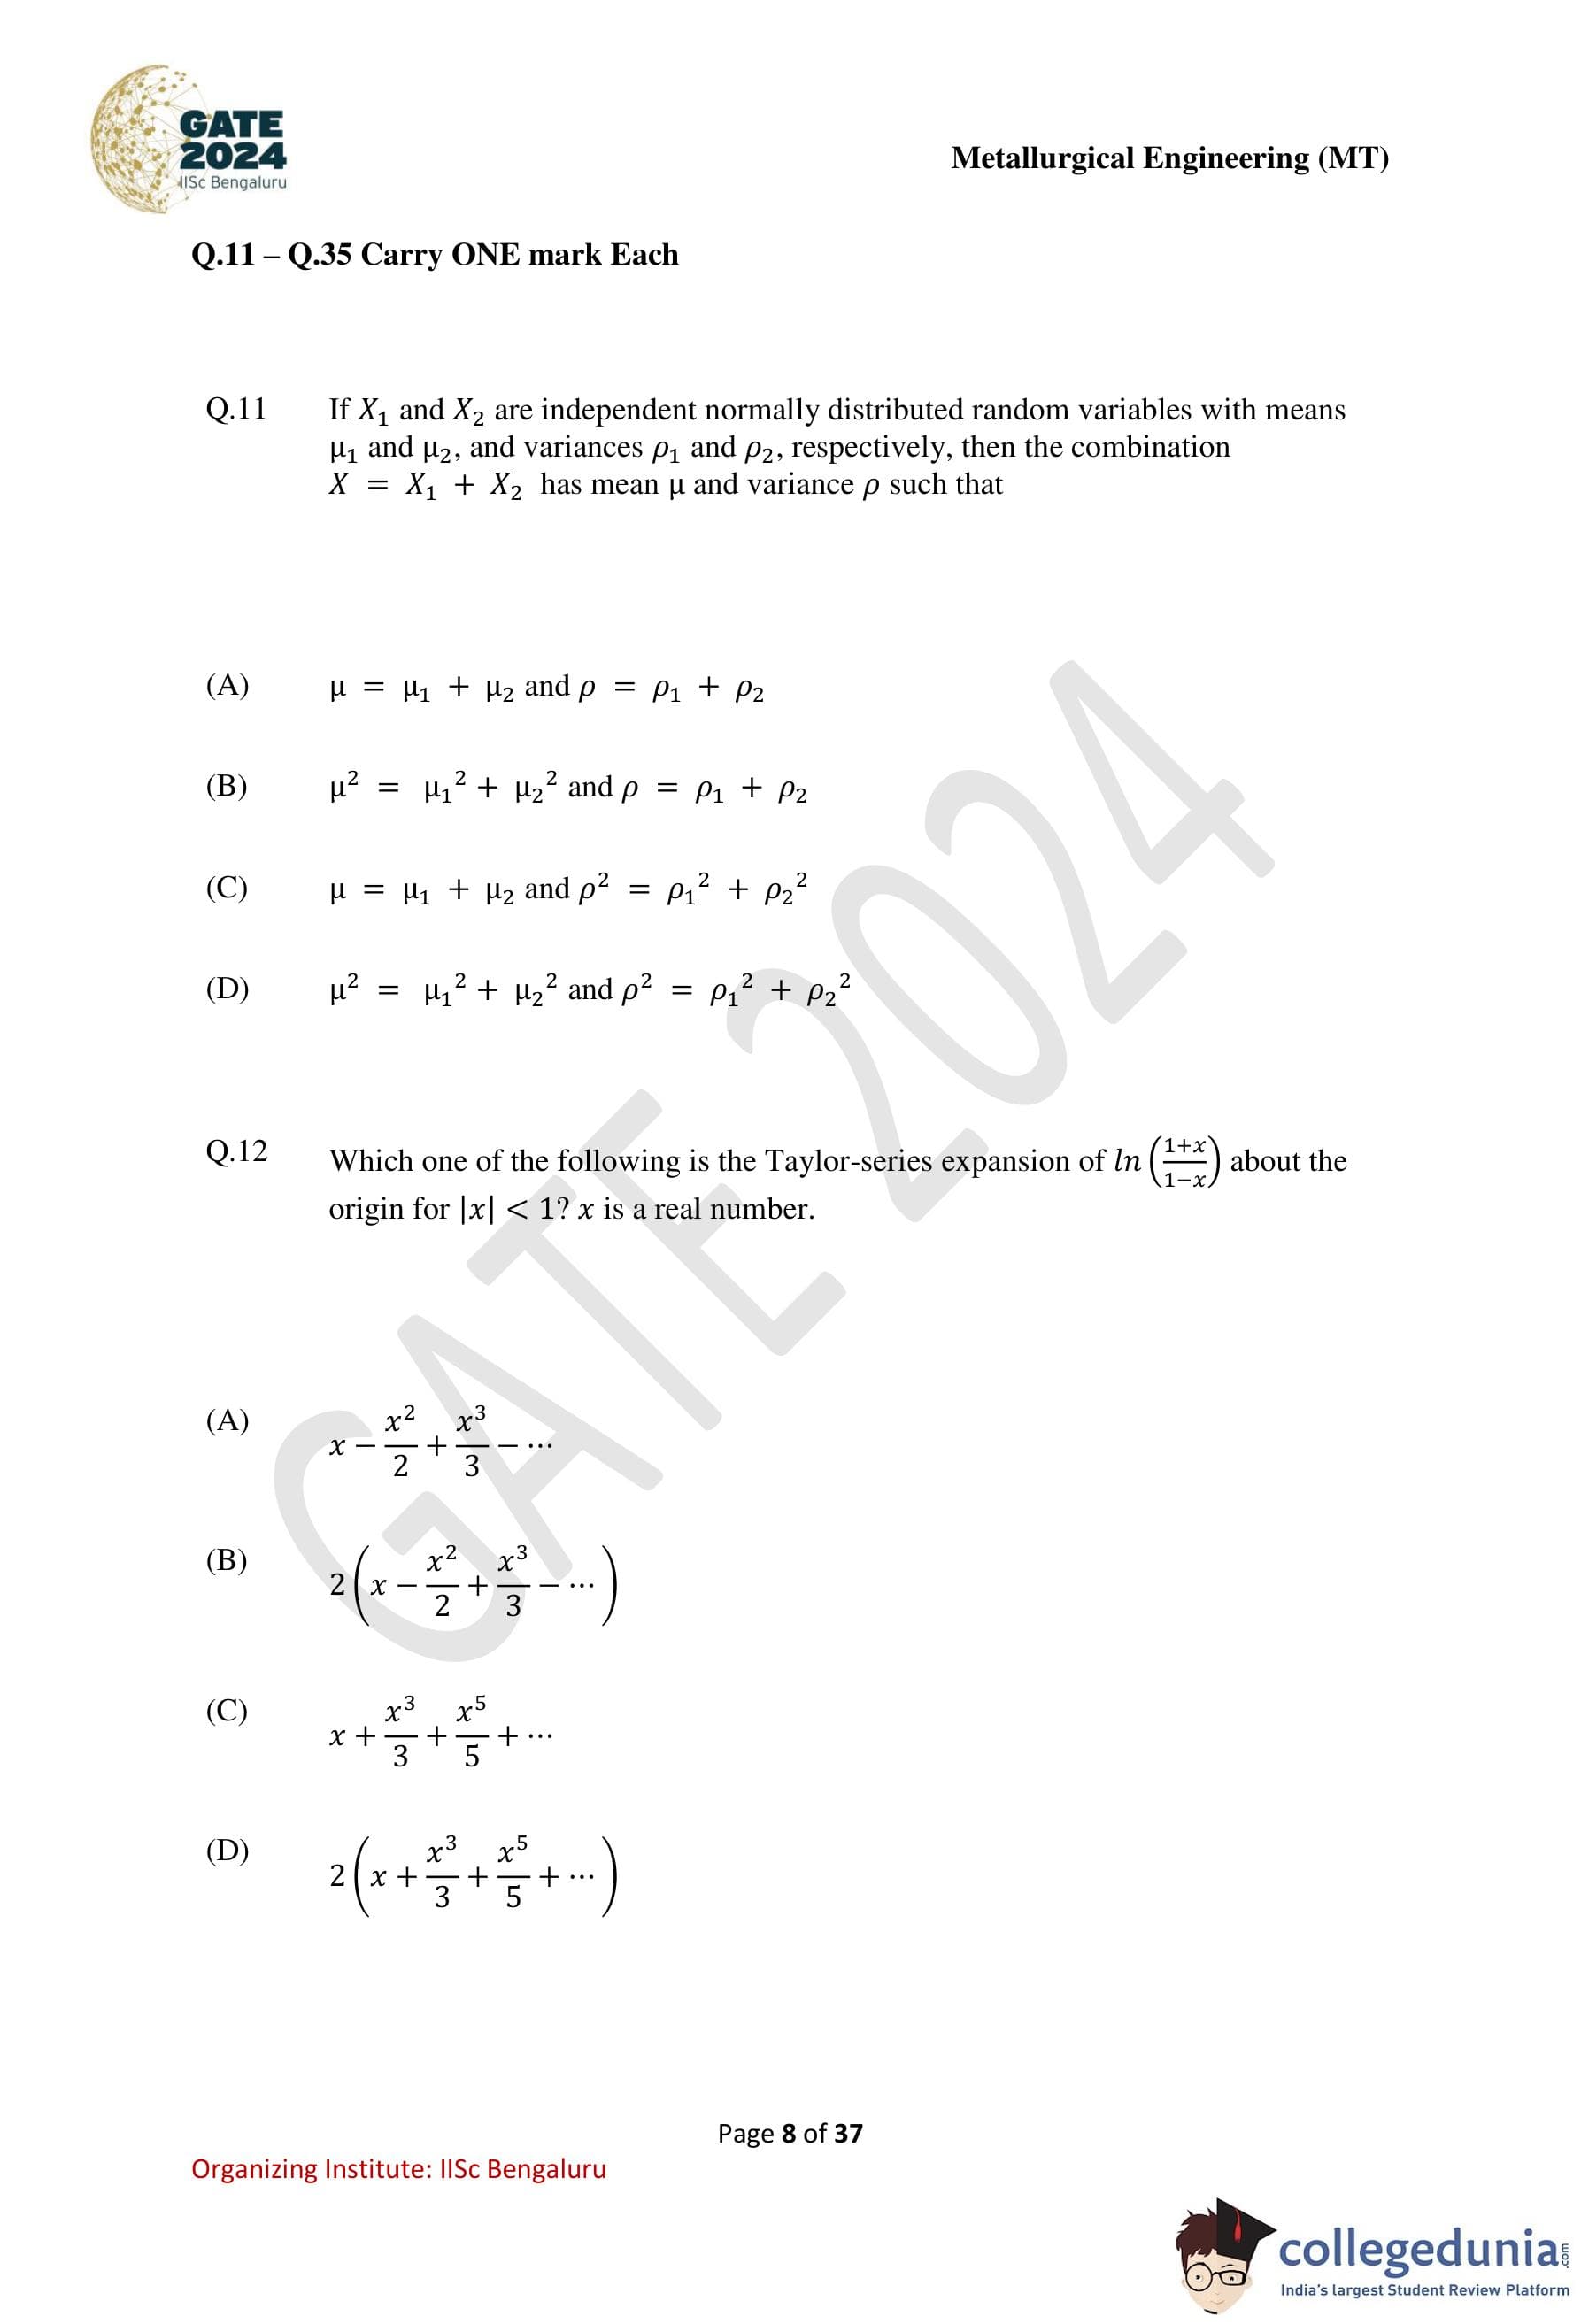
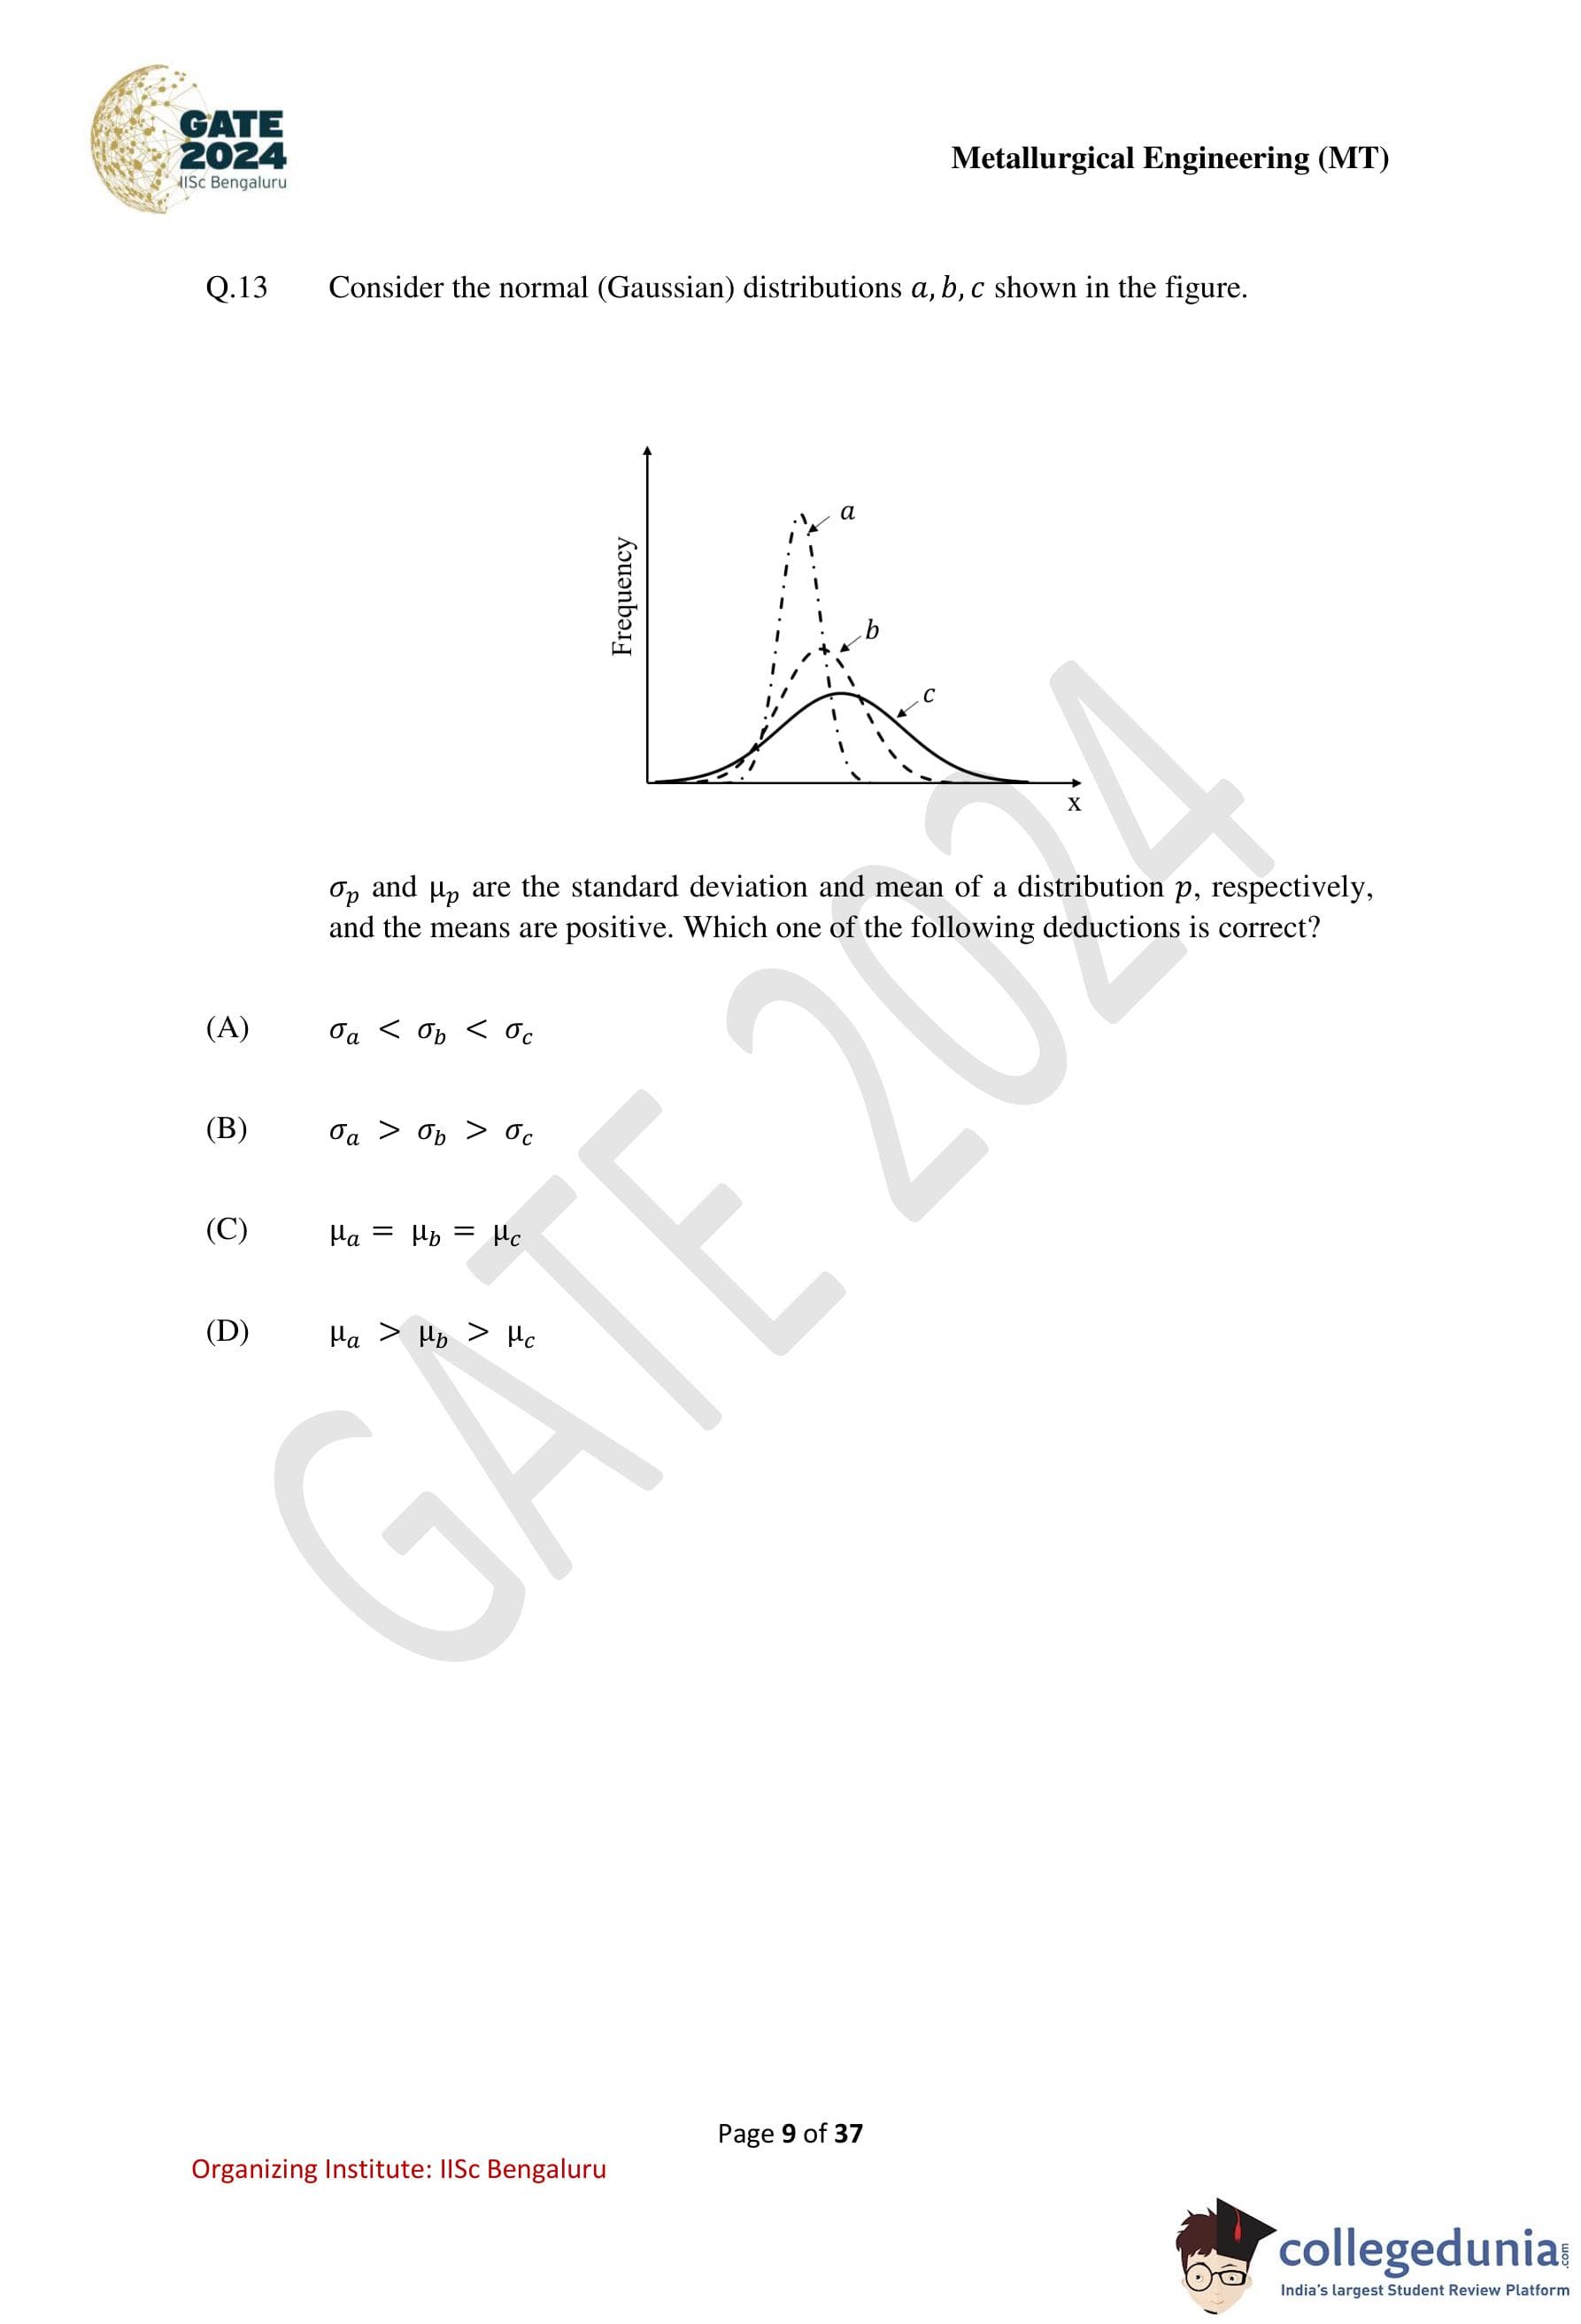
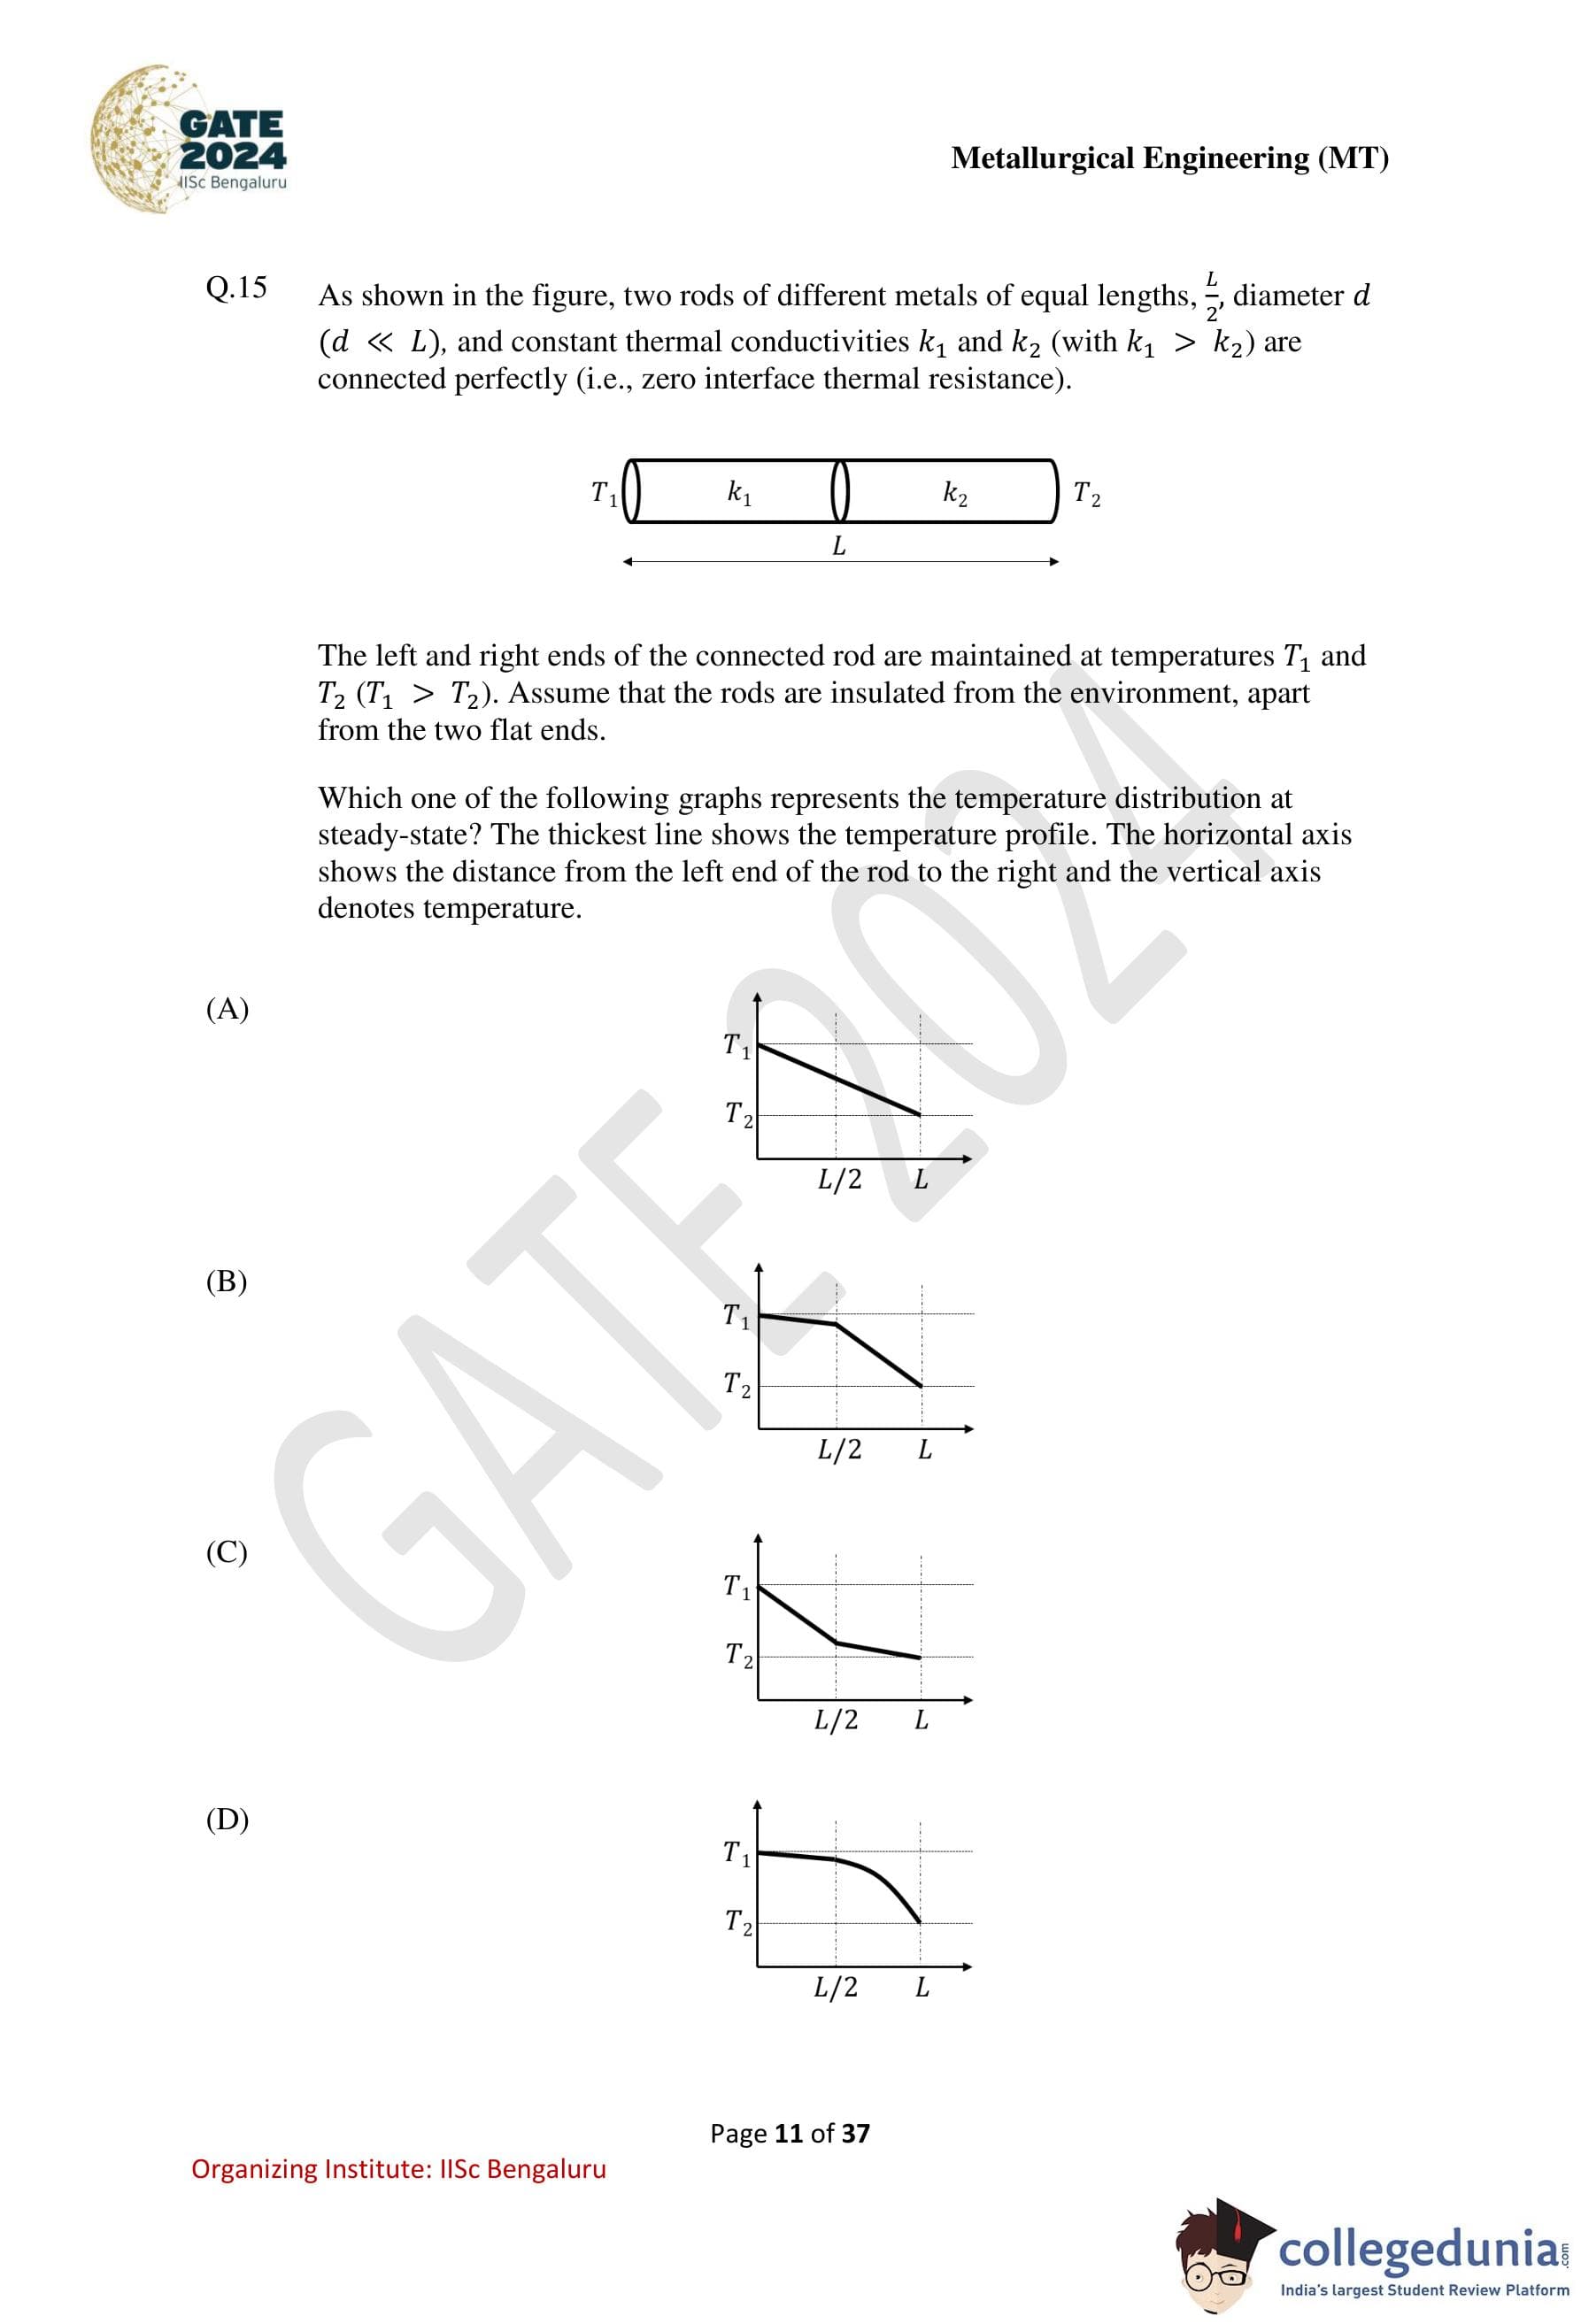
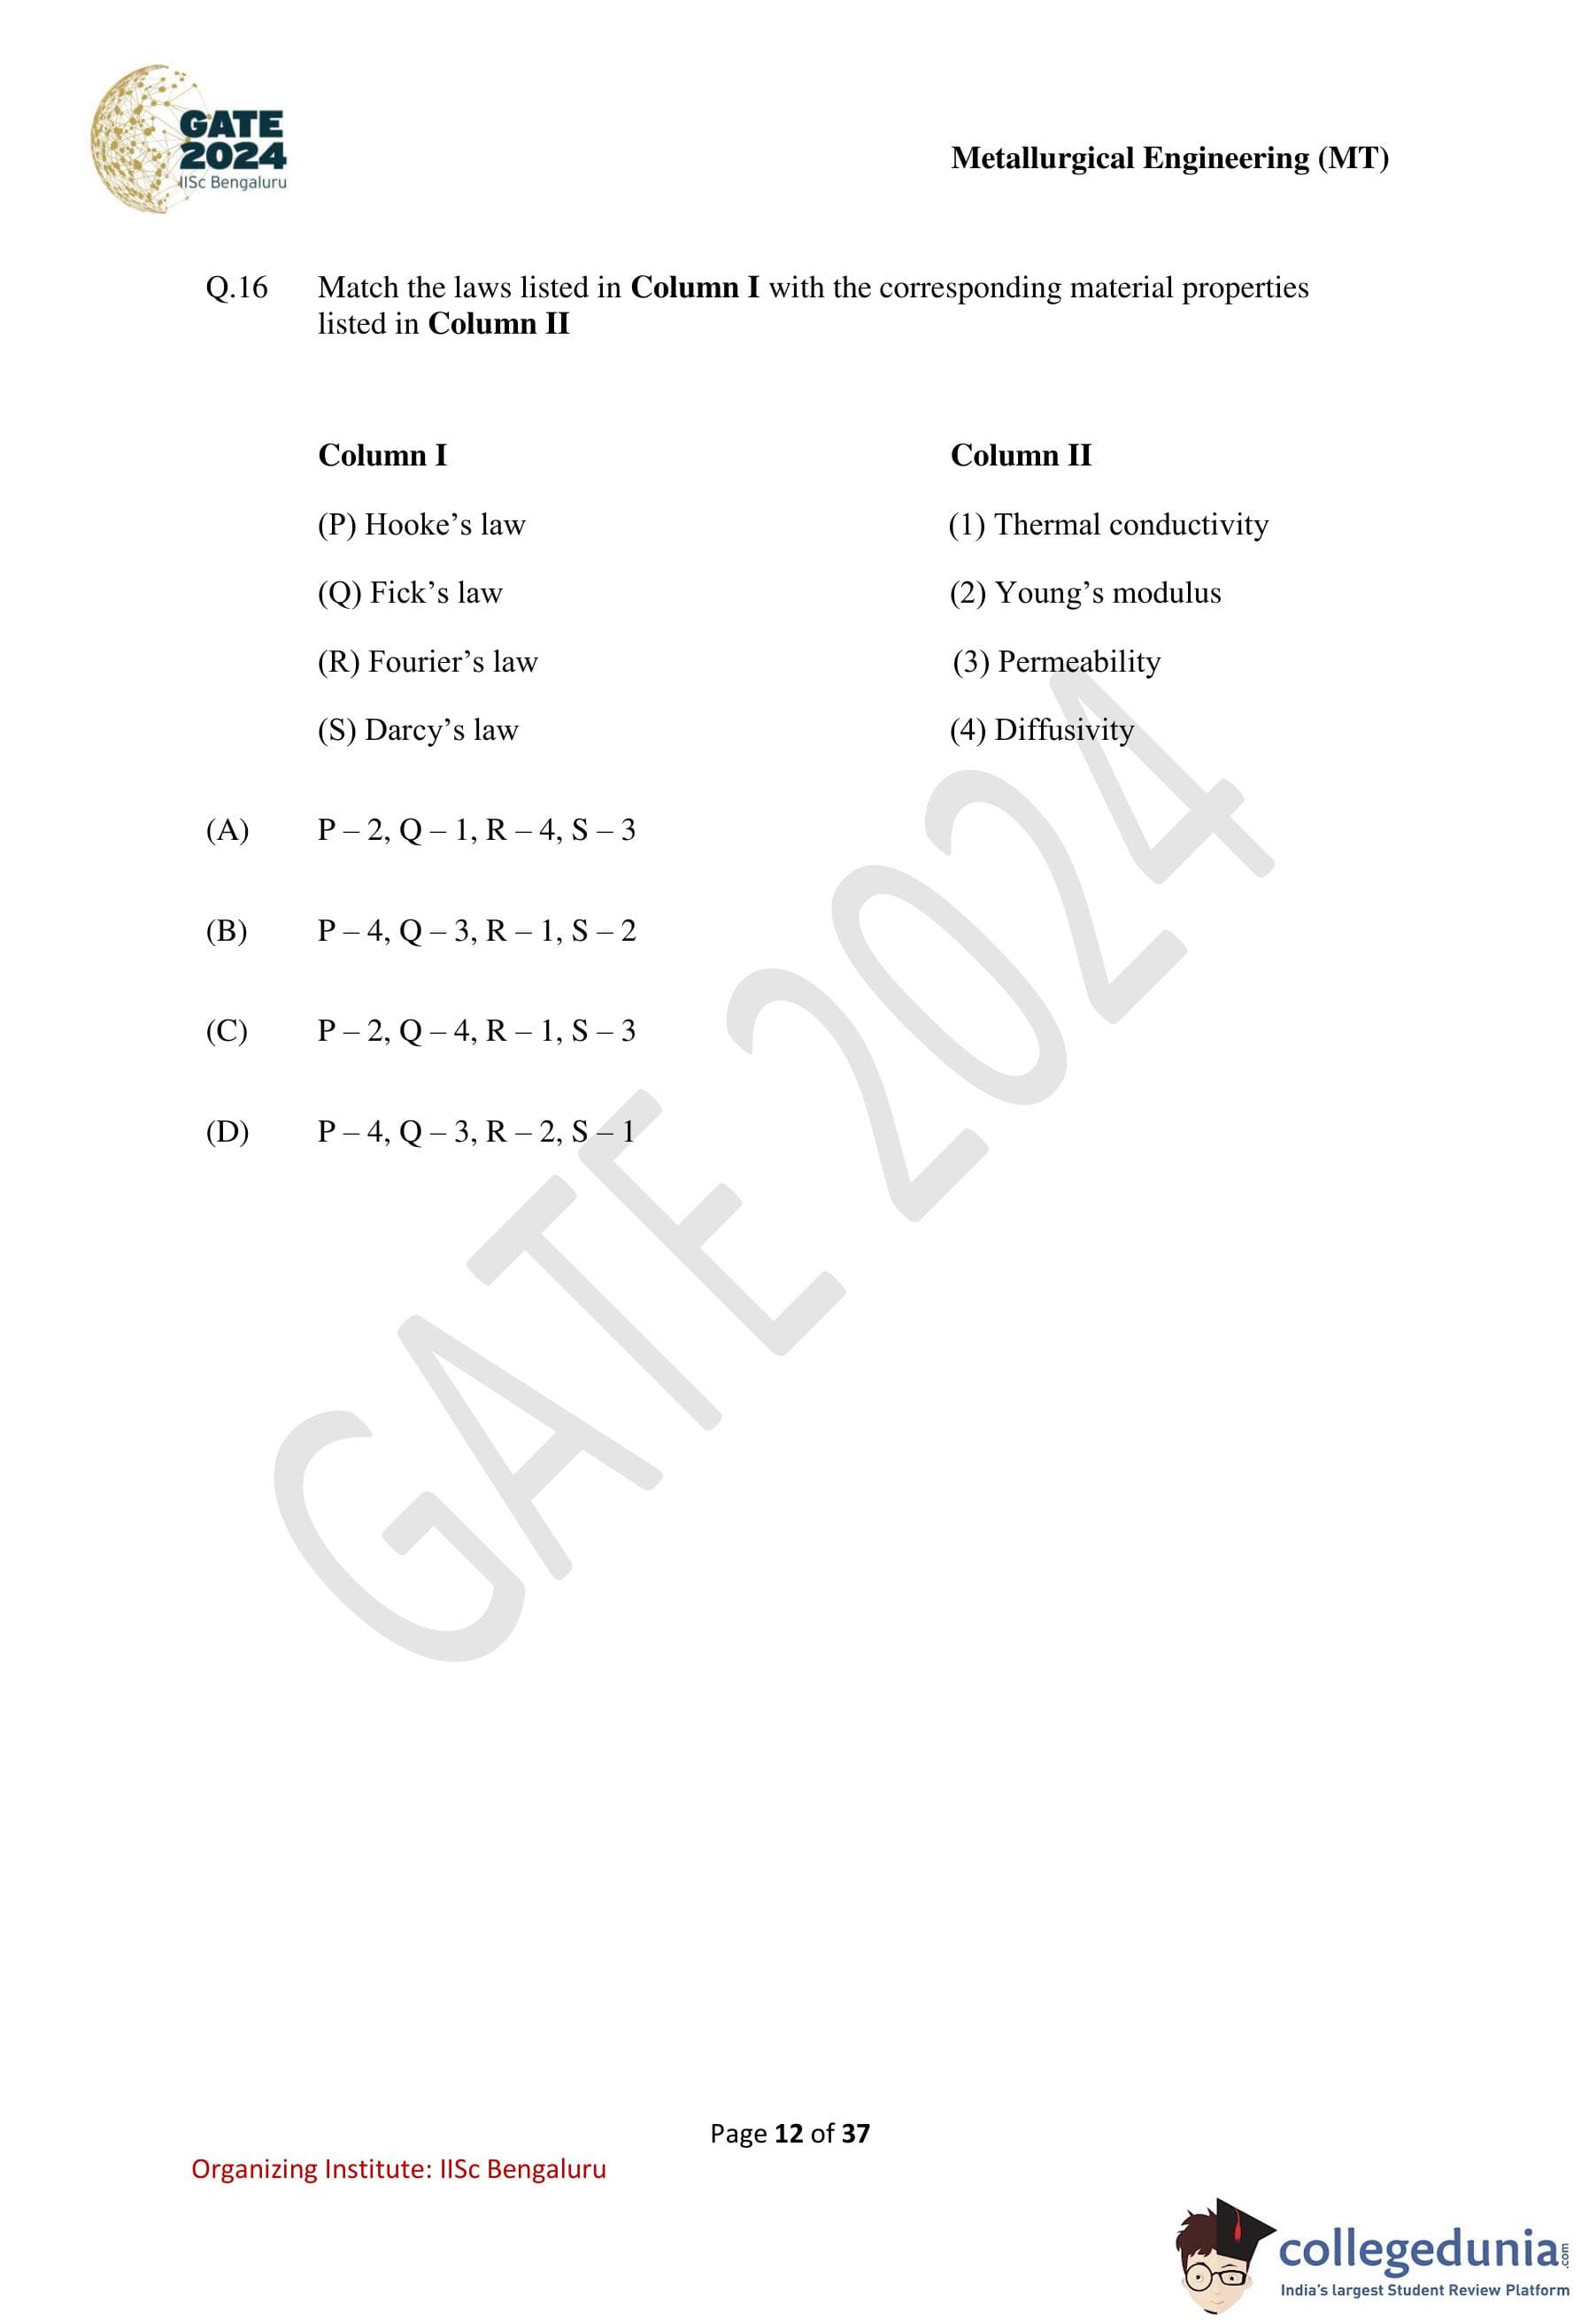
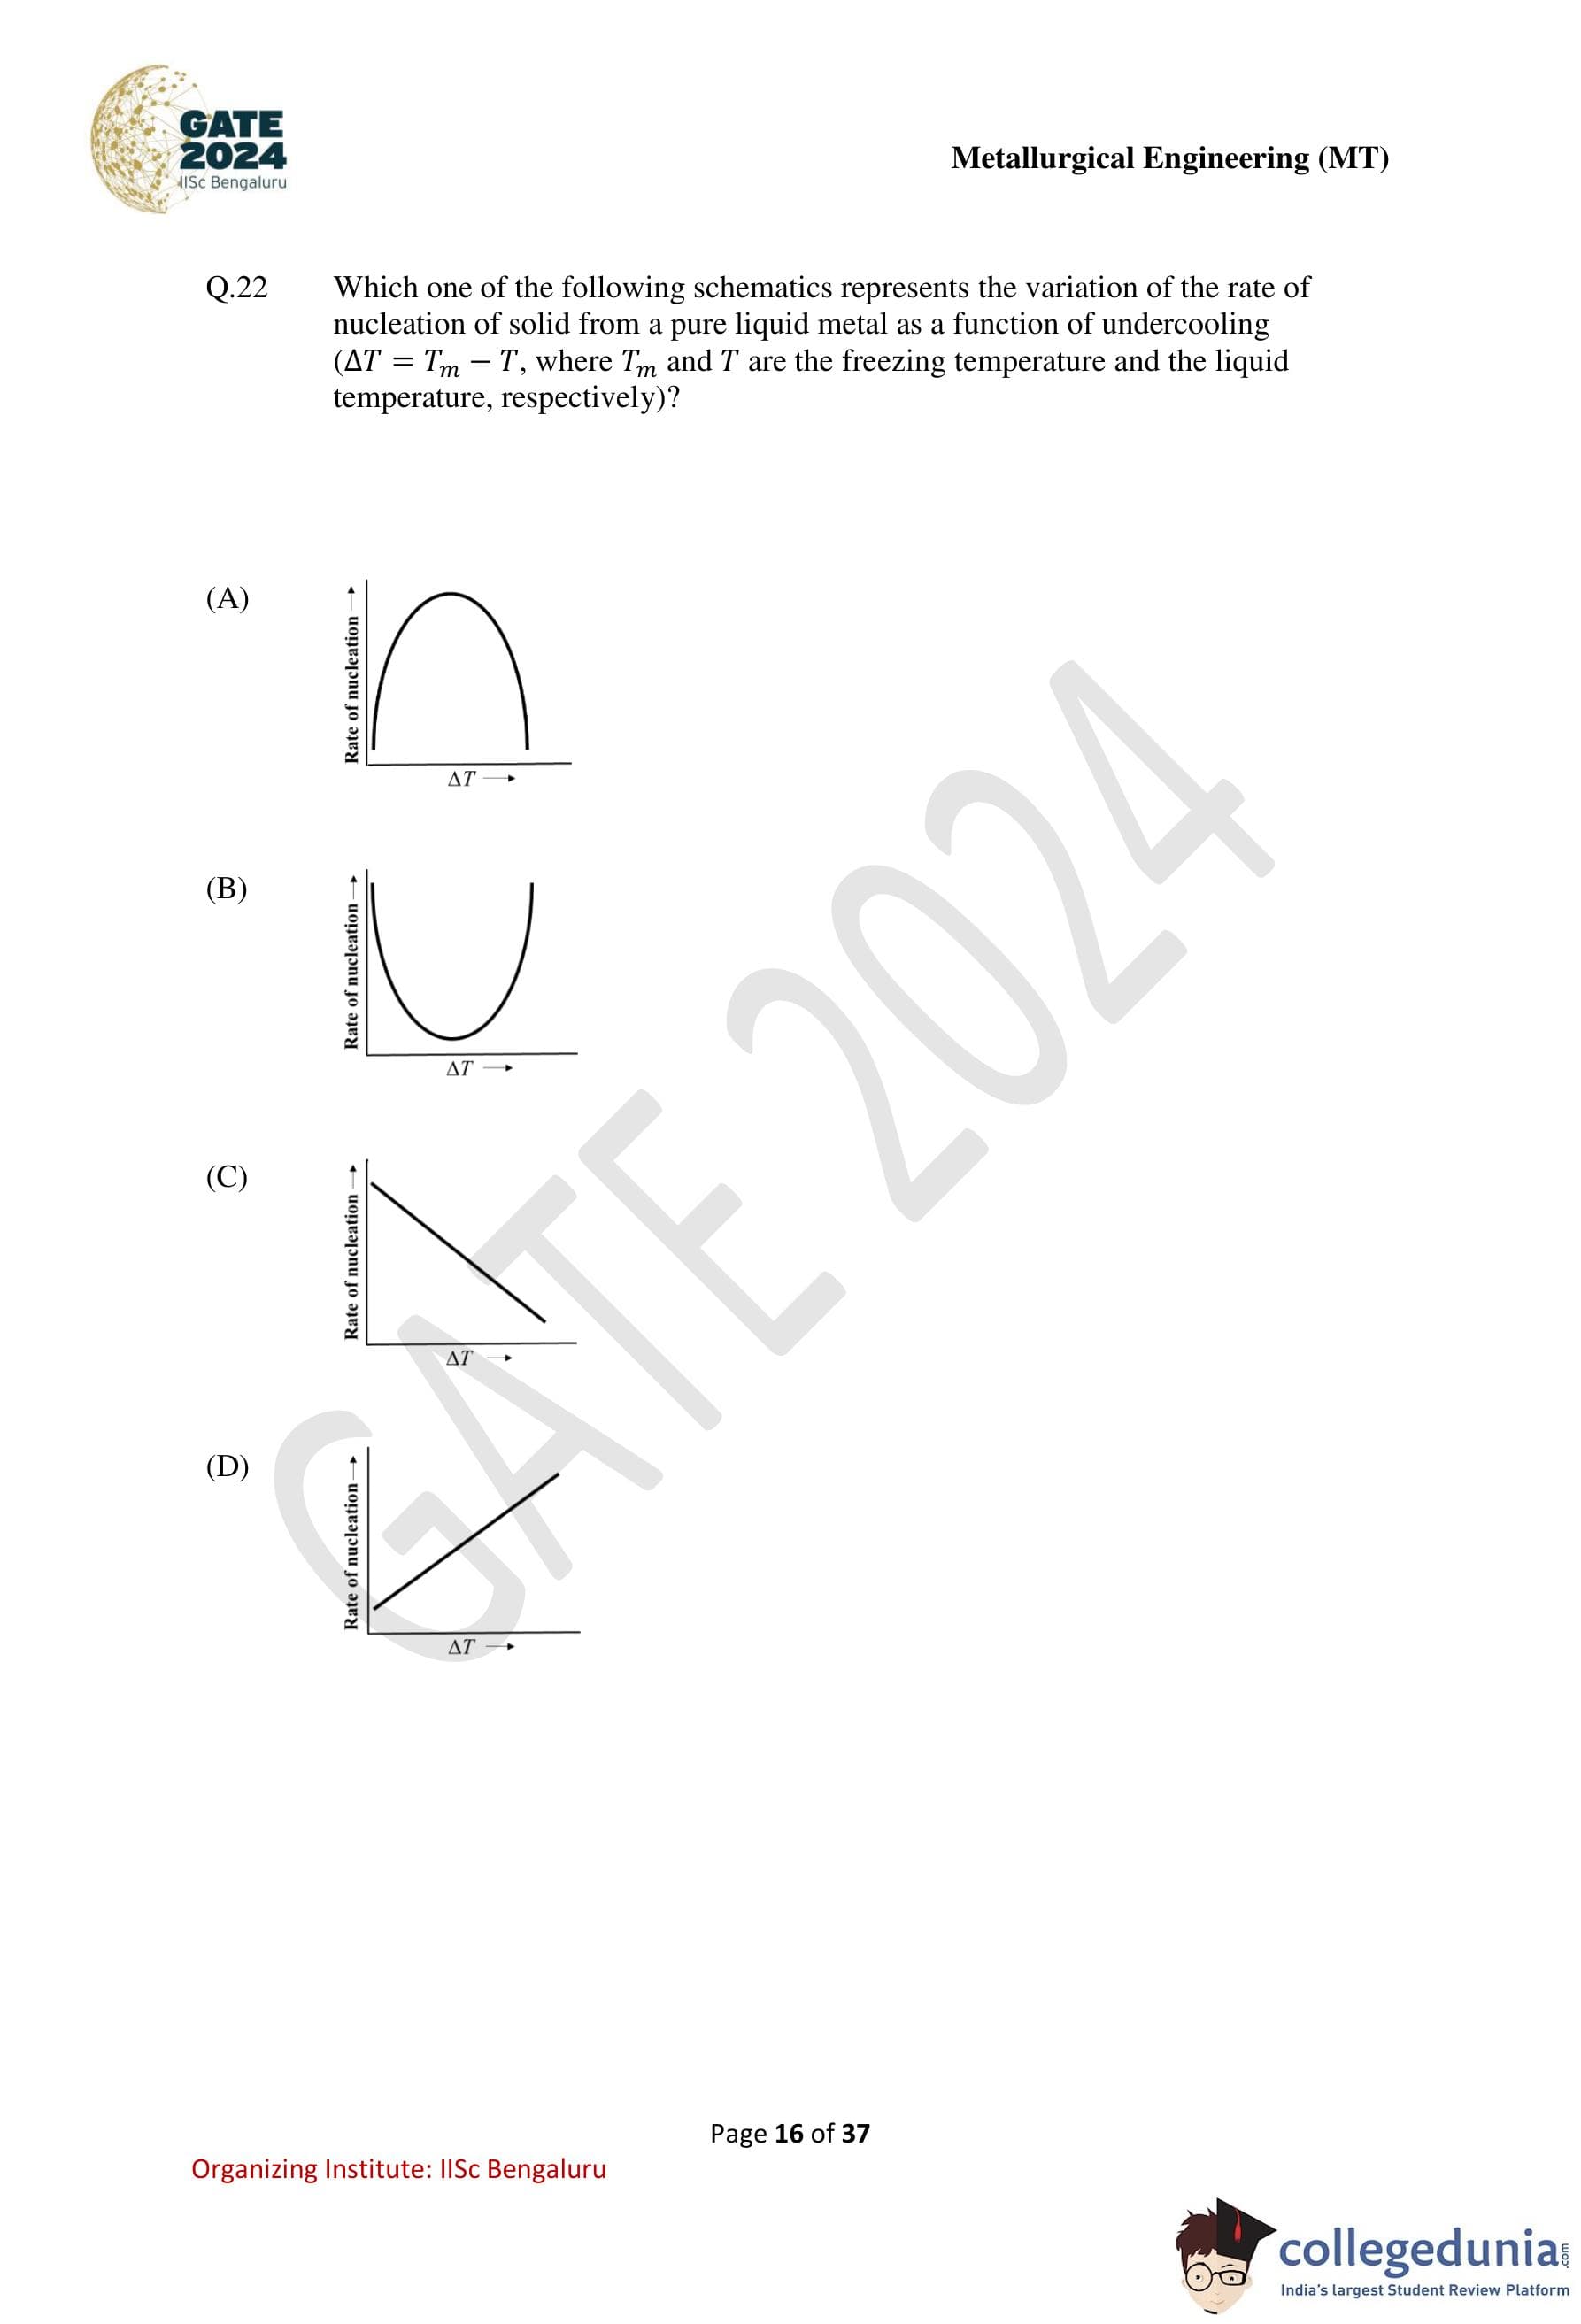
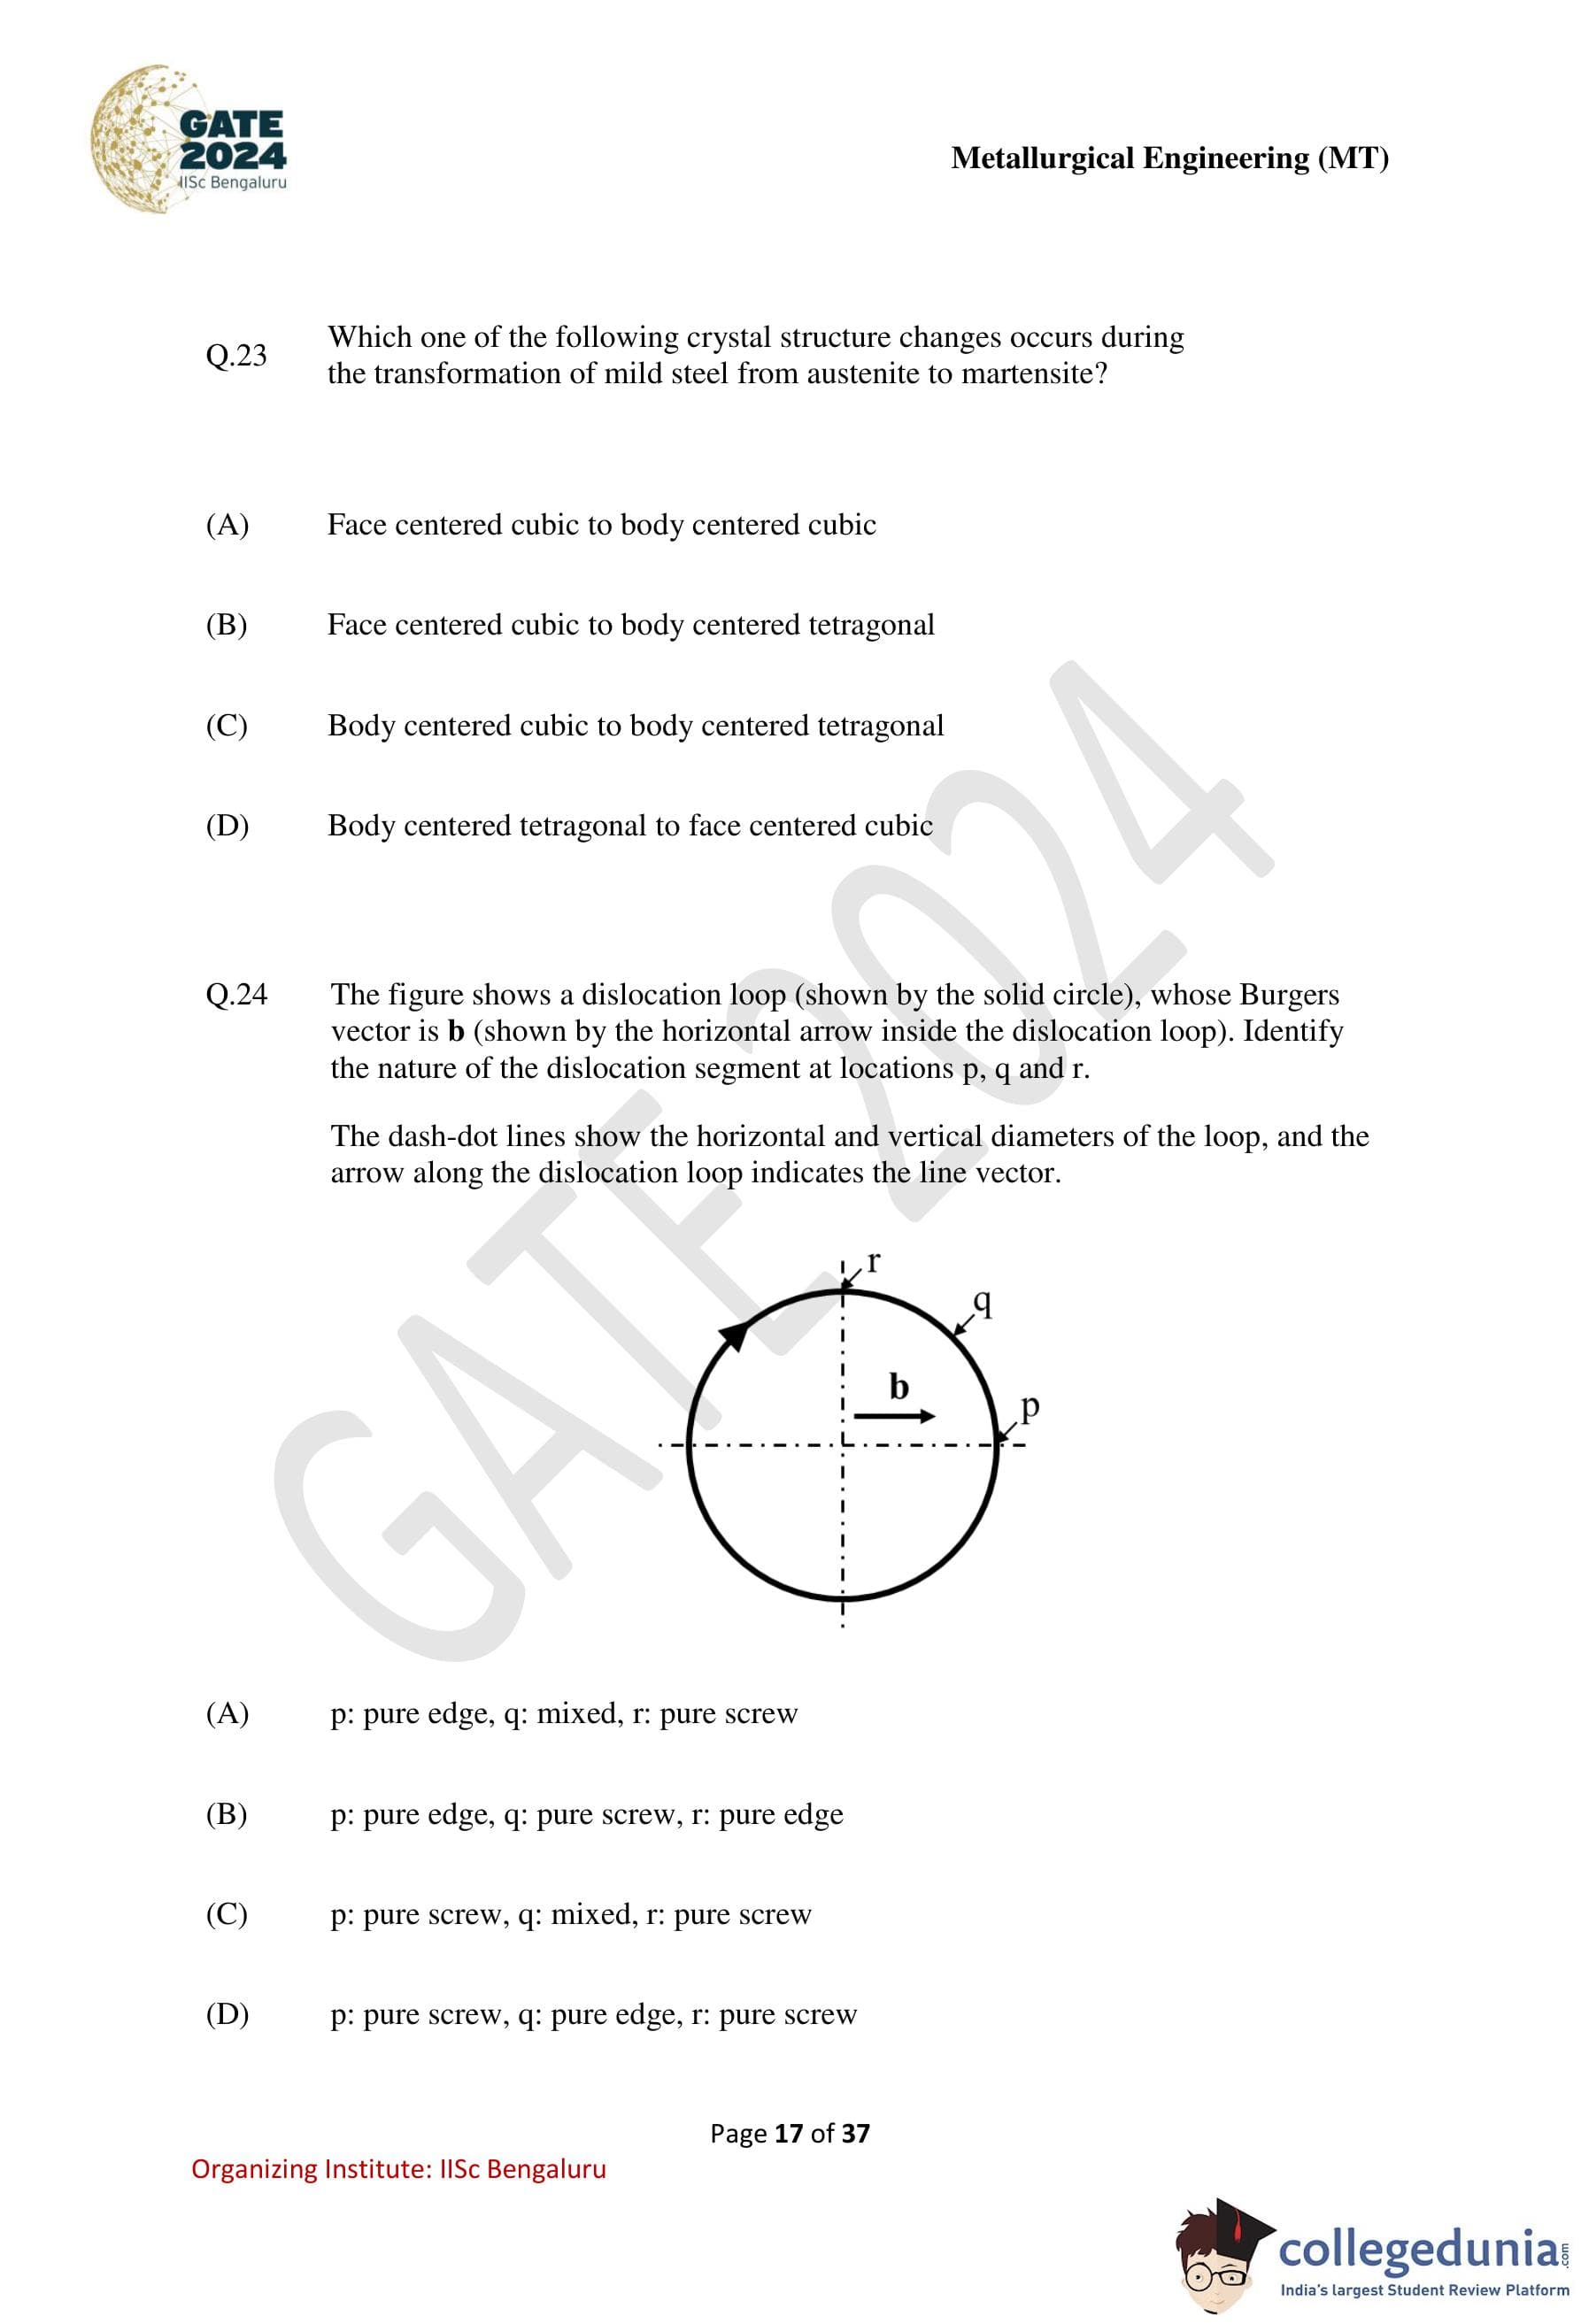
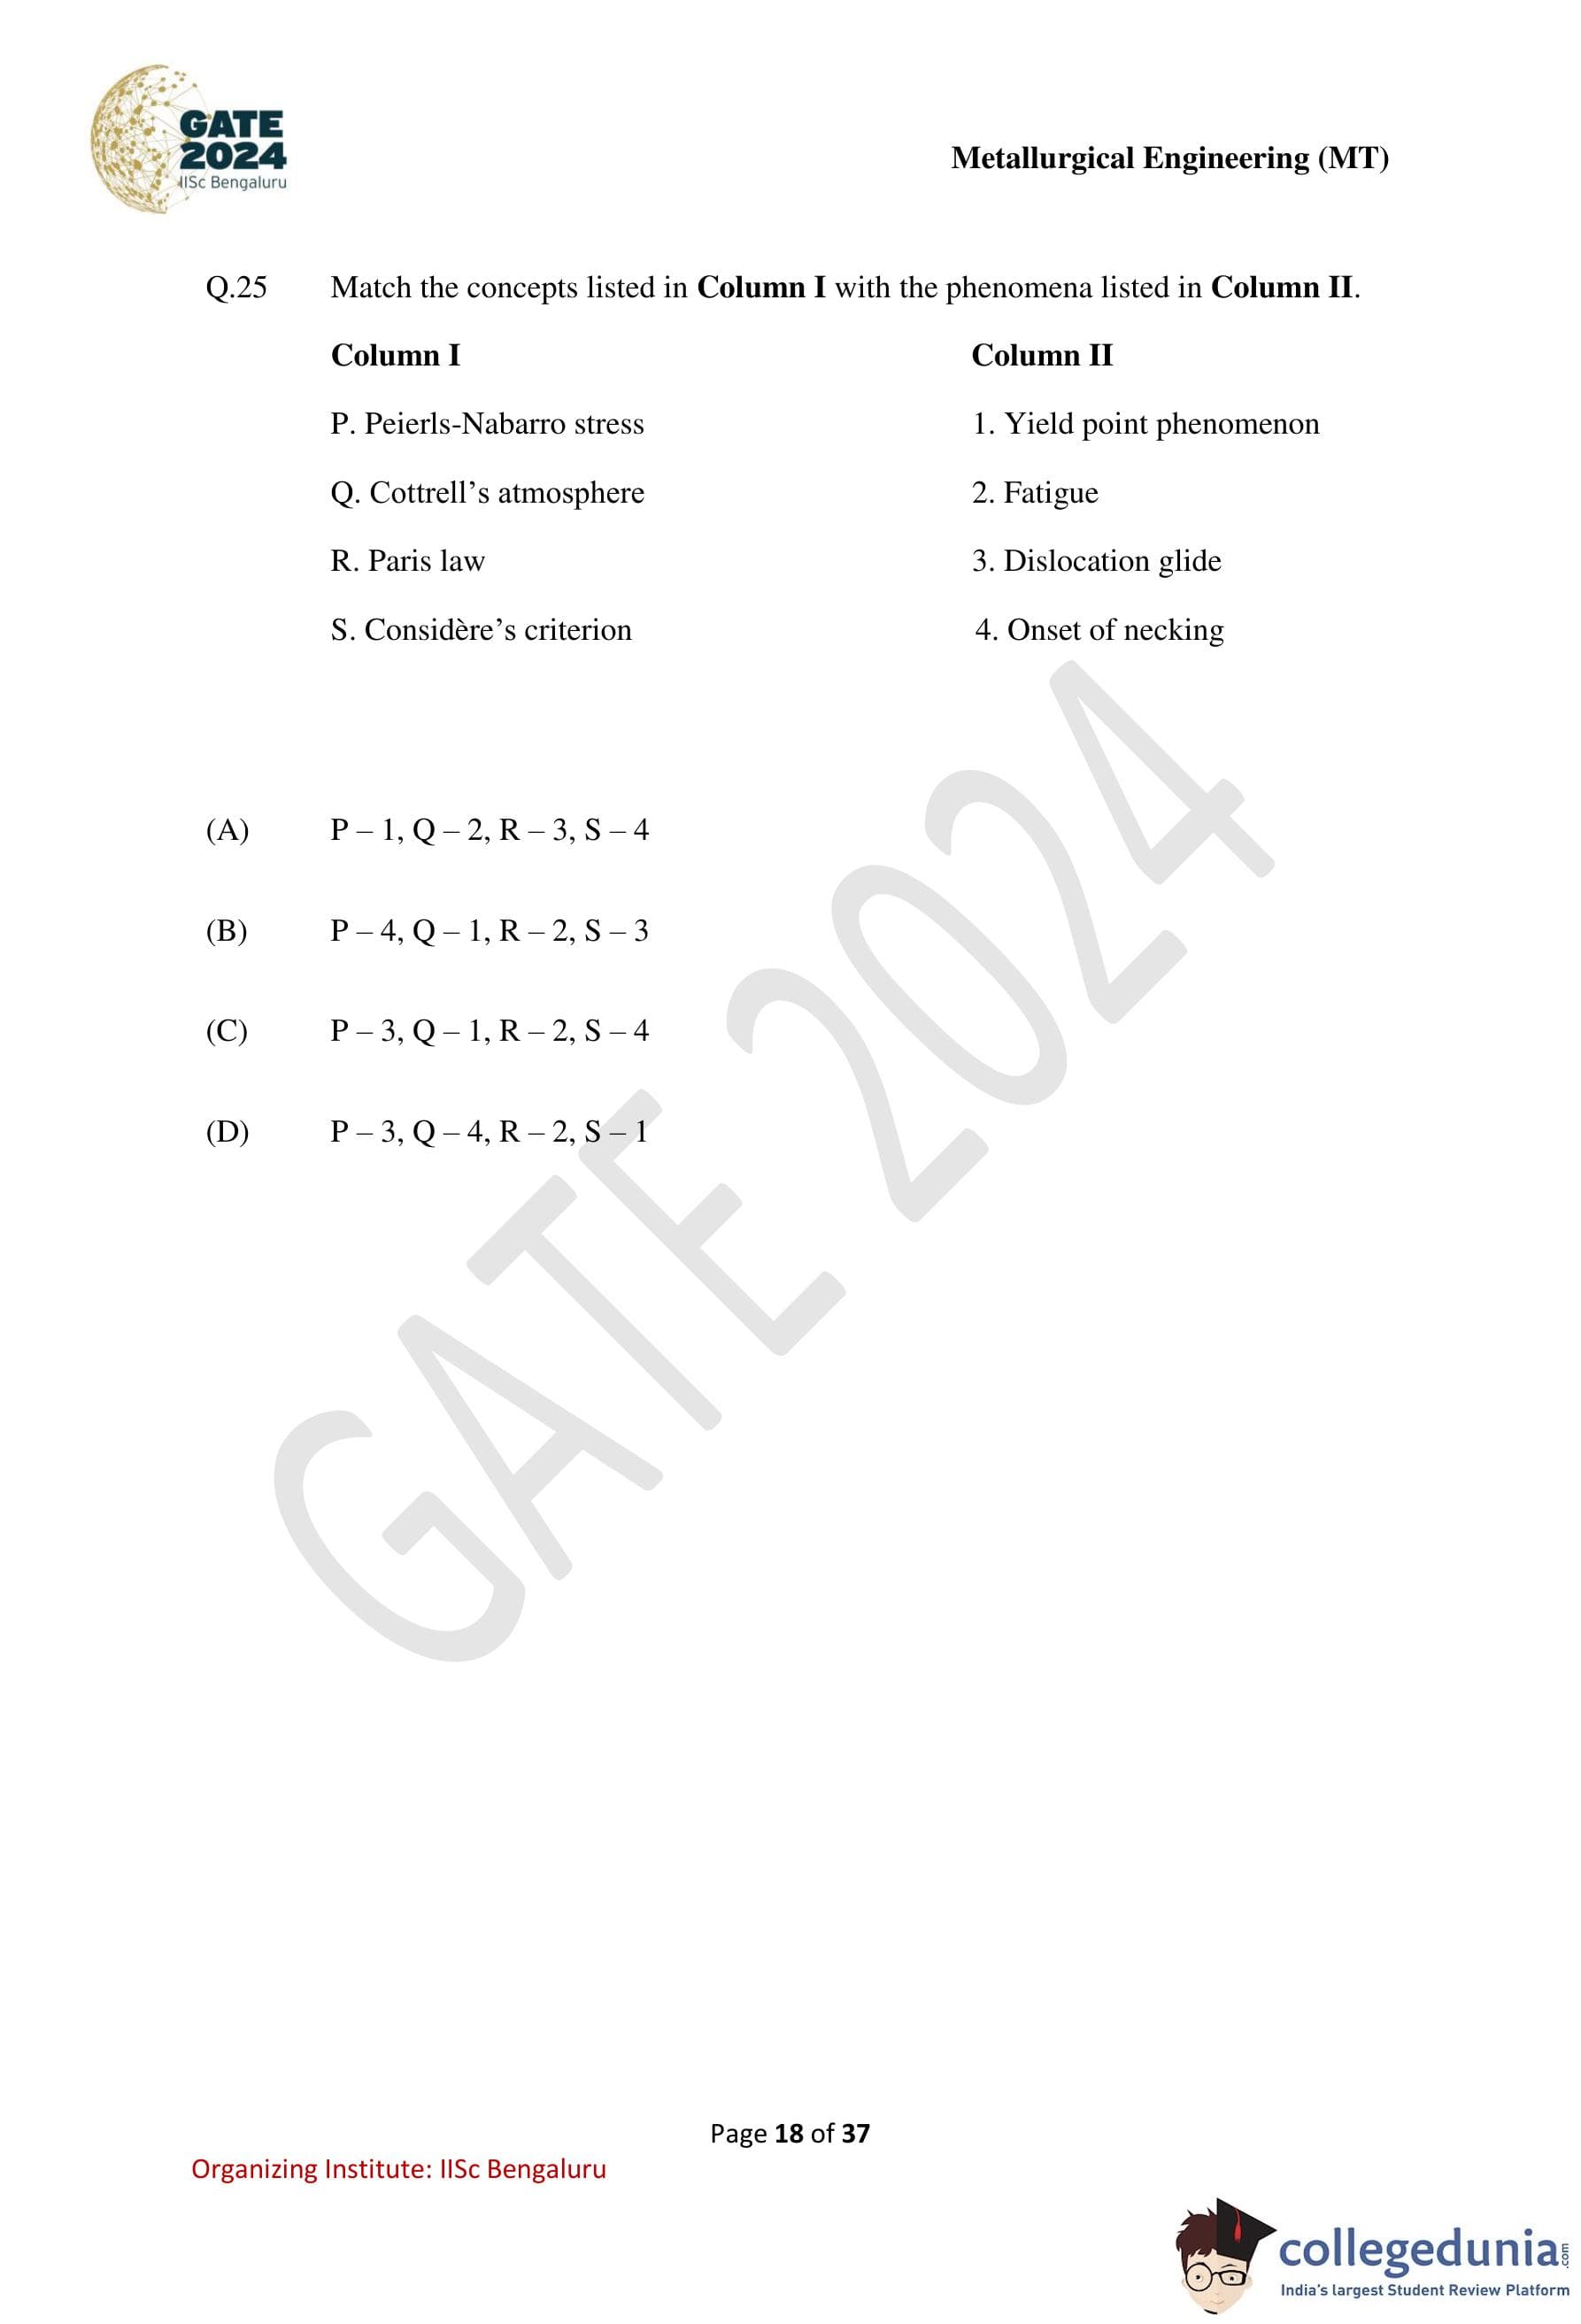
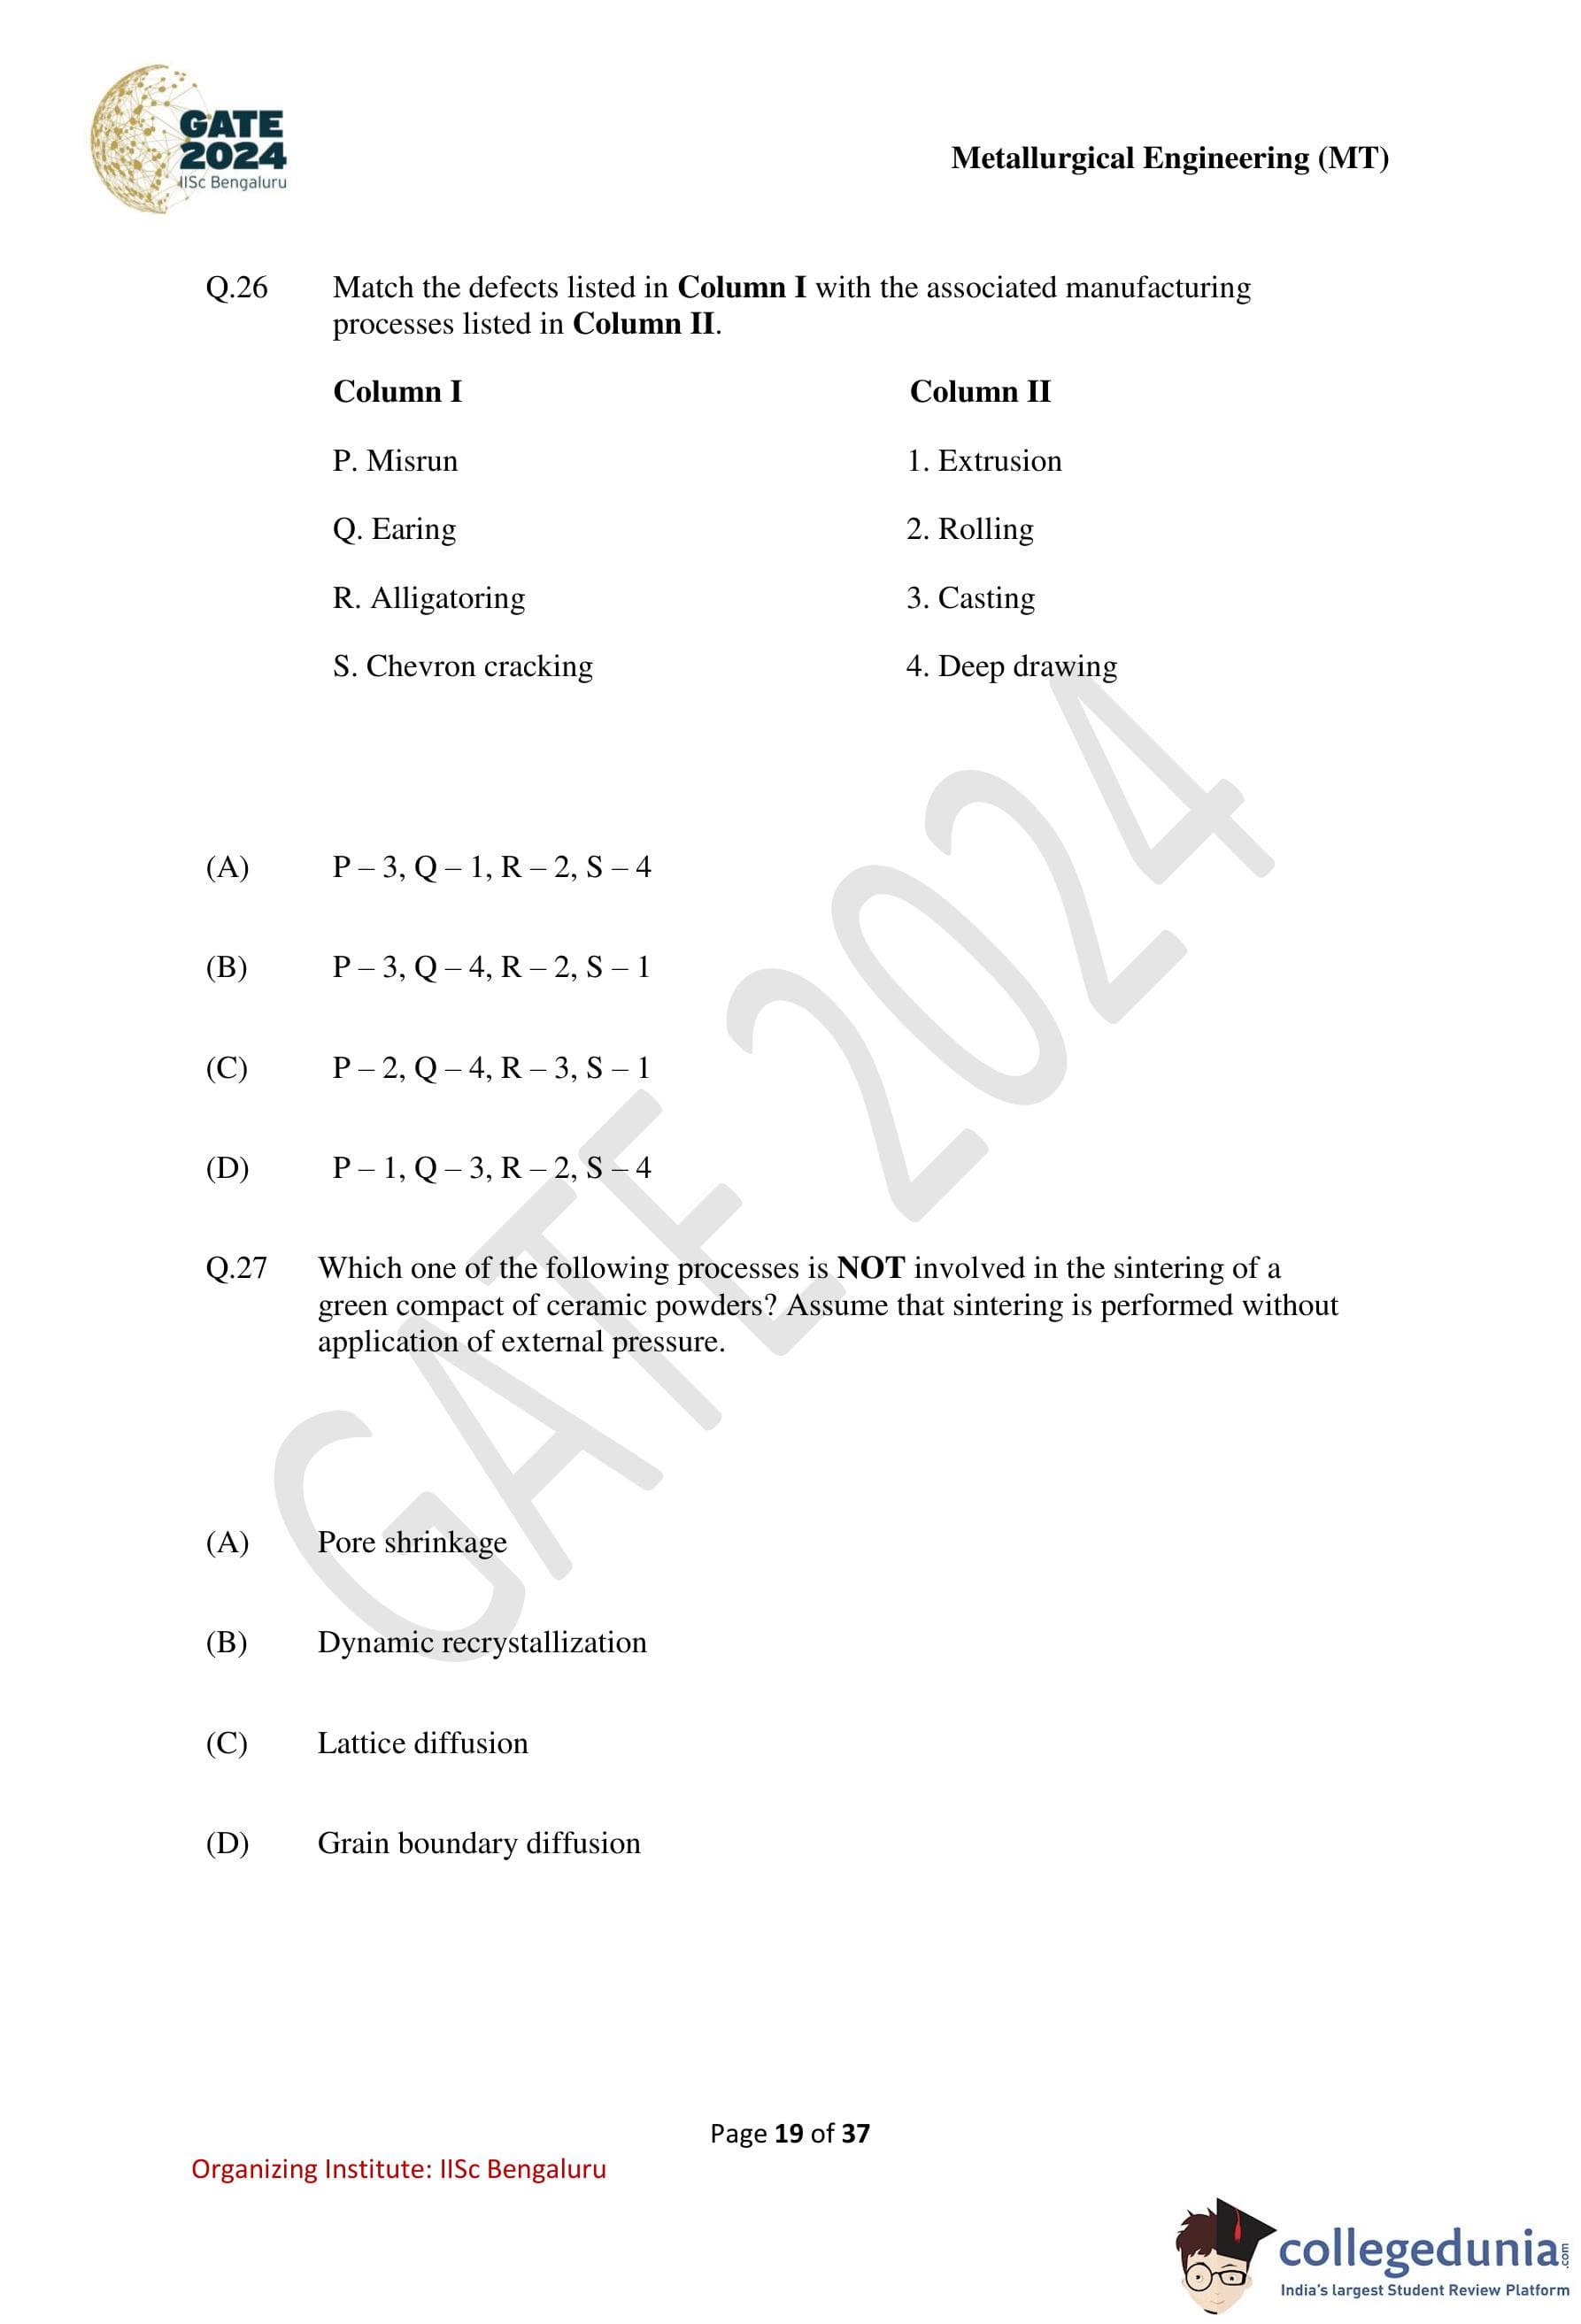
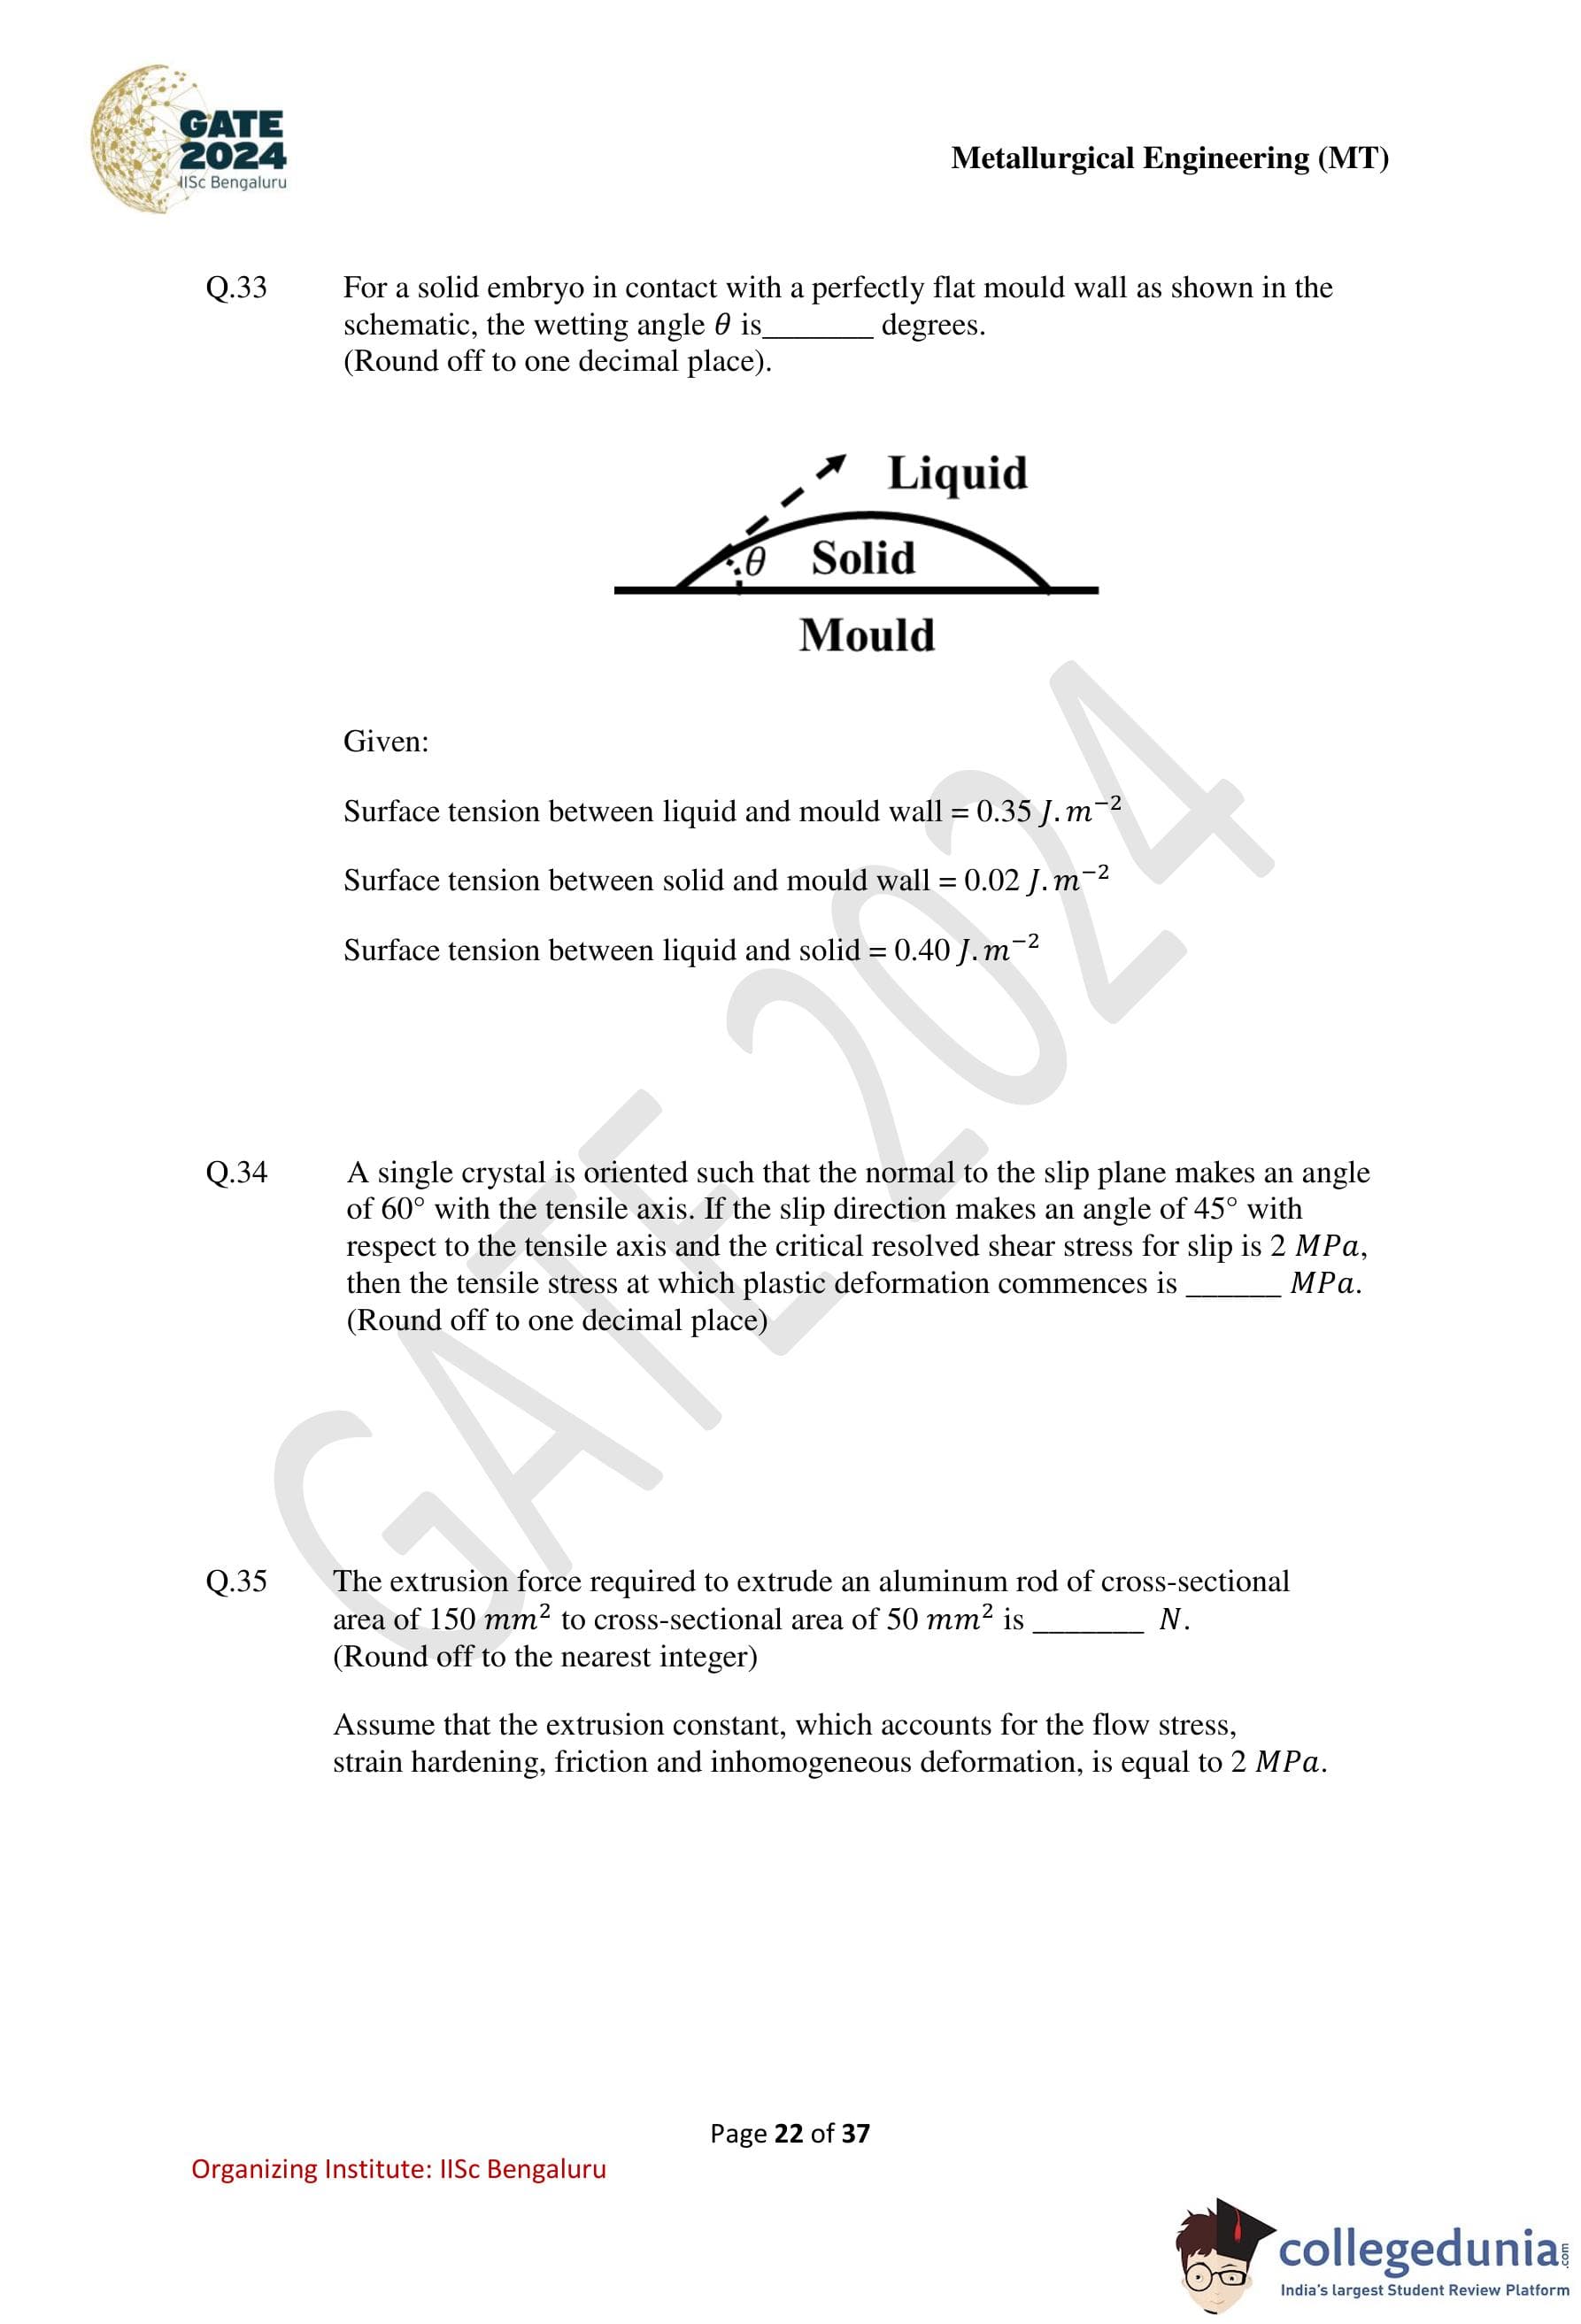
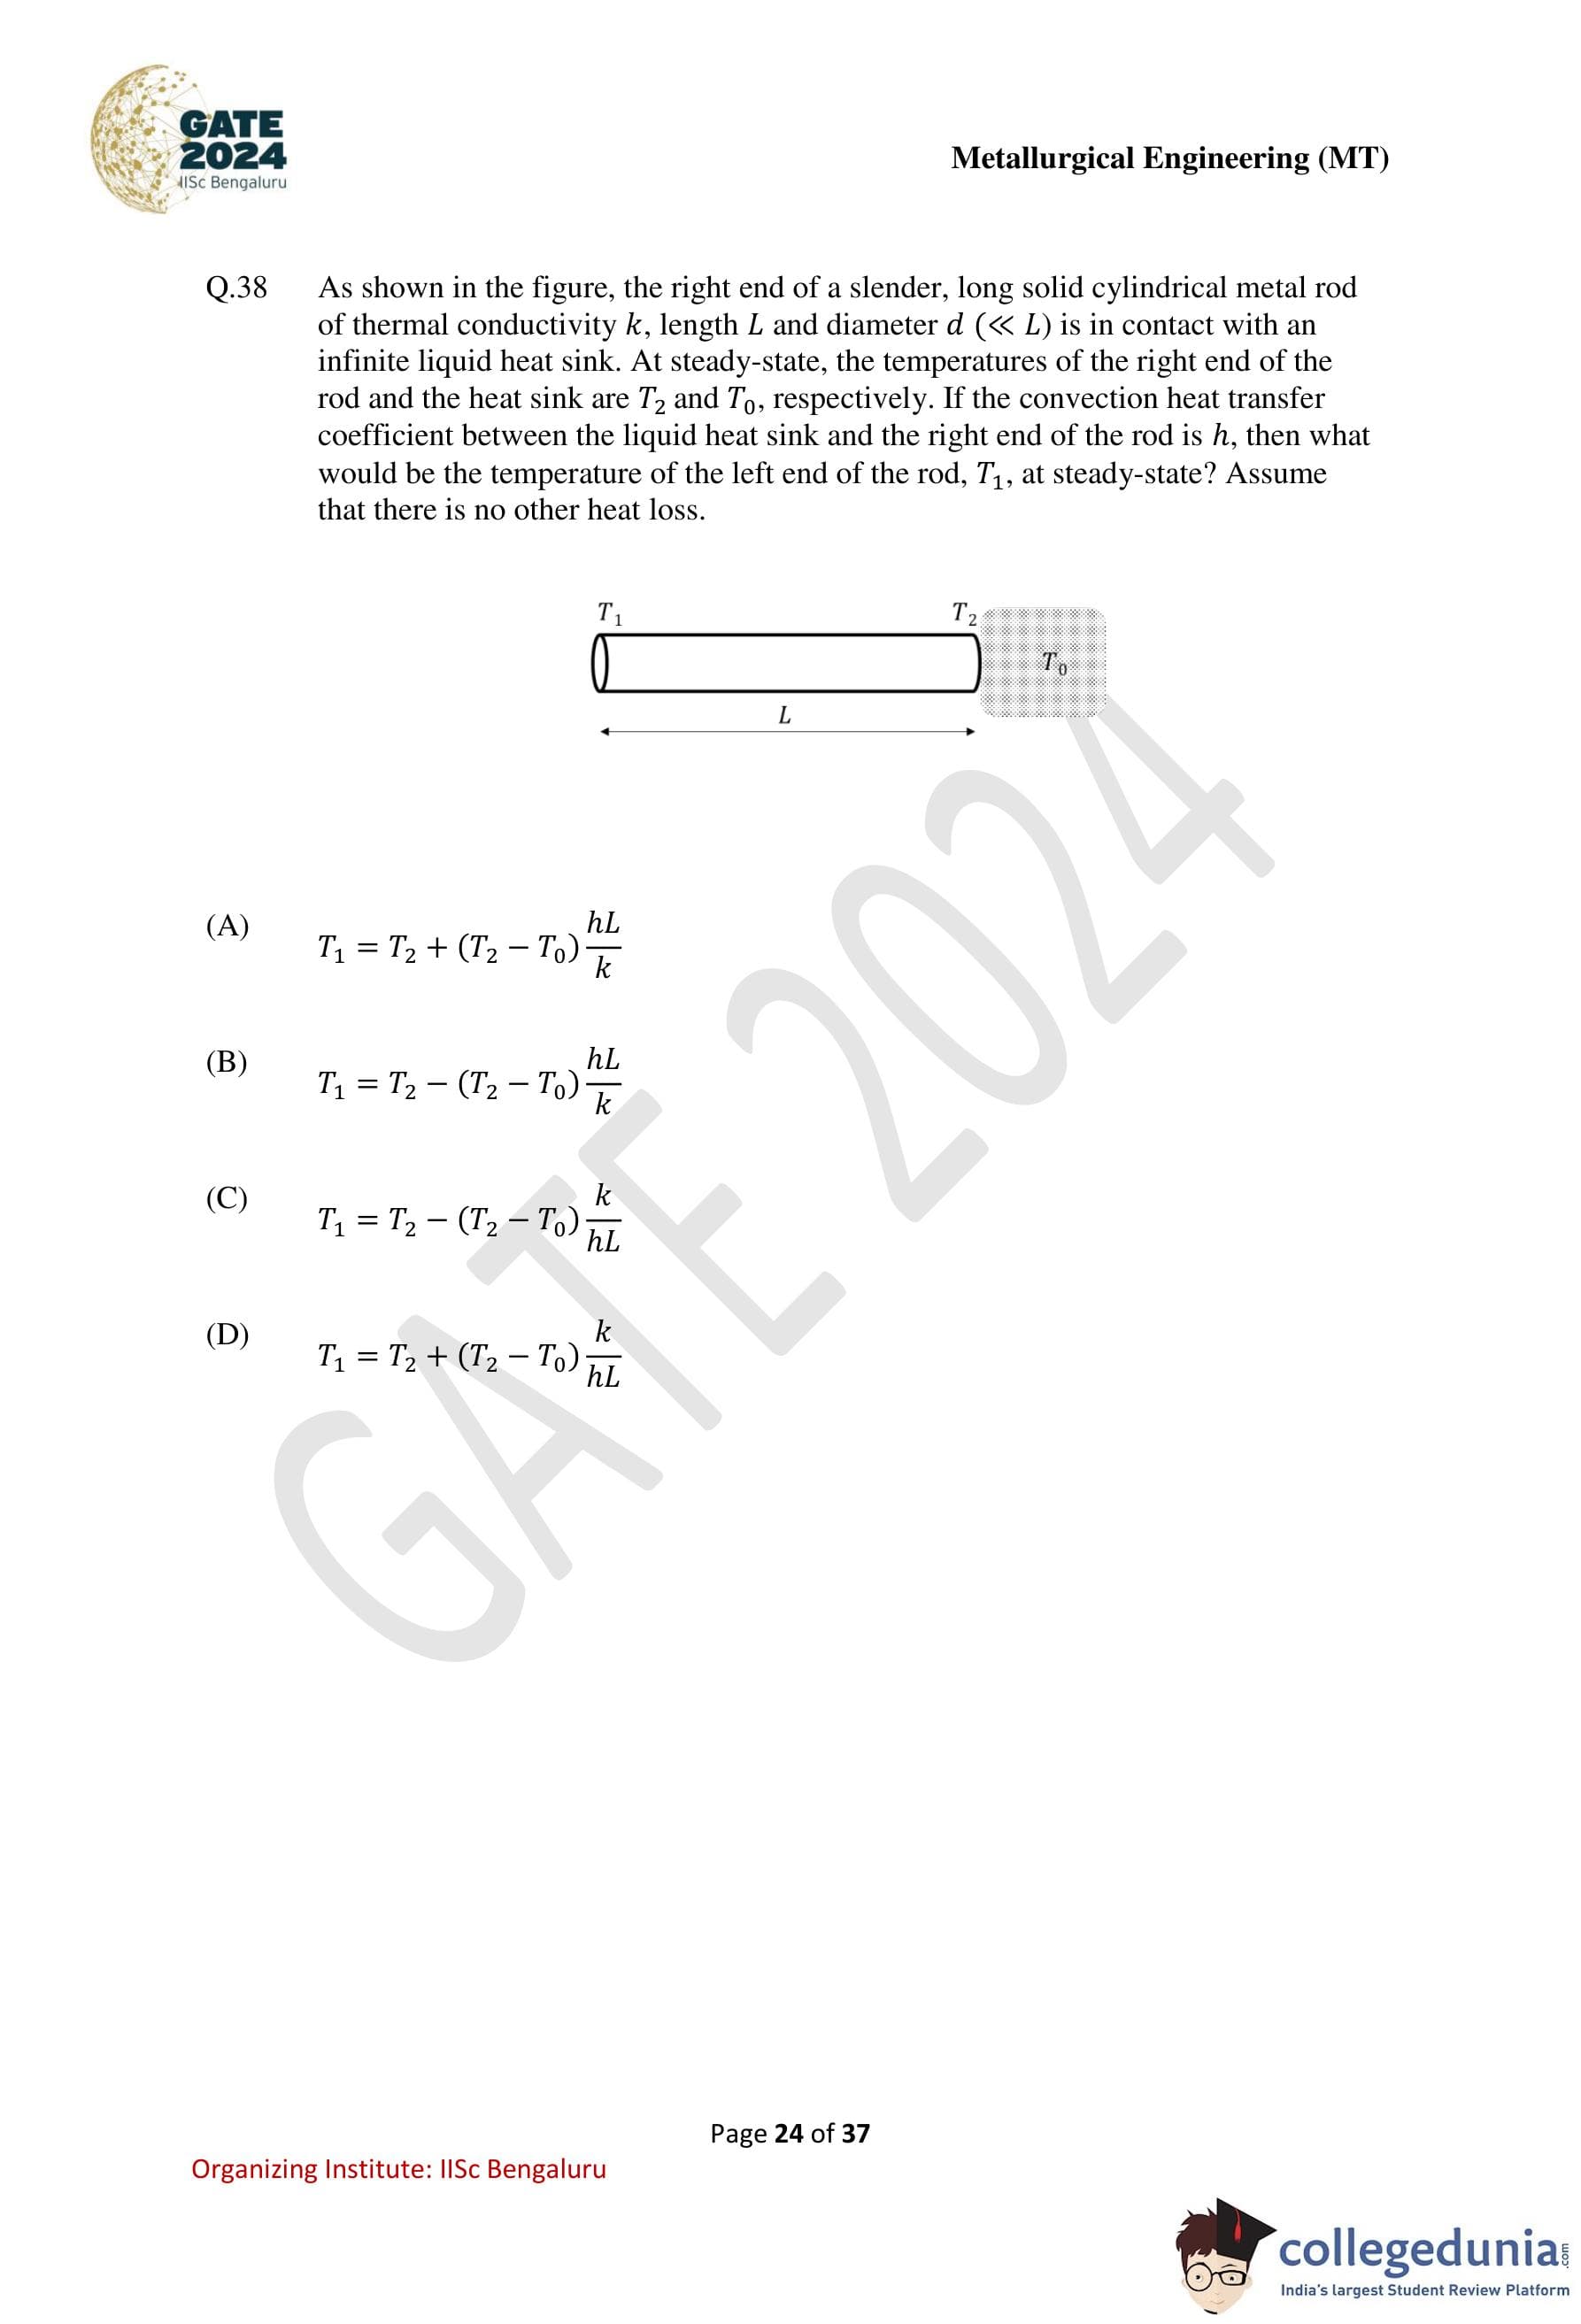
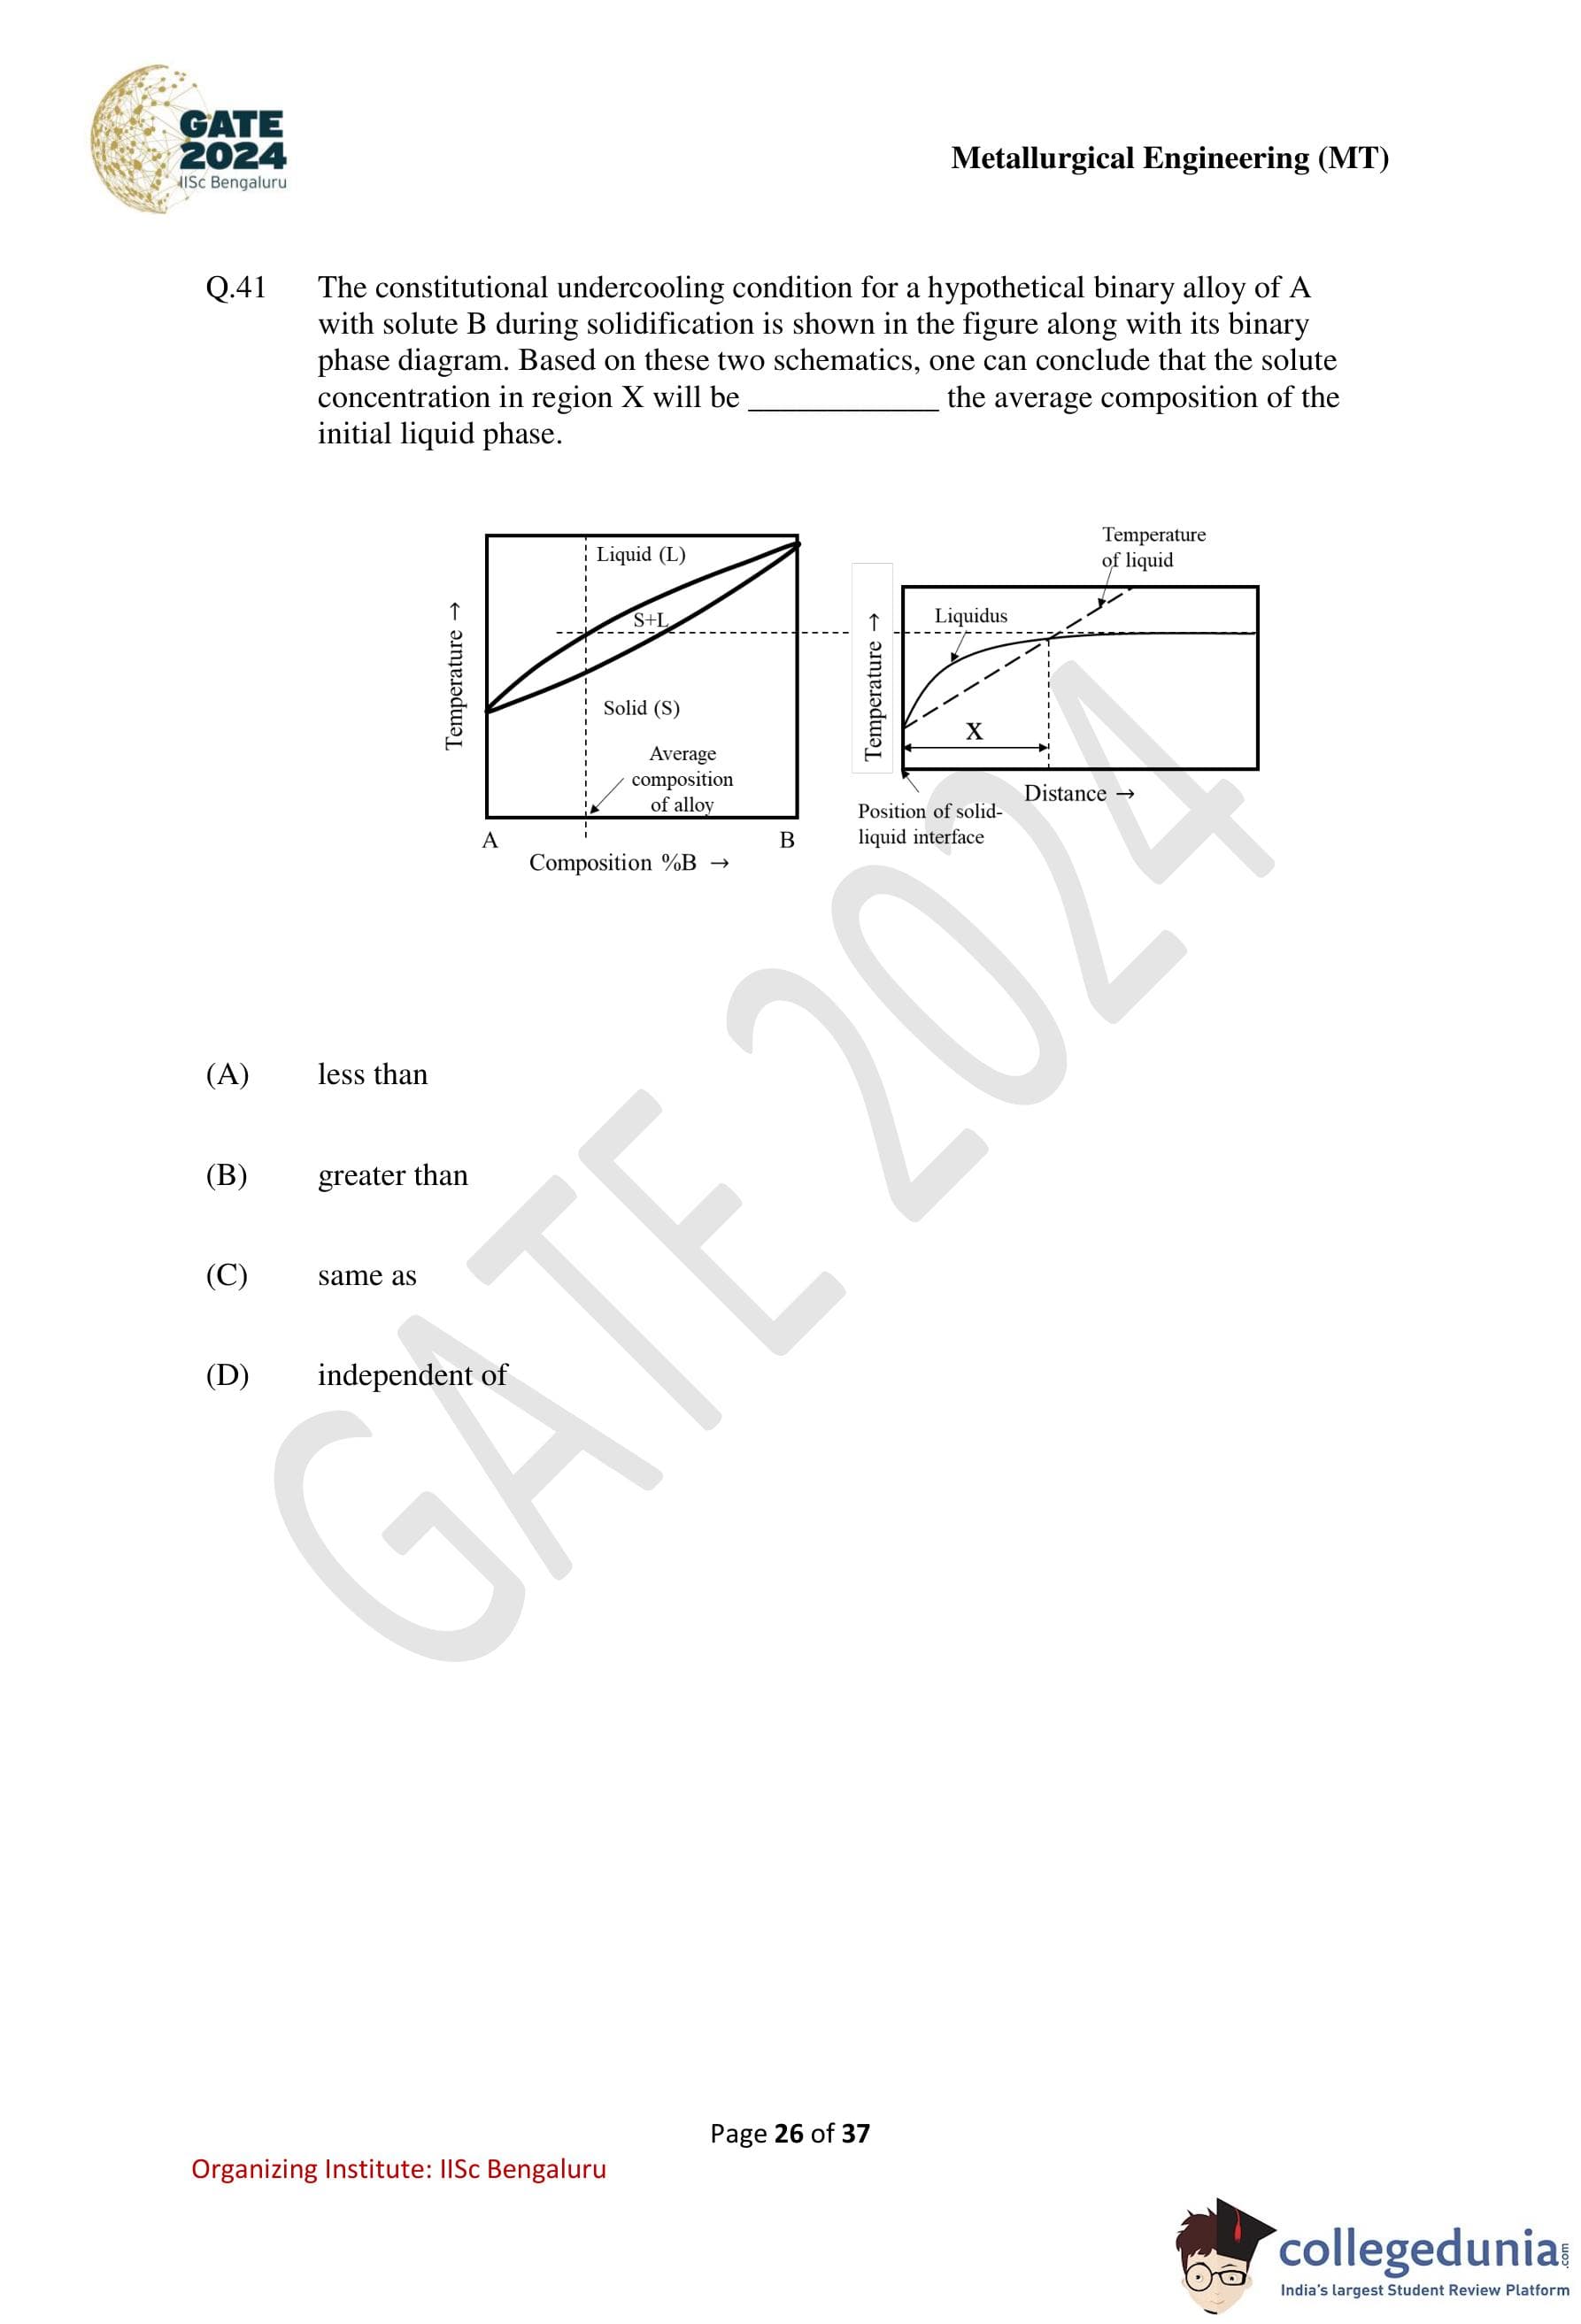
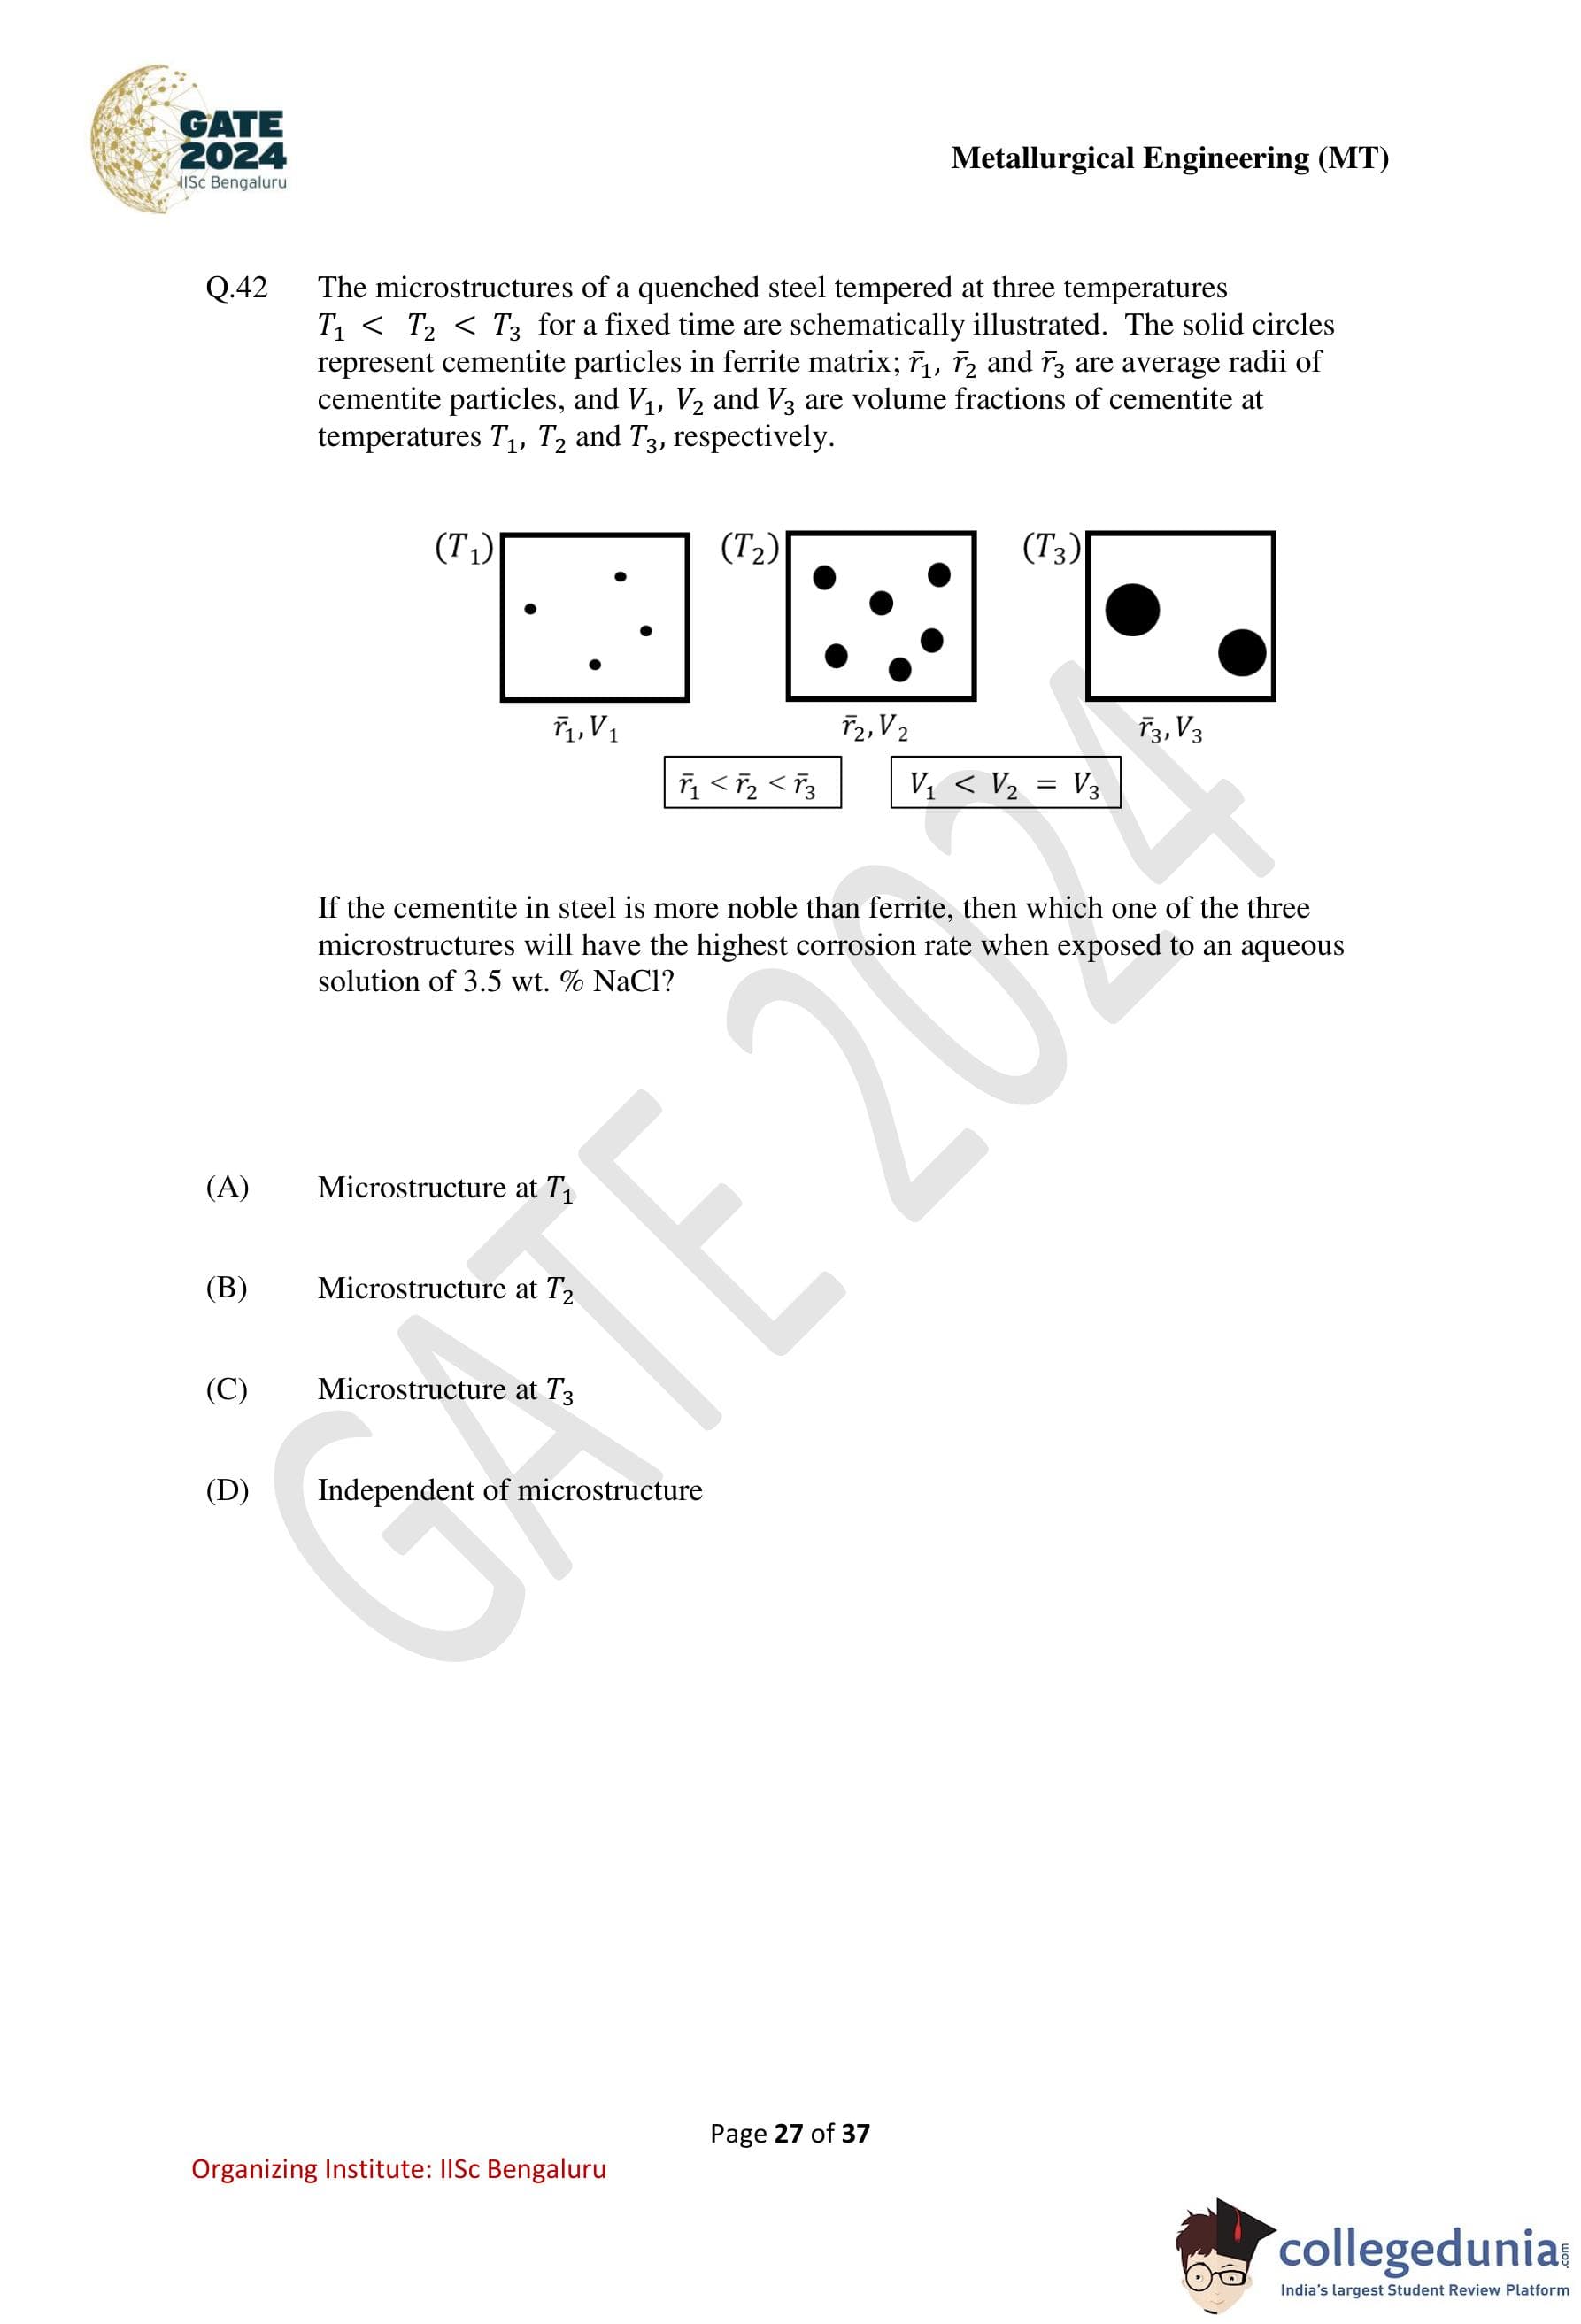
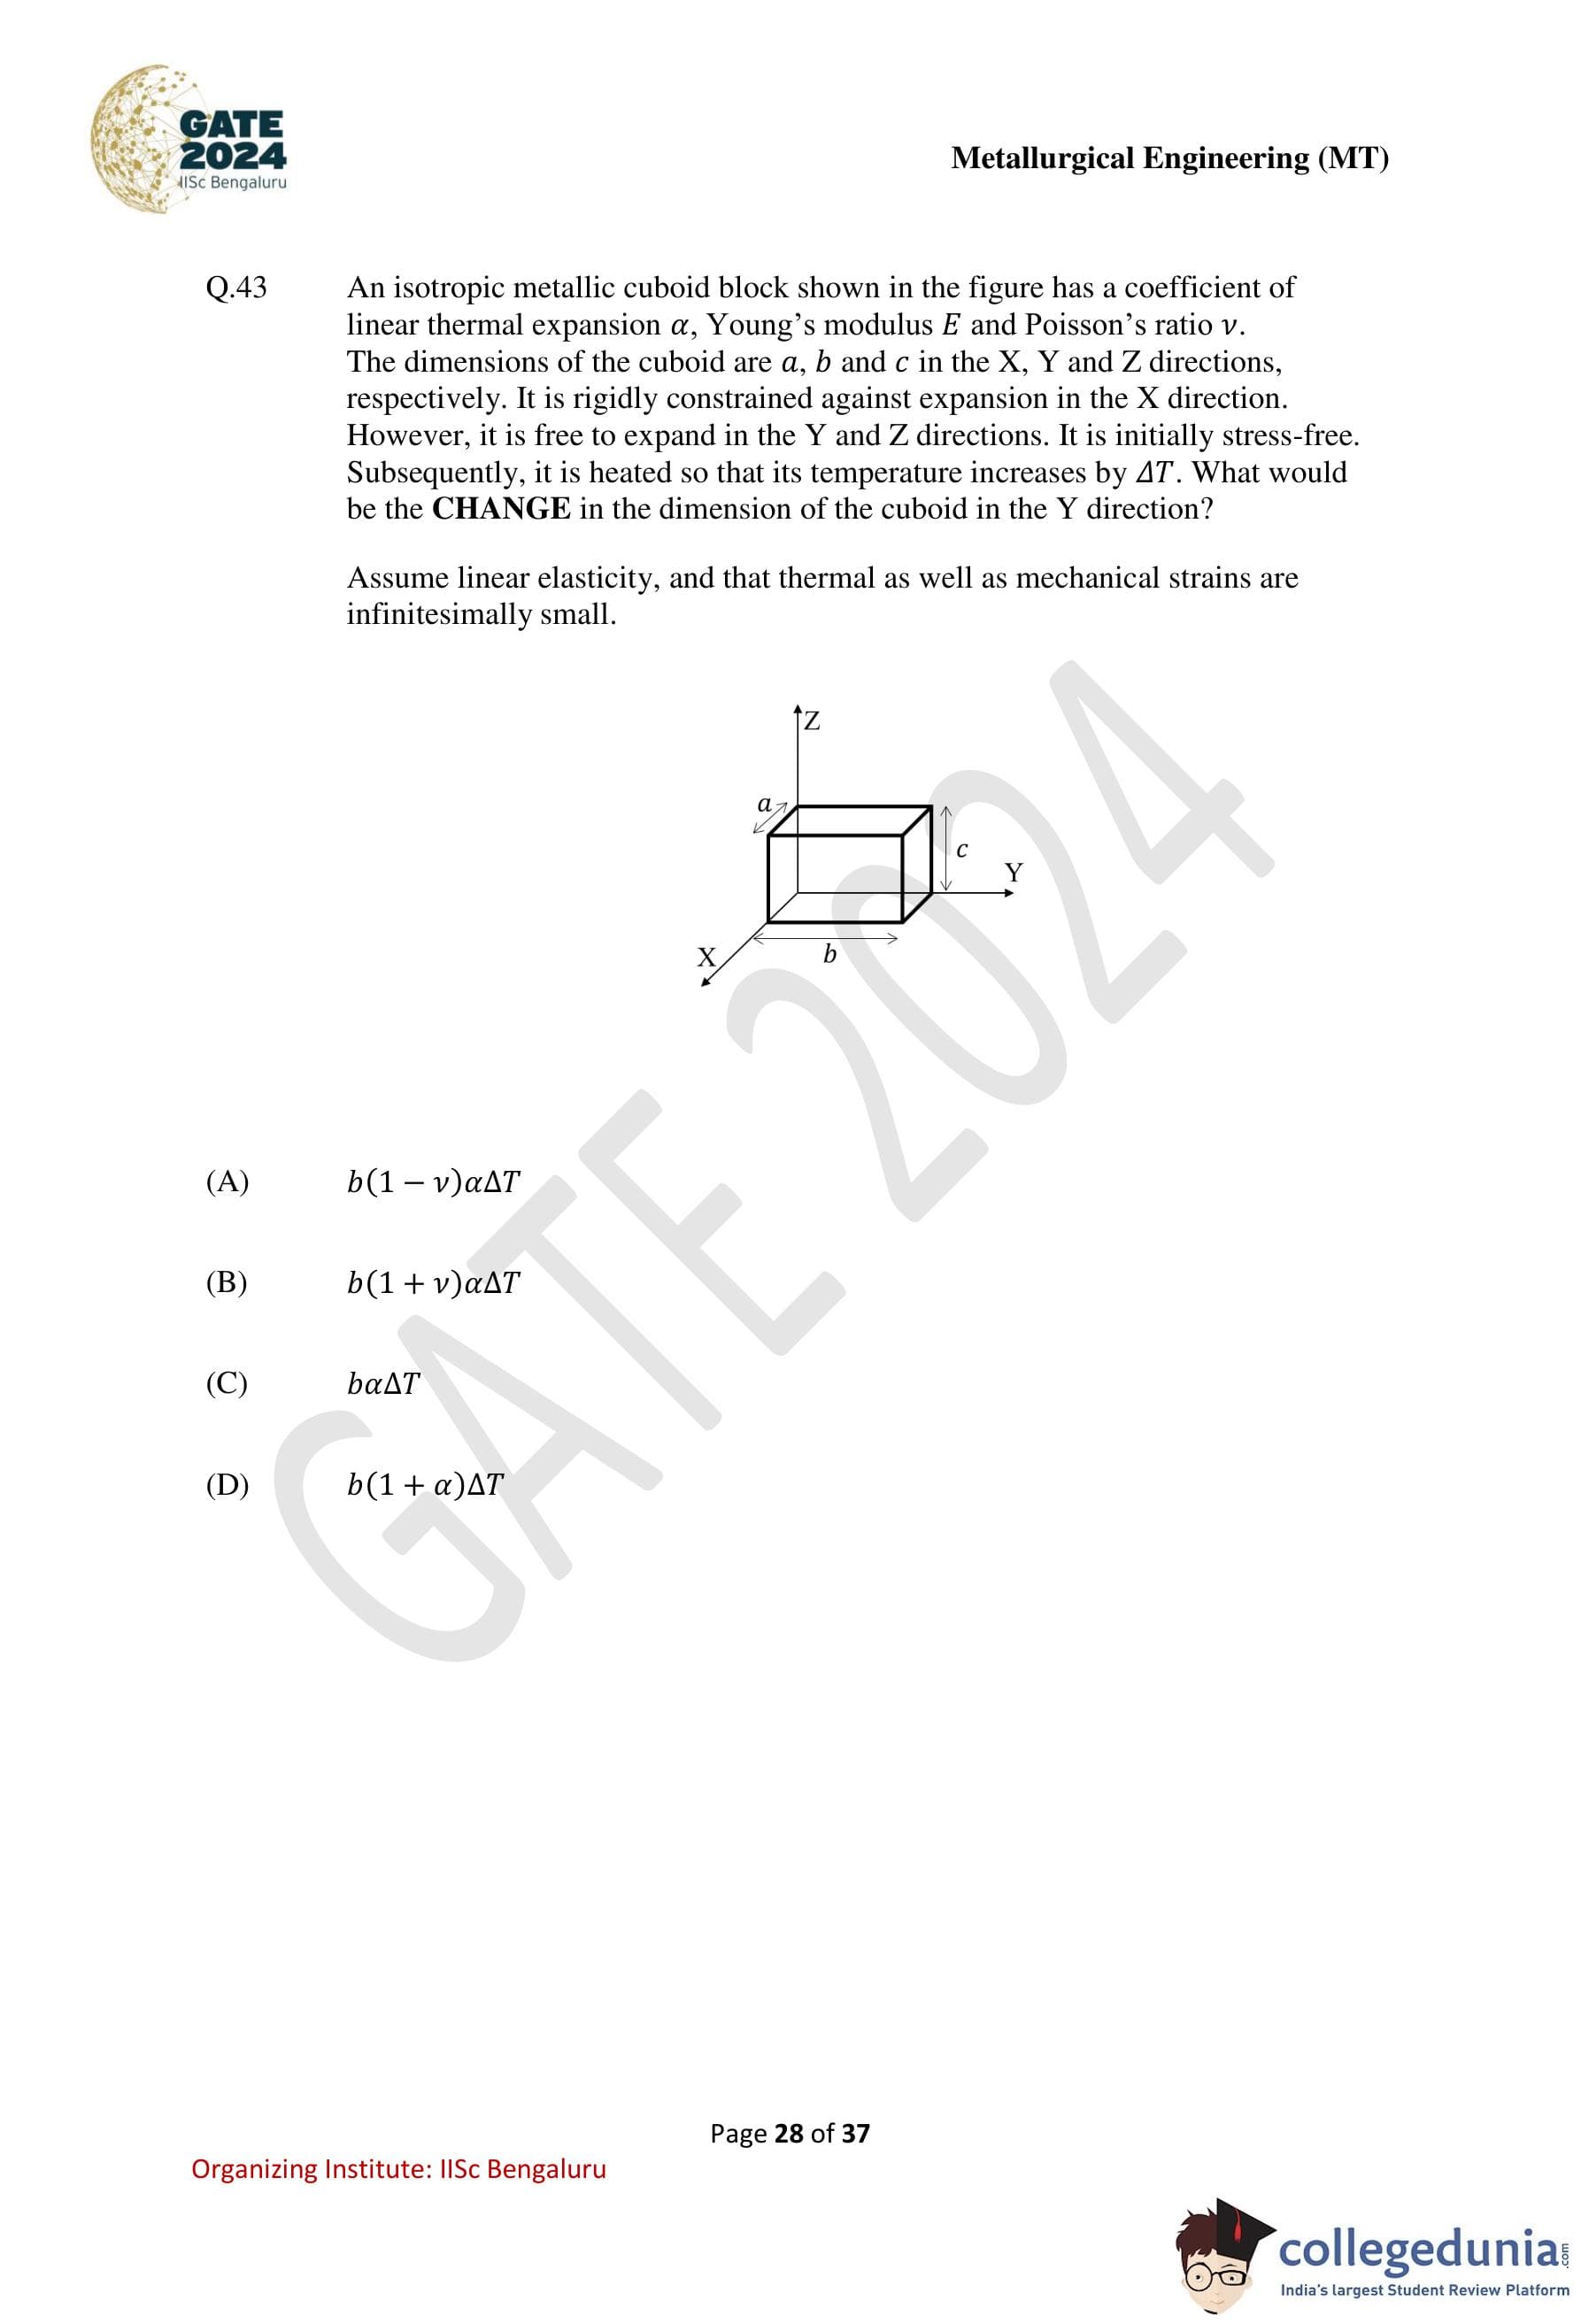
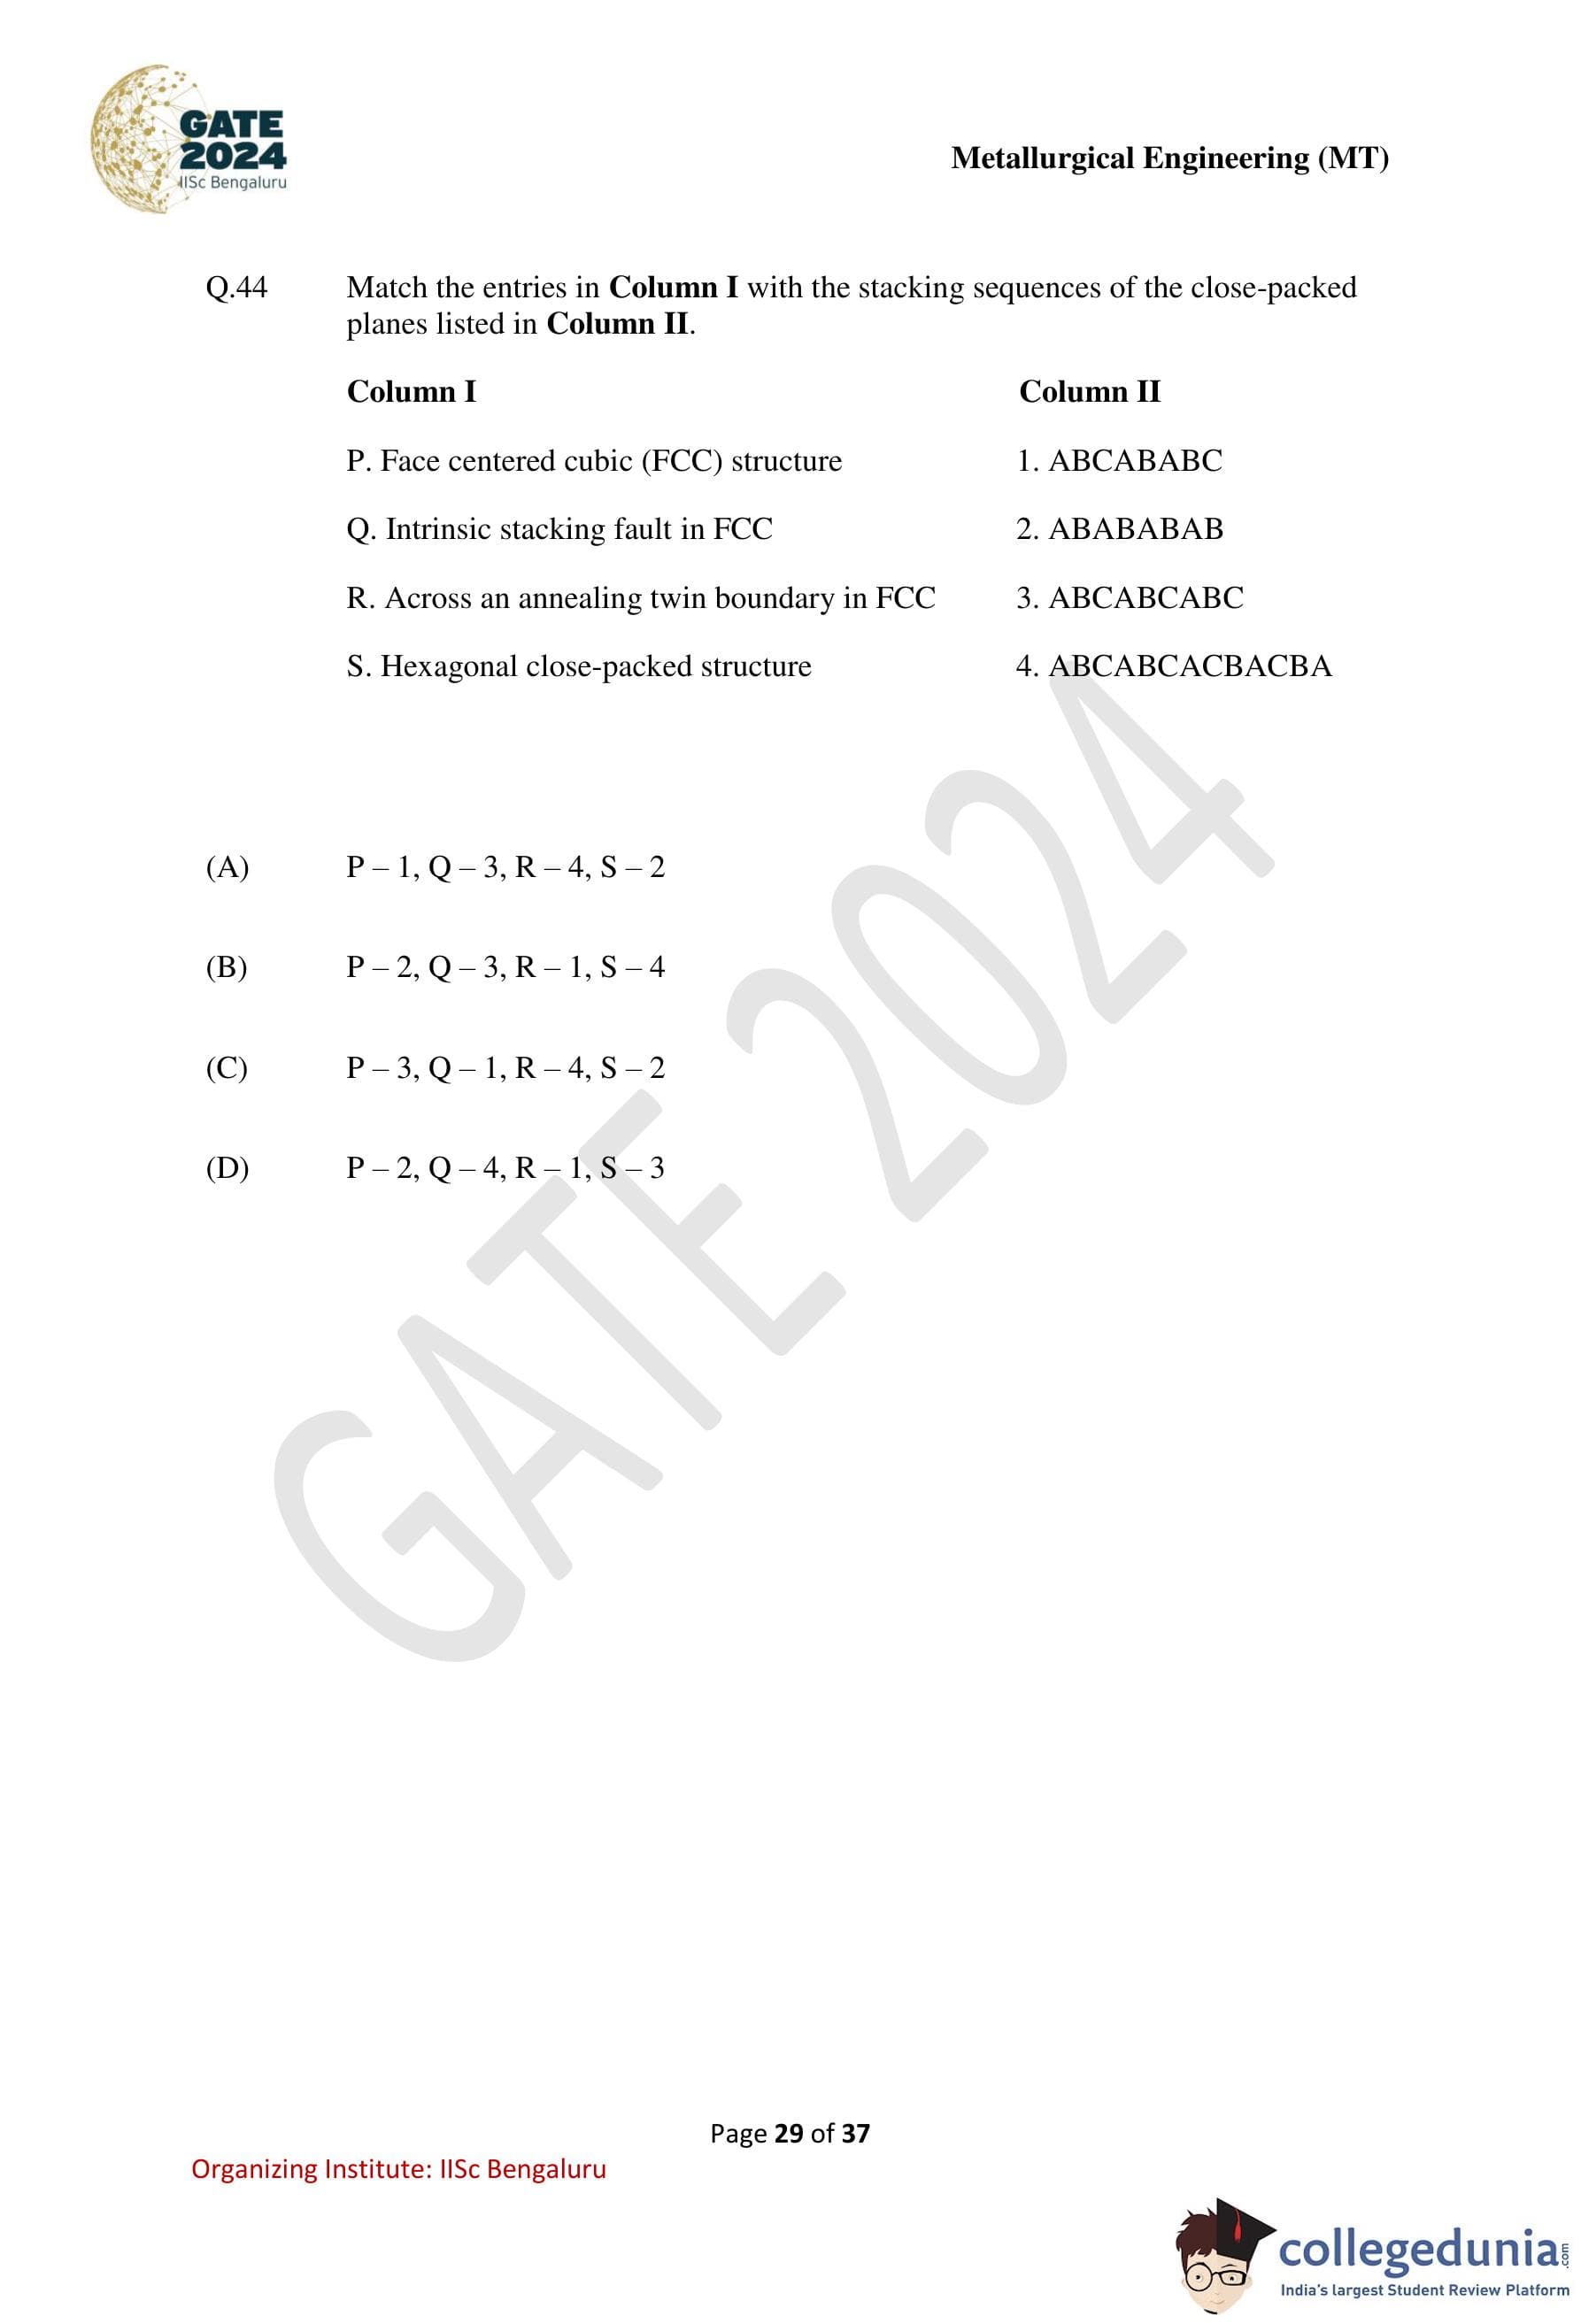
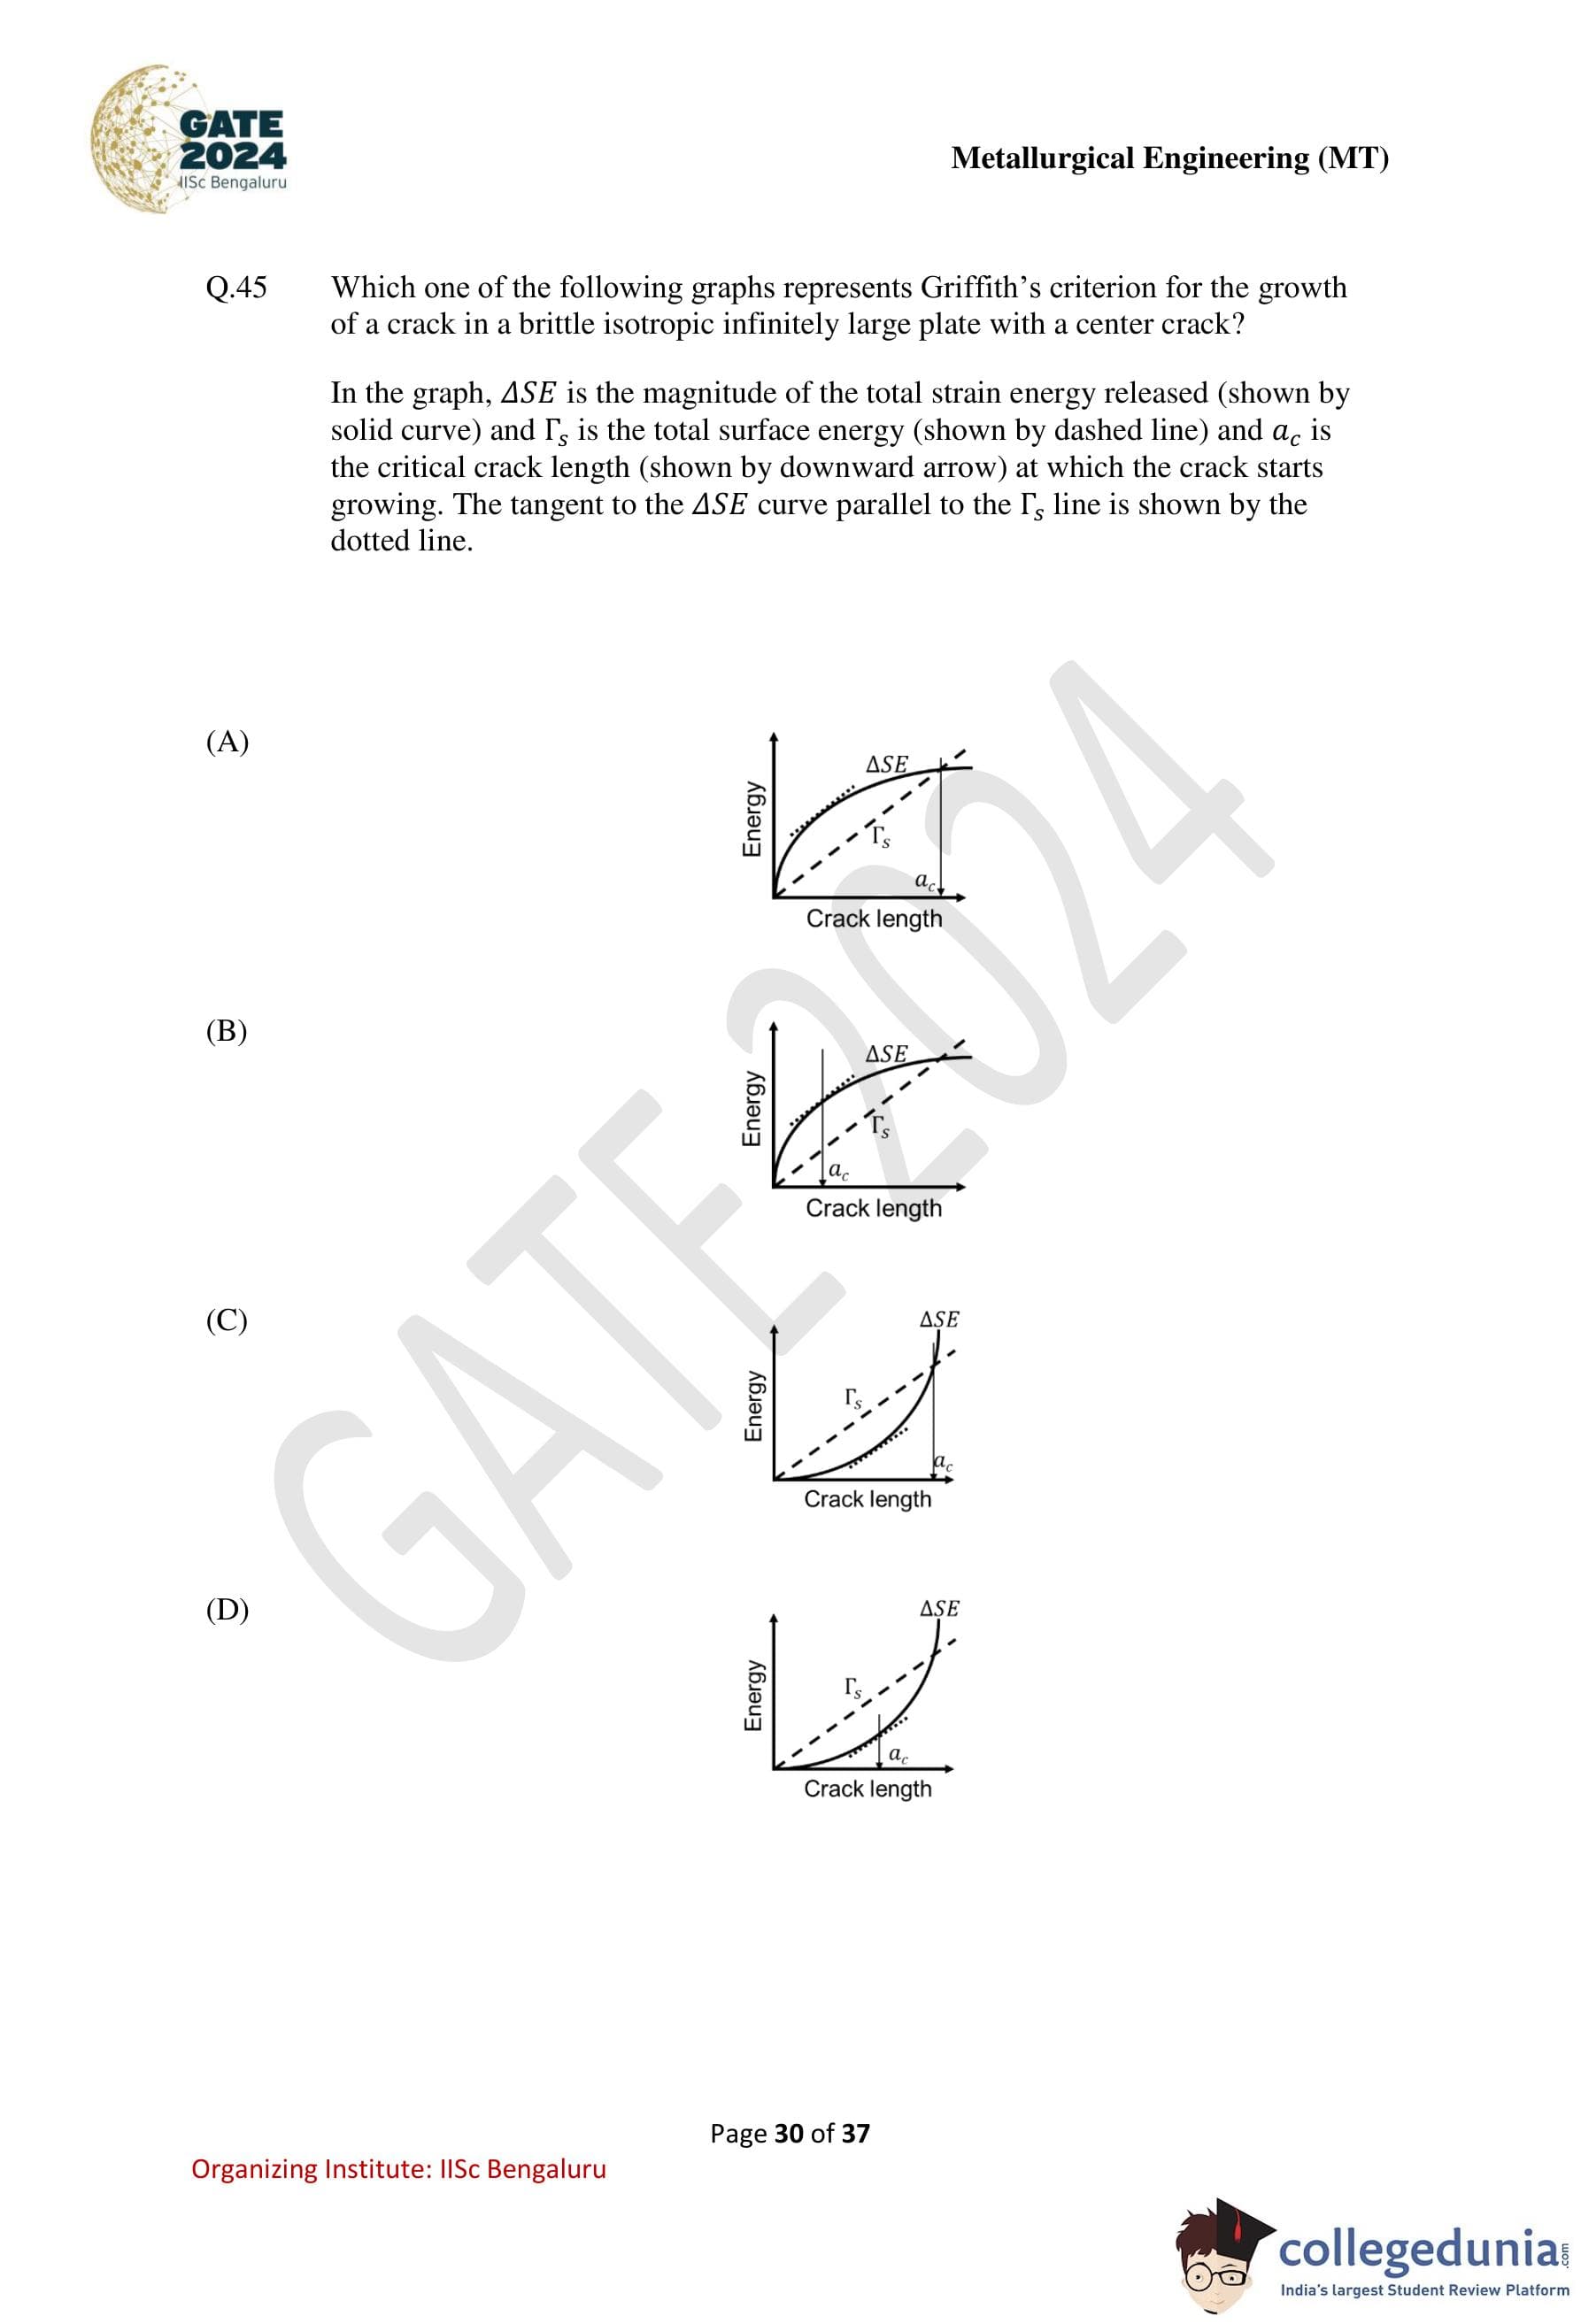
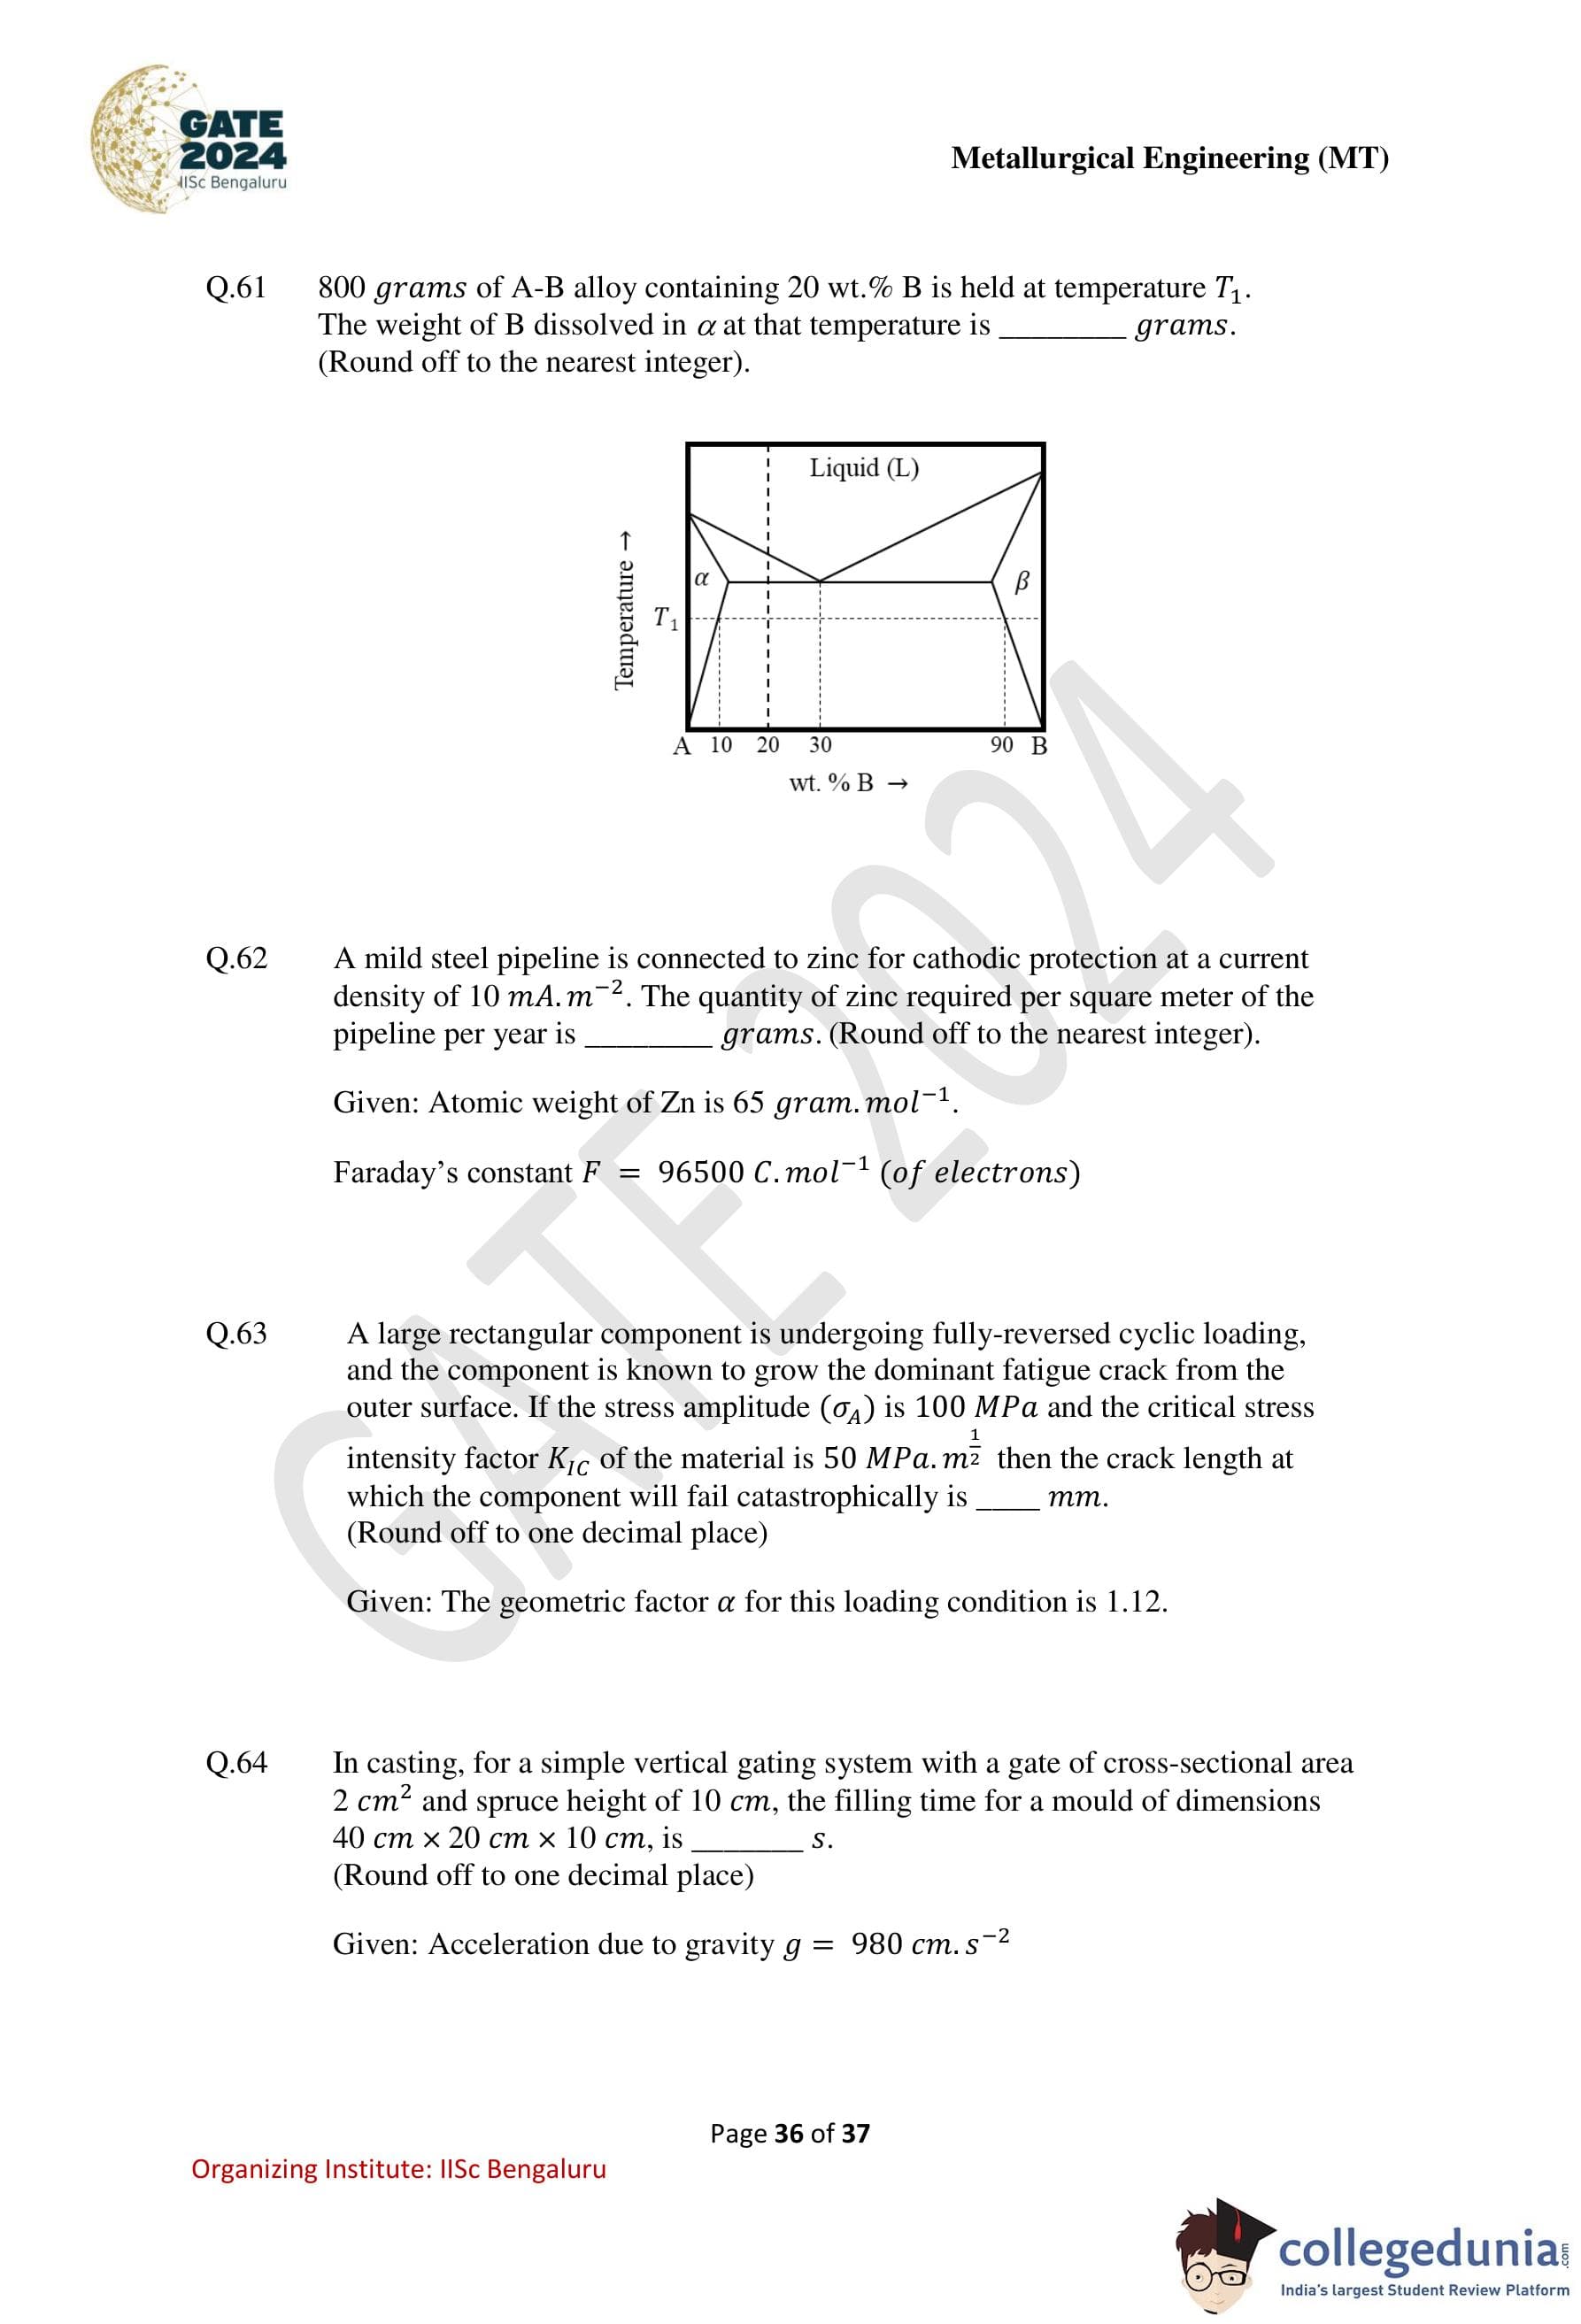
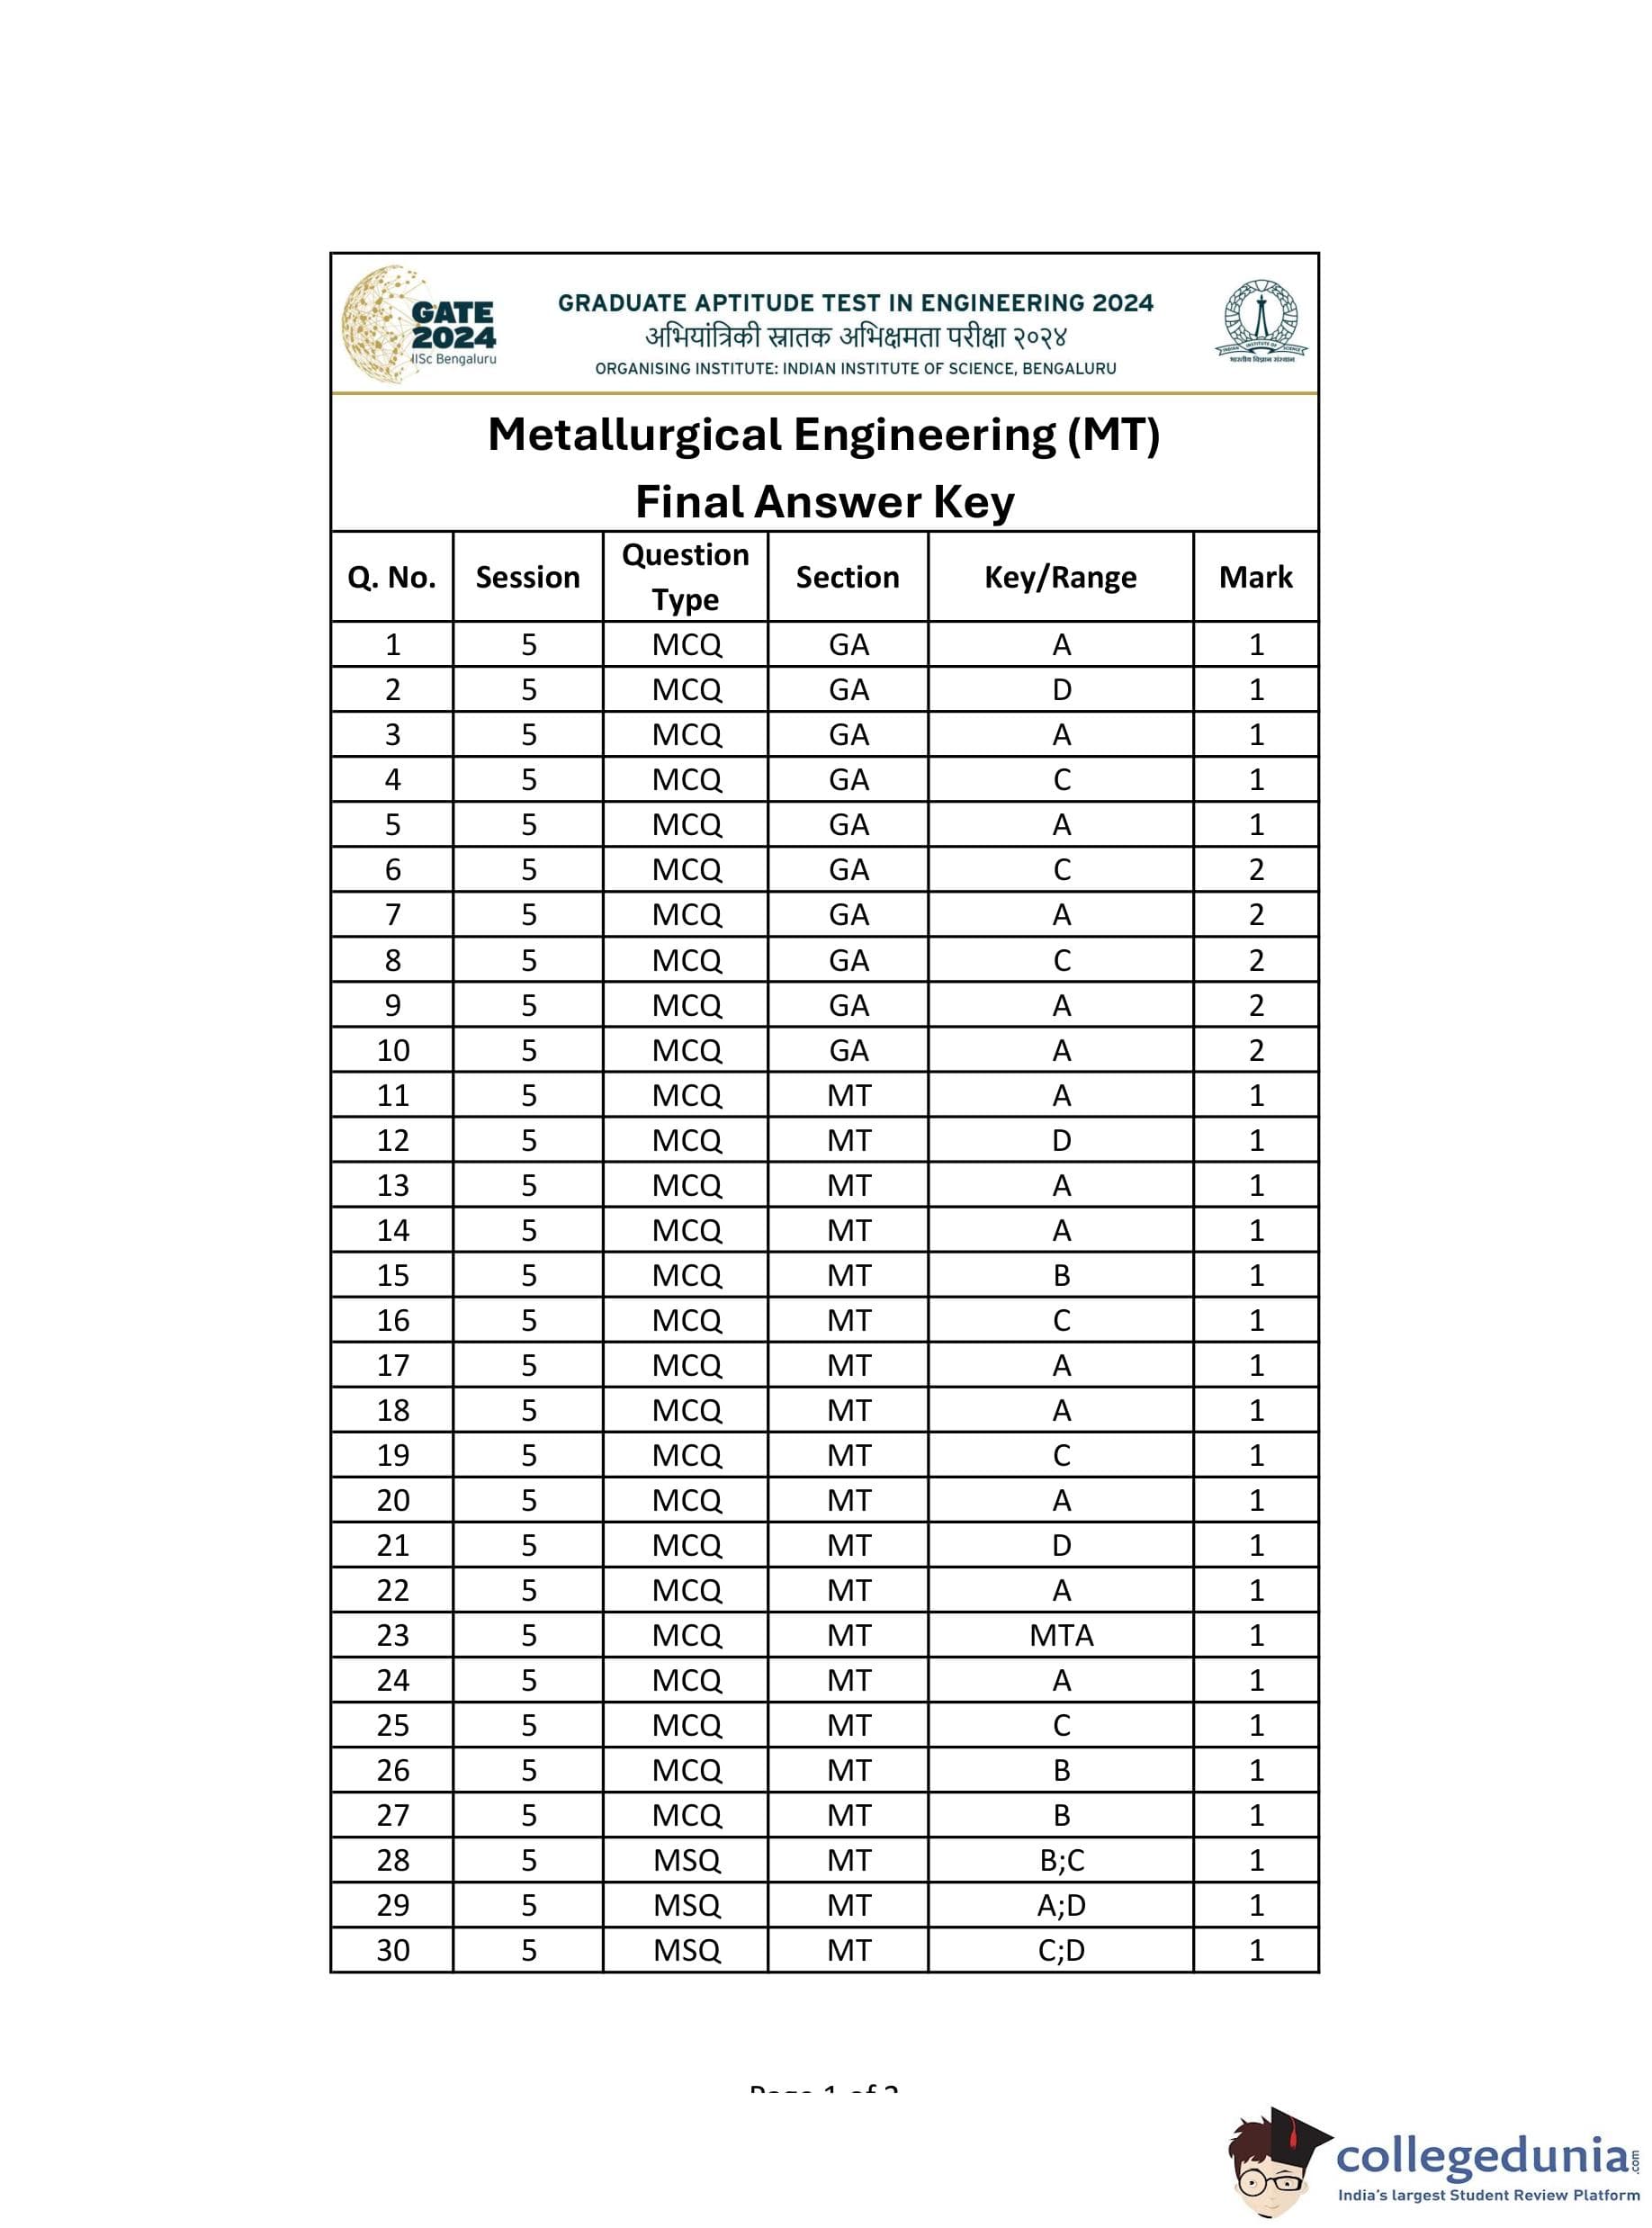
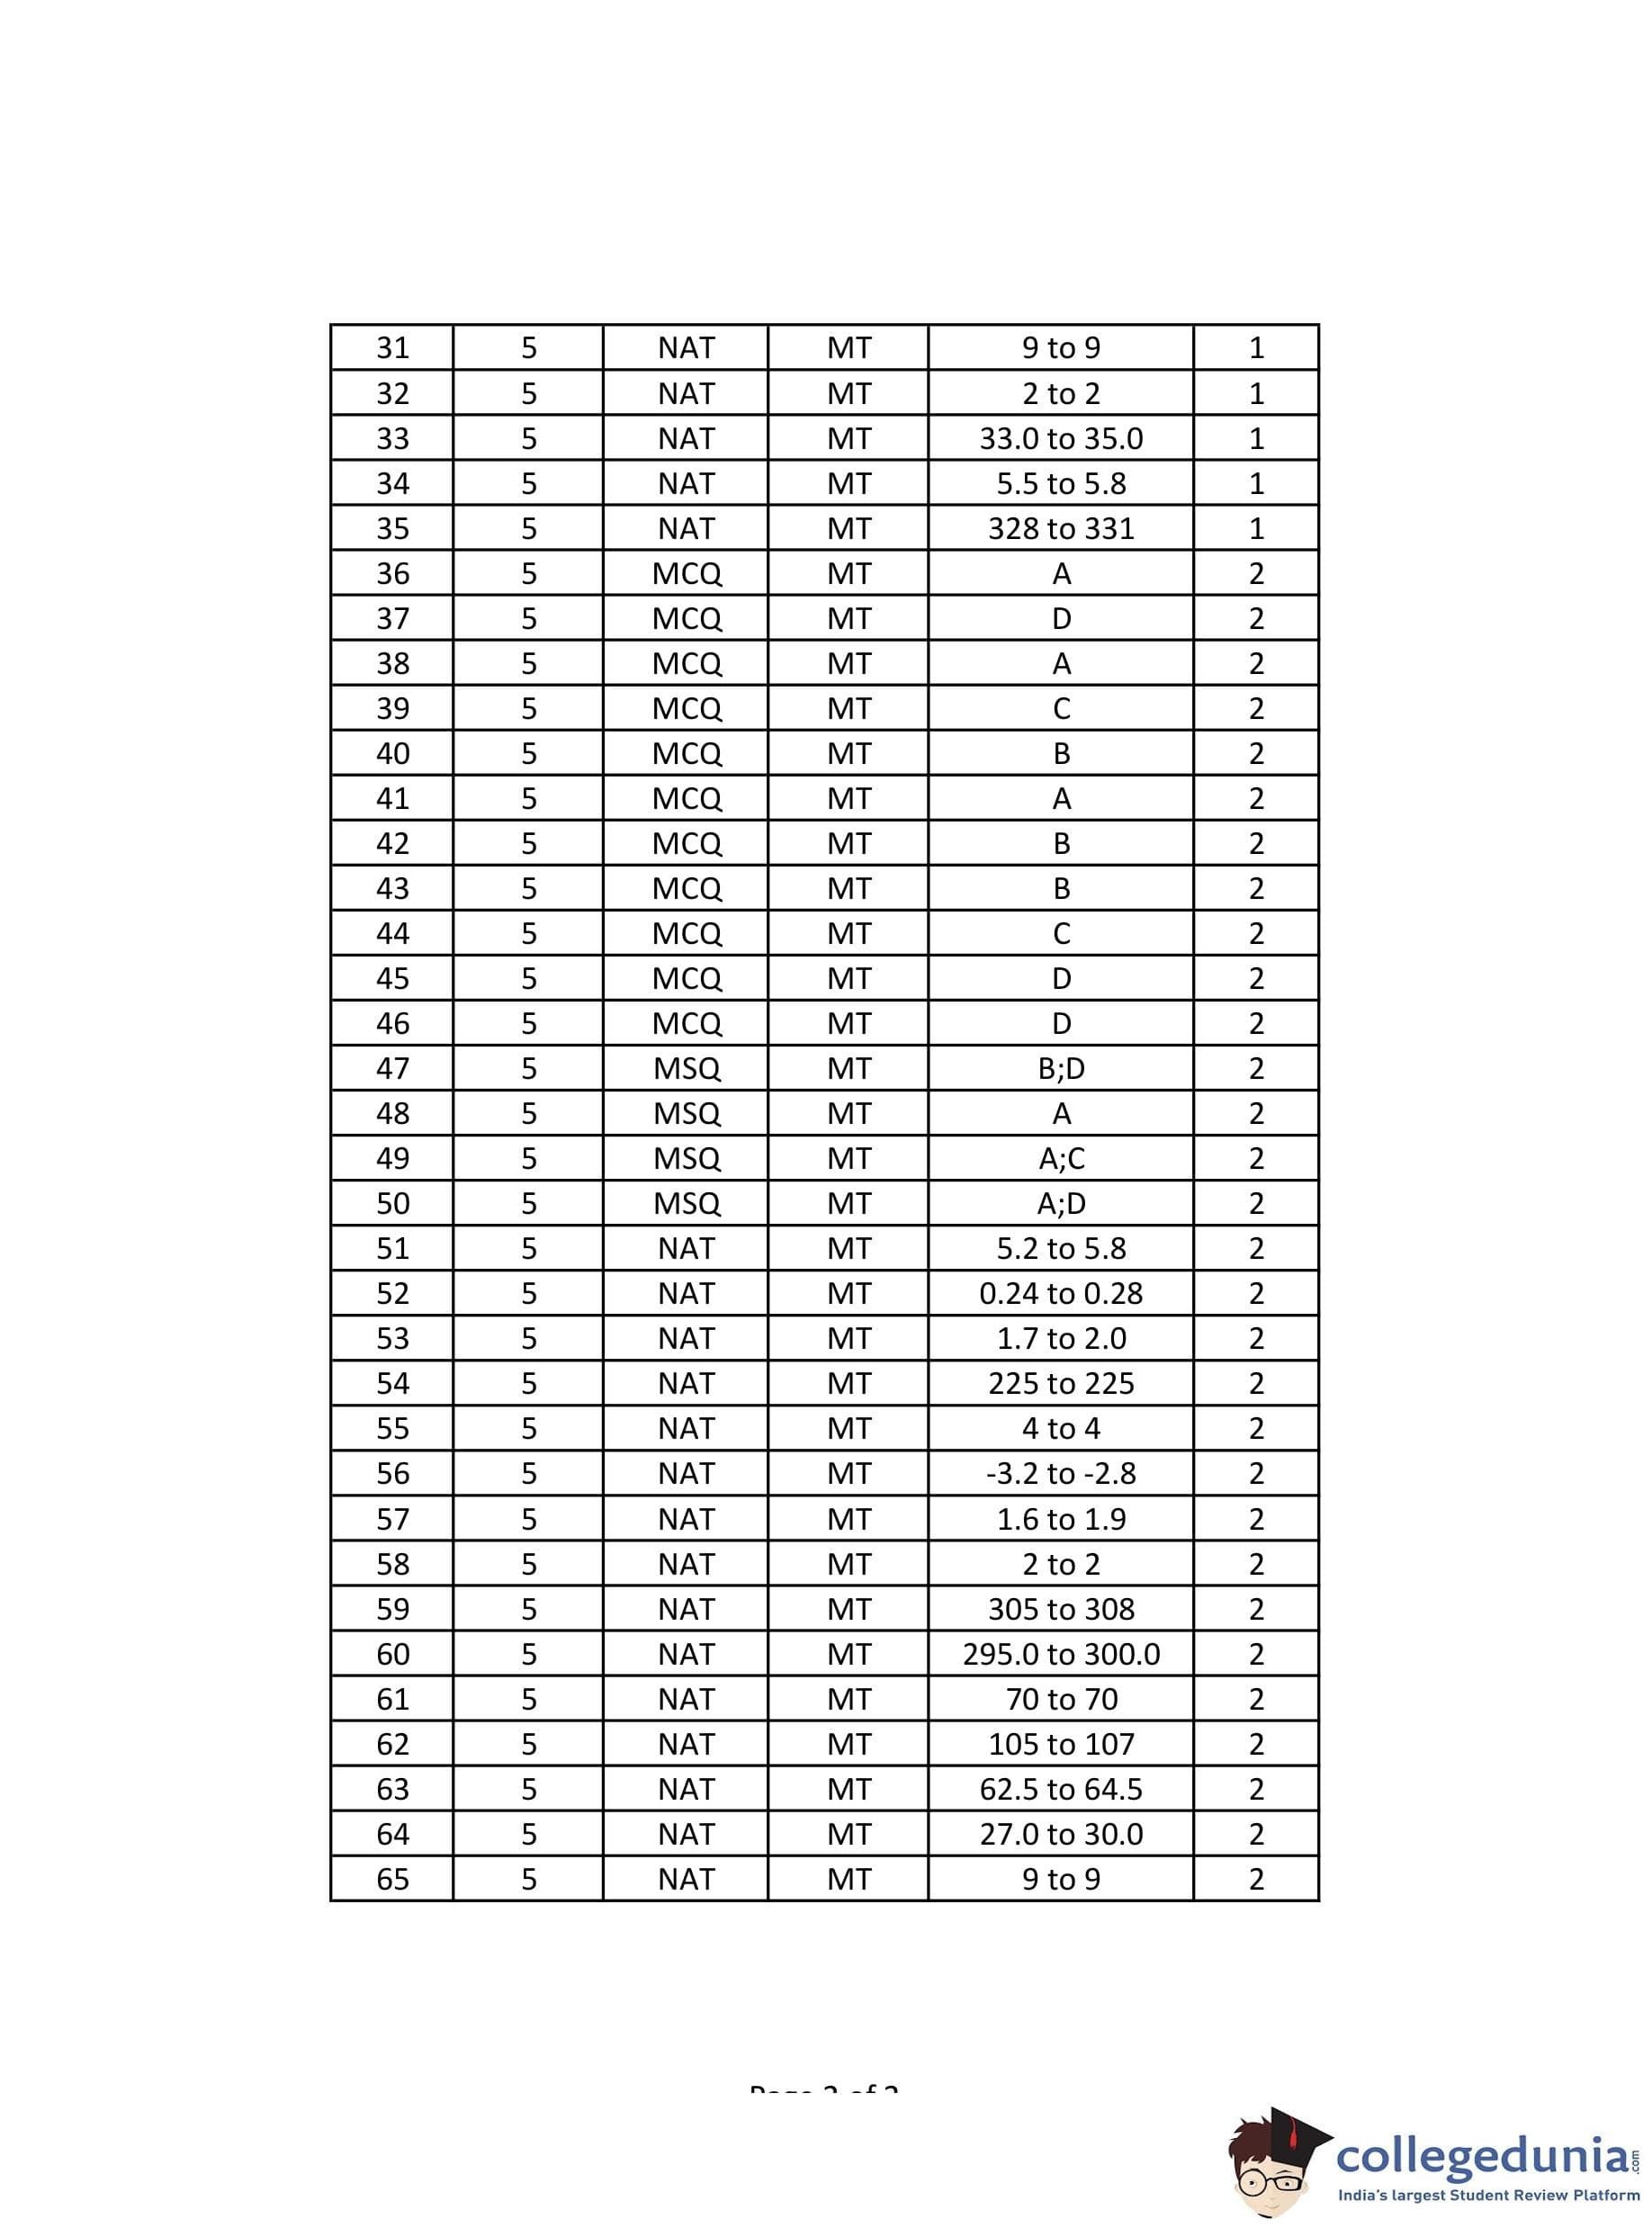
Also Check:
| Previous Year GATE Metallurgical Engineering Question Papers | GATE 2024 Metallurgical Engineering Paper Analysis |
Comments