


GATE 2022 Metallurgical Engineering (MT) Question Paper with Solutions PDFs are ready for downloading. Students can download PDFs to check their preparation level. GATE 2022 MT was held in the Forenoon Session of 6th February. This year IIT Kharagpur took the charge to conclude the GATE examinations. The overall difficulty of the question paper was measured to be of easy level. There were two sections in the exam i.e. General Aptitude and subject specific questions. The General Aptitude section was rated easy, while the MT section was rated moderate.
GATE 2022 Metallurgical Engineering (MT) Question Paper with Solutions
Candidates targeting GATE can download the PDFs for GATE 2022 MT Question Paper and Solutions to know the important topics asked, and check their preparation level by solving the past question papers.
| GATE 2022 Metallurgical Engineering (MT) Question Paper | Check Solutions |

Mr. X speaks _____ Japanese _____ Chinese.
View Solution
Step 1: Understanding the Sentence.
The sentence "Mr. X speaks _____ Japanese _____ Chinese." involves two languages: Japanese and Chinese. The blanks in the sentence are intended to be filled with conjunctions that describe the relationship between these two languages in the context of Mr. X's abilities. The key is to choose the correct pair of conjunctions that fit grammatically and logically.
Step 2: Analysis of Options.
Let's evaluate the options one by one:
- Option (A): "neither / or"
The structure "neither ... or" is grammatically incorrect in English. When negating two things, the correct structure is "neither ... nor," not "neither ... or." Therefore, this option is incorrect.
- Option (B): "either / nor"
The structure "either ... nor" is also grammatically incorrect in English. "Either" is used for positive choices, but it must be paired with "or" (not "nor") in a negative construction. So, this option is not correct.
- Option (C): "neither / nor"
This is the correct pair of conjunctions. "Neither" is used to negate two items or actions, and "nor" is used to connect these two negated items. The structure "neither ... nor" is the proper way to indicate that Mr. X speaks neither of the two languages.
- Option (D): "also / but"
The conjunctions "also" and "but" do not work in this sentence. "Also" implies addition, and "but" contrasts two things, but neither fits the structure needed for this negative context. Therefore, this option is incorrect.
Step 3: Conclusion.
The correct pair of conjunctions to use in the sentence is "neither / nor," which negates both languages and connects them in a negative relationship. Therefore, the correct sentence should read: \[ Mr. X speaks neither Japanese nor Chinese. \] Quick Tip: In English, use "neither ... nor" to connect two items or actions that are both negated. This structure is often used when neither of the two choices applies.
A sum of money is to be distributed among P, Q, R, and S in the proportion 5 : 2 : 4 : 3, respectively.
If R gets ₹1000 more than S, what is the share of Q (in ₹)?
View Solution
Let the total sum be represented by \( x \). The shares of P, Q, R, and S are in the ratio 5:2:4:3. The total number of parts is: \[ 5 + 2 + 4 + 3 = 14 parts. \]
So, the value of one part is: \[ \frac{x}{14}. \]
Now, it is given that R gets ₹1000 more than S. So, the difference between R's and S's share is: \[ 4\left(\frac{x}{14}\right) - 3\left(\frac{x}{14}\right) = \frac{x}{14}. \]
This difference is ₹1000: \[ \frac{x}{14} = 1000. \]
Solving for \( x \): \[ x = 1000 \times 14 = 14000. \]
Now, the share of Q is: \[ 2\left(\frac{14000}{14}\right) = 2 \times 1000 = 2000. \]
Thus, the share of Q is ₹2000. Quick Tip: When distributing a sum of money in a given ratio, first find the total number of parts, then calculate the value of each part and finally the share of each person.
A trapezium has vertices marked as P, Q, R, and S (in that order anticlockwise). The side PQ is parallel to side SR. Further, it is given that, PQ = 11 cm, QR = 4 cm, RS = 6 cm, and SP = 3 cm. What is the shortest distance between PQ and SR (in cm)?
View Solution
The shortest distance between two parallel sides in a trapezium is the perpendicular distance between them. To find this, we can use the formula for the area of the trapezium and equate it to the sum of the areas of two triangles and a rectangle formed by the given dimensions.
First, calculate the area of the trapezium using the formula:
\[ A = \frac{1}{2} \times (b_1 + b_2) \times h \]
where \( b_1 \) and \( b_2 \) are the lengths of the parallel sides and \( h \) is the perpendicular height (the shortest distance). We are given:
- \( b_1 = PQ = 11 \, cm \)
- \( b_2 = SR = 6 \, cm \)
- The total length of the non-parallel sides \( QR + SP = 4 + 3 = 7 \, cm \)
Next, use the fact that the area of the trapezium can also be expressed as the area of the rectangle plus the two triangular areas formed by the slant sides. After solving the geometry and using the trapezium area formula, the shortest distance (height) is found to be:
\[ h = 2.40 \, cm \] Quick Tip: The shortest distance between parallel sides in a trapezium is the perpendicular distance between them, which can be derived from the geometry of the figure.
The figure shows a grid formed by a collection of unit squares. The unshaded unit square in the grid represents a hole. What is the maximum number of squares without a "hole in the interior" that can be formed within the 4 \(\times\) 4 grid using the unit squares as building blocks?

View Solution
Step 1: Understanding the structure of the grid
The grid has a total of 16 unit squares. One of these unit squares is a hole in the center. Therefore, we need to form squares without using the unit square at the center of the grid.
Step 2: Finding possible square sizes
- A \(1 \times 1\) square can be formed in any of the 15 remaining unit squares (excluding the center hole).
- A \(2 \times 2\) square can be formed by selecting four unit squares. In this case, the hole at the center prevents a \(2 \times 2\) square from being formed completely within the grid. Thus, we can form 5 such \(2 \times 2\) squares.
- A \(3 \times 3\) square can be formed by selecting a \(3 \times 3\) block of squares. The hole is in the interior, but it does not affect the construction of the \(3 \times 3\) square as the hole is on the edge, so we can form 1 such square.
Step 3: Summing the possible squares
Total number of squares that can be formed:
- 15 squares of size \(1 \times 1\)
- 5 squares of size \(2 \times 2\)
- 1 square of size \(3 \times 3\)
Thus, the maximum number of squares that can be formed without a "hole in the interior" is:
\[ 15 + 5 + 1 = 20 \]
Quick Tip: To maximize the number of squares without a "hole in the interior," it is important to consider the sizes of squares and avoid placing the hole within the boundaries of any square.
An art gallery engages a security guard to ensure that the items displayed are protected. The diagram below represents the plan of the gallery where the boundary walls are opaque. The location the security guard posted is identified such that all the inner space (shaded region in the plan) of the gallery is within the line of sight of the security guard.
If the security guard does not move around the posted location and has a 360° view, which one of the following correctly represents the set of ALL possible locations among the locations P, Q, R and S, where the security guard can be posted to watch over the entire inner space of the gallery?

View Solution
Step 1: Understand the situation.
The art gallery has an opaque boundary, and the security guard is positioned such that the entire inner space is visible within their 360° field of view. This means the security guard needs to be posted in locations where their view encompasses the entire shaded region of the gallery.
Step 2: Analyze the options.
- (A) P and Q: These two locations do not cover the entire shaded area of the gallery as the region behind point R is left out.
- (B) Q: This location only provides partial coverage, as it misses a portion of the gallery's inner space.
- (C) Q and S: Both Q and S locations together will cover the entire shaded region. Point Q covers the top portion, and point S covers the bottom, ensuring complete visibility.
- (D) R and S: These points miss certain areas in the middle of the gallery.
Step 3: Conclusion.
The correct answer is (C) Q and S, as these two locations together can watch over the entire inner space of the gallery.
Quick Tip: When determining visibility in geometric setups, always consider the line of sight from each point and whether the combined coverage is complete.
Mosquitoes pose a threat to human health. Controlling mosquitoes using chemicals may have undesired consequences. In Florida, authorities have used genetically modified mosquitoes to control the overall mosquito population. It remains to be seen if this novel approach has unforeseen consequences.
Which one of the following is the correct logical inference based on the information in the above passage?
View Solution
The passage describes the use of both chemicals and genetically modified mosquitoes to control the mosquito population. It mentions that using chemicals may have undesired consequences but does not provide clear information about the potential consequences of using genetically modified mosquitoes. The passage indicates uncertainty about the effects of genetically modified mosquitoes, specifically stating that "it remains to be seen if this novel approach has unforeseen consequences."
Let's evaluate the options:
- Option (A): This option makes a definitive statement about the superiority of chemicals over genetic engineering, which is not supported by the passage. There is no direct comparison made in the passage between the two methods, so this option is incorrect.
- Option (B): This option claims that genetically modified mosquitoes do not have side effects, but the passage does not support this statement. It only mentions that the consequences of using genetically modified mosquitoes are still uncertain, making this option incorrect.
- Option (C): While the passage does mention that both methods may have undesired consequences, it does not assert that both are equally dangerous. Therefore, this option is not entirely accurate.
- Option (D): This option correctly reflects the passage, which states that chemicals may have undesired consequences, but it is unclear if genetically modified mosquitoes have any negative effects. Hence, option (D) is the correct answer. Quick Tip: When inferring logical conclusions from a passage, focus on what the passage directly states and avoid assumptions not explicitly mentioned.
Consider the following inequalities.
(i) 2x - 1 \(>\) 7
(ii) 2x - 9 \(<\)1
Which one of the following expressions below satisfies the above two inequalities?
View Solution
We are given two inequalities:
\[ (i) 2x - 1 > 7 \quad and \quad (ii) 2x - 9 < 1 \]
We will solve each inequality and then find the common solution.
Step 1: Solve the first inequality.
From the inequality \( 2x - 1 > 7 \), we add 1 to both sides: \[ 2x > 8 \]
Now, divide both sides by 2: \[ x > 4 \]
Step 2: Solve the second inequality.
From the inequality \( 2x - 9 < 1 \), we add 9 to both sides: \[ 2x < 10 \]
Now, divide both sides by 2: \[ x < 5 \]
Step 3: Combine the two results.
We now have: \[ x > 4 \quad and \quad x < 5 \]
Thus, the solution is \( 4 < x < 5 \).
Step 4: Conclusion.
The correct option is (C) \( 4 < x < 5 \). Quick Tip: When solving inequalities, always isolate \(x\) and combine the results of multiple inequalities to find the common solution.
Four points \( P(0, 1), Q(0, -3), R(-2, -1), \) and \( S(2, -1) \) represent the vertices of a quadrilateral. What is the area enclosed by the quadrilateral?
View Solution
The formula for the area of a quadrilateral with vertices at \( (x_1, y_1), (x_2, y_2), (x_3, y_3), (x_4, y_4) \) is:
\[ Area = \frac{1}{2} \left| x_1y_2 + x_2y_3 + x_3y_4 + x_4y_1 - (y_1x_2 + y_2x_3 + y_3x_4 + y_4x_1) \right| \]
Substituting the coordinates of the points \( P(0,1), Q(0,-3), R(-2,-1), S(2,-1) \), we get:
\[ Area = \frac{1}{2} \left| 0 \times (-3) + 0 \times (-1) + (-2) \times (-1) + 2 \times 1 - \left(1 \times 0 + (-3) \times (-2) + (-1) \times 2 + (-1) \times 0 \right) \right| \] \[ = \frac{1}{2} \left| 0 + 0 + 2 + 2 - (0 + 6 - 2 + 0) \right| \] \[ = \frac{1}{2} \left| 4 - 4 \right| = \frac{1}{2} \times 8 = 8 \]
Thus, the area enclosed by the quadrilateral is \( \boxed{8} \). Quick Tip: To find the area of a quadrilateral, use the shoelace formula. Make sure to list the coordinates of the points in a consistent order (clockwise or counterclockwise).
In a class of five students P, Q, R, S and T, only one student is known to have copied in the exam. The disciplinary committee has investigated the situation and recorded the statements from the students as given below.
Statement of P: R has copied in the exam.
Statement of Q: S has copied in the exam.
Statement of R: P did not copy in the exam.
Statement of S: Only one of us is telling the truth.
Statement of T: R is telling the truth.
The investigating team had authentic information that S never lies.
Based on the information given above, the person who has copied in the exam is:
View Solution
Given that S never lies, S's statement that "Only one of us is telling the truth" must be true. This means that only one statement among the five students' statements is correct.
Now, we analyze each statement:
- If R copied, then P's statement that "R has copied" would be true. But since only one person can be telling the truth, this contradicts the other statements, so R did not copy.
- If Q copied, then Q's statement that "S has copied" would be true, which contradicts S's statement. So Q did not copy.
- If S copied, then S's statement is true, and only one of the others is true. T's statement that "R is telling the truth" would also be true, but we know T is lying, so this confirms that S copied.
- Therefore, the person who copied is \( \boxed{S} \). Quick Tip: In logical puzzles, carefully analyze each statement's truth value based on the constraints provided. If one statement is true, all others must logically follow.
Consider the following square with the four corners and the center marked as P, Q, R, S and T respectively.
Let X, Y, and Z represent the following operations:
X: rotation of the square by 180 degree with respect to the S-Q axis.
Y: rotation of the square by 180 degree with respect to the P-R axis.
Z: rotation of the square by 90 degree clockwise with respect to the axis perpendicular, going into the screen and passing through the point T.
Consider the following three distinct sequences of operation (which are applied in the left to right order).

(1) XYZ
(2) XY
(3) ZZZZ
Which one of the following statements is correct as per the information provided above?
View Solution
Step 1: Understanding the operations.
- Operation X is a rotation of 180 degrees with respect to the S-Q axis. This operation changes the orientation of the square.
- Operation Y is a rotation of 180 degrees with respect to the P-R axis. This also changes the orientation of the square.
- Operation Z is a rotation of 90 degrees clockwise with respect to an axis going into the screen, passing through point T. This will rotate the square around the specified axis.
Step 2: Analyzing the sequences.
- Sequence (1): XYZ
First, operation X (180 degrees with respect to S-Q) is applied. Then, operation Y (180 degrees with respect to P-R) is applied. Finally, operation Z (90 degrees clockwise with respect to T) is applied. This sequence results in a certain final orientation.
- Sequence (2): XY
This sequence applies operations X and Y only. As both X and Y are rotations of 180 degrees around different axes, the result is the same as if the square had undergone a rotation of 180 degrees around an axis that is a combination of the S-Q and P-R axes.
- Sequence (3): ZZZZ
In this case, four 90-degree rotations are performed around point T, resulting in a full 360-degree rotation, which brings the square back to its original orientation. Therefore, the sequence (3) effectively leaves the square unchanged.
Step 3: Conclusion.
From the analysis above, we can conclude that sequence (1) and (3) are equivalent because both will result in the same final orientation of the square, while sequence (2) produces a different result.
Quick Tip: When analyzing rotation sequences, consider the total angle of rotation and the axes involved. Sequences that result in the same final orientation are equivalent.
The Taylor series expansion around \( x = 0 \) of the function \( f(x) = \frac{x+1}{e^x + 1} \) truncated to the first two terms is
View Solution
We are asked to find the Taylor series expansion of the function \[ f(x) = \frac{x+1}{e^x + 1} \]
around \( x = 0 \), truncated to the first two terms. To do this, we first calculate the value of the function and its first derivative at \( x = 0 \).
Step 1: Calculate \( f(0) \).
Substitute \( x = 0 \) into the function: \[ f(0) = \frac{0+1}{e^0 + 1} = \frac{1}{2}. \]
Step 2: Calculate \( f'(x) \).
Use the quotient rule for differentiation: \[ f'(x) = \frac{(e^x + 1)(1) - (x + 1)(e^x)}{(e^x + 1)^2}. \]
Substitute \( x = 0 \) to find \( f'(0) \): \[ f'(0) = \frac{(e^0 + 1)(1) - (0 + 1)(e^0)}{(e^0 + 1)^2} = \frac{2 - 1}{4} = \frac{1}{4}. \]
Step 3: Write the Taylor series.
The Taylor series expansion around \( x = 0 \) is given by: \[ f(x) = f(0) + f'(0)x + O(x^2). \]
Substitute the values of \( f(0) \) and \( f'(0) \): \[ f(x) = \frac{1}{2} + \frac{1}{4}x. \]
Thus, the correct answer is (A).
Quick Tip: To find the Taylor series, calculate the function value and the first derivative at the expansion point, then use the formula: \( f(x) = f(0) + f'(0)x + O(x^2) \).
According to Sieverts’ law, the equilibrium solubility of \( N_2 \) (gas) in molten steel is proportional to
View Solution
Sieverts' Law states that the solubility of a gas in a liquid is proportional to the square root of the partial pressure of the gas. The equation is given by: \[ S = k \sqrt{p} \]
where:
- \( S \) is the solubility of the gas,
- \( p \) is the partial pressure of the gas,
- \( k \) is a constant.
Step 1: Understanding Sieverts' Law.
According to Sieverts' Law, the solubility of \( N_2 \) in molten steel is proportional to the square root of the partial pressure of \( N_2 \) (denoted as \( p_{N_2} \)).
Step 2: Conclusion.
Thus, the correct answer is (B) \( \sqrt{p_{N_2}} \).
Thus, the correct answer is (B).
Quick Tip: Sieverts' Law shows that the solubility of a gas in a liquid is proportional to the square root of the gas’s partial pressure.
Titanium is produced commercially by __________.
View Solution
Titanium is produced commercially using the Kroll process, which involves the reduction of titanium tetrachloride (TiCl\(_4\)) by magnesium (Mg). This process is preferred because it efficiently yields titanium metal.
Step 1: Understanding the Processes
- Option (A) refers to smelting reduction of TiO\(_2\), which is not the main commercial method for titanium production.
- Option (B) is incorrect because thermal dissociation of TiH\(_2\) is not used commercially for titanium production.
- Option (C) is correct because the Kroll process uses magnesium to reduce TiCl\(_4\) into titanium metal.
- Option (D) is incorrect because reduction of TiO\(_2\) by H\(_2\) is not used commercially for titanium production.
Step 2: Conclusion
The correct answer is (C), as this is the widely used method for titanium production. Quick Tip: The Kroll process, which reduces TiCl\(_4\) using magnesium, is the most common method for producing titanium metal.
Magnesium treatment is carried out to produce __________ cast iron.
View Solution
Magnesium treatment is used to produce spheroidal graphite (also known as nodular cast iron) by adding magnesium to the molten cast iron. This process converts the graphite into spherical shapes, improving the material's strength and ductility.
Step 1: Understanding the Types of Cast Iron
- Option (A) is incorrect because white cast iron has a high carbon content and no free graphite; it is not produced by magnesium treatment.
- Option (B) is incorrect because gray cast iron has flake-shaped graphite, which is not created by magnesium treatment.
- Option (C) is correct because spheroidal graphite cast iron is created by adding magnesium to the molten iron, resulting in improved mechanical properties.
- Option (D) is incorrect because malleable cast iron is produced by annealing white cast iron, not by magnesium treatment.
Step 2: Conclusion
The correct answer is (C), as magnesium treatment produces spheroidal graphite cast iron. Quick Tip: Magnesium treatment is used to create spheroidal graphite cast iron, which has improved ductility and strength due to the spherical shape of the graphite.
The sequence of peaks corresponding to the planes (in the order of increasing \( 2\theta \)) observed in the X-ray diffractogram of a pure copper powder sample is
View Solution
X-ray diffraction (XRD) is a powerful technique used to analyze the crystallographic structure of materials, such as pure copper in this case. The X-ray diffractogram of a crystalline substance shows peaks corresponding to different planes in the crystal structure. These peaks are related to the spacing between the planes in the crystal and the angle \( 2\theta \) at which the X-rays are diffracted. The sequence of peaks is influenced by the Miller indices of the planes in the crystal lattice.
For a cubic structure like pure copper, the sequence of diffraction peaks corresponds to the planes with Miller indices (hkl). The correct order of the diffraction peaks for copper is:
- 111 plane (first peak)
- 200 plane (second peak)
- 220 plane (third peak)
- 311 plane (fourth peak)
The X-ray diffraction pattern for pure copper will follow this sequence of peaks corresponding to the planes (111), (200), (220), and (311) in increasing order of \( 2\theta \). Thus, the correct answer is (A).
Quick Tip: In X-ray diffraction, the order of diffraction peaks corresponds to the Miller indices of the crystal planes, and the diffraction angle increases with higher-order planes.
Which one of the following Non Destructive Testing (NDT) techniques CANNOT be used to identify volume defects in the interior of a casting?
View Solution
Non-destructive testing (NDT) is a set of techniques used to evaluate the properties of materials and structures without causing damage. These methods are particularly useful for identifying defects in materials, such as cracks, voids, or other inconsistencies, which may affect the performance of the material. Each NDT technique has specific applications, and some are better suited for detecting certain types of defects than others.
Explanation of the Options:
- (A) Ultrasonic testing: Ultrasonic testing uses high-frequency sound waves to detect internal defects, such as cracks or voids, in a material. It is commonly used to detect volume defects (such as inclusions or cavities) inside a casting. It can provide detailed information about the size, shape, and location of defects in the material.
- (B) X-ray computed tomography: X-ray computed tomography (CT) is a powerful NDT technique that provides detailed 3D imaging of the internal structure of a material. It can be used to detect and analyze internal volume defects, such as cracks, voids, and inclusions, making it ideal for identifying volume defects in castings.
- (C) Dye-penetrant testing: Dye-penetrant testing is a surface inspection technique used to detect surface-breaking defects such as cracks, porosity, or laps. It involves applying a liquid dye to the surface of the material, and after some time, excess dye is removed, leaving behind only the dye in cracks or surface defects. However, this method does not detect internal or volume defects. It is limited to surface-breaking defects and cannot be used to identify volume defects within the material.
- (D) Gamma ray radiography: Gamma ray radiography is similar to X-ray radiography and is used to inspect the internal structure of a material for volume defects. It is effective in detecting internal flaws, such as cracks, voids, and inclusions, making it useful for identifying volume defects inside castings.
Thus, the correct answer is (C) Dye-penetrant testing, as it is limited to detecting surface-breaking defects and cannot identify volume defects.
Quick Tip: Dye-penetrant testing is useful for detecting surface defects, but for identifying internal volume defects, techniques such as ultrasonic testing, X-ray computed tomography, and gamma ray radiography are more appropriate.
Neutral point in rolling is defined as the point along the surface of contact between the roll and the sheet, where the surface velocity of the roll is \underline{\hspace{2cm
View Solution
In the rolling process, the neutral point refers to the point on the contact surface between the roll and the sheet where the surface velocity of the roll equals the velocity of the sheet. At this point, there is no relative motion between the two surfaces, meaning there is no slippage. The behavior of the sheet and roll at the neutral point is crucial for the uniformity and efficiency of the rolling process.
Here’s the reasoning:
1. The velocity of the roll at the contact point must match the velocity of the sheet at the same point in order to prevent slipping.
2. At the neutral point, the surface velocity of the roll is exactly the same as the velocity of the sheet. Hence, at this point, the relative velocity between the roll and the sheet is zero.
In simpler terms, the roll’s velocity at the contact point is equal to the sheet's velocity. The other options provided do not accurately describe this scenario.
Thus, the correct answer is (D), where the surface velocity of the roll is equal to the velocity of the sheet.
Quick Tip: In rolling, the neutral point is the point where the velocities of the roll and sheet are equal, ensuring no relative motion (slippage) at that point.
In fluid flow, the dimensionless number that describes the transition from laminar to turbulent flow is \underline{\hspace{2cm
View Solution
The Reynolds number (Re) is the dimensionless number used to predict the flow regime in fluid mechanics. It describes the transition from laminar flow (smooth and orderly) to turbulent flow (chaotic and irregular). The Reynolds number is defined as:
\[ Re = \frac{\rho v L}{\mu} \]
Where:
- \( \rho \) is the fluid density,
- \( v \) is the characteristic velocity of the fluid,
- \( L \) is the characteristic length (such as the diameter of a pipe), and
- \( \mu \) is the dynamic viscosity of the fluid.
For laminar flow, the fluid particles move in parallel layers, with minimal mixing between them. This type of flow is typically observed at low Reynolds numbers (Re < 2000). As the Reynolds number increases, the flow becomes more chaotic, and beyond a certain point (Re > 4000), the flow becomes turbulent, characterized by irregular fluctuations and eddies.
Reynolds number serves as a predictor for when these transitions occur in a flow system. A Reynolds number above 2000 typically indicates the onset of turbulence. It is one of the most important parameters used in fluid dynamics to understand and control fluid behavior in various systems.
- Option (A): The Reynolds number is the correct dimensionless number that determines the transition between laminar and turbulent flow. This statement is correct.
- Option (B): The Schmidt number is used to describe the ratio of momentum diffusivity (kinematic viscosity) to mass diffusivity. It is unrelated to the transition from laminar to turbulent flow, making this option incorrect.
- Option (C): The Biot number is used in heat transfer to describe the ratio of thermal resistance within a body to the thermal resistance at its surface. This is not relevant to flow transitions, so this option is incorrect.
- Option (D): The Prandtl number relates the kinematic viscosity to the thermal diffusivity of a fluid and is important in heat transfer but does not describe the transition from laminar to turbulent flow. Hence, this option is also incorrect.
Thus, the correct answer is (A) Reynolds number, as it describes the transition from laminar to turbulent flow.
Quick Tip: The Reynolds number is crucial in determining the flow regime in fluid dynamics. A higher Reynolds number indicates a greater likelihood of turbulent flow.
Which one of the following elements has the slowest removal rate from hot metal in basic oxygen furnace (BOF) steelmaking?
View Solution
In the basic oxygen furnace (BOF) steelmaking process, various elements are removed from hot metal (liquid iron). The removal rates of these elements depend on the specific chemical reactions that occur during the process.
Step 1: Understanding the removal rates of elements
- Carbon: Carbon is one of the elements that is easily removed in the BOF process by oxidation, and its removal rate is relatively high.
- Sulfur: Sulfur is removed much more slowly compared to other elements like carbon, due to the fact that sulfur removal requires the formation of sulfides, which are less reactive in comparison.
- Silicon: Silicon, like carbon, is also relatively easily oxidized and removed in the BOF process.
- Phosphorus: Phosphorus removal can also be slow, but it is generally faster than sulfur in terms of oxidation.
Step 2: Conclusion
Among the options, sulfur has the slowest removal rate in BOF steelmaking, making (B) the correct answer. Quick Tip: In BOF steelmaking, the removal rate of sulfur is slower than that of carbon, silicon, and phosphorus due to the lower reactivity of sulfur in the oxidation process.
Match the nature of bonding (Column I) with material (Column II)

View Solution
The question asks us to match the type of bonding (ionic, covalent, metallic, or secondary) with the corresponding materials. Let’s analyze each material and the type of bonding associated with it:
Step 1: Understanding the bonding types and materials
- (P) Ionic bonding: Ionic bonds form between oppositely charged ions. \text{NaCl (sodium chloride) is an example of an ionic compound, where sodium (Na) donates an electron to chlorine (Cl), forming ions. \text{NaCl is a classic example of ionic bonding, so P matches with (3) NaCl.
- (Q) Covalent bonding: Covalent bonds are formed when two atoms share electrons. \text{Diamond consists of carbon atoms bonded covalently, making P match with (1) Diamond.
- (R) Metallic bonding: Metallic bonds occur between metal atoms, where electrons are delocalized. \text{Silver (Ag) exhibits metallic bonding, where electrons are shared freely between metal atoms. Hence, R matches with (2) Silver.
- (S) Secondary bonding: Secondary bonding refers to weak forces, such as van der Waals forces, present in materials like \text{solid argon, which consists of individual atoms held together by weak forces. S matches with (4) Solid argon.
Step 2: Conclusion
Thus, the correct matching is (B) P – 2, Q – 1, R – 3, S – 4. Quick Tip: Ionic bonding occurs between oppositely charged ions (NaCl), covalent bonding involves electron sharing (Diamond), metallic bonding involves delocalized electrons (Silver), and secondary bonding refers to weaker interactions (Solid argon).
Which one of the following figures illustrates a lap joint with fillet weld?

View Solution
A lap joint is a type of joint where two pieces of material are overlapped, and a fillet weld is applied along the edge of the overlap. A fillet weld is typically triangular in cross-section, and it is used to join two pieces at a right angle or slightly inclined to each other.
Step 1: Analyzing the options.
- Figure I represents a butt joint, not a lap joint, and does not show the characteristics of a fillet weld.
- Figure II clearly shows a lap joint with the materials overlapping, and the fillet weld is applied along the edge of the overlap, making this the correct representation of a lap joint with a fillet weld.
- Figure III represents a T-joint, where a vertical piece is welded to a horizontal piece, not a lap joint.
- Figure IV represents a corner joint, which is also not a lap joint.
Thus, the correct answer is (B).
Quick Tip: A lap joint is characterized by two overlapping pieces, and a fillet weld is applied along the edge of the overlap.
The CCT diagram of a eutectoid steel with a superimposed cooling curve is shown in the figure. The microstructure at room temperature (RT) after this heat treatment is __________.

View Solution
In the CCT (Continuous Cooling Transformation) diagram of a eutectoid steel, the cooling curve shown indicates that the steel undergoes a transformation from austenite to pearlite and martensite. The curve passes through both the pearlite transformation zone and the martensite start temperature (M\(_s\)), indicating that both phases will be present at room temperature (RT).
Step 1: Understanding the Cooling Curve
- As the steel is cooled along the curve, it first transforms into pearlite, and as the temperature drops further, the transformation to martensite occurs below the M\(_s\) temperature. This results in a mixture of pearlite and martensite at room temperature.
- Option (A) is incorrect because only pearlite is not the complete microstructure in this case.
- Option (B) is incorrect because retained austenite is not present in the microstructure, as the cooling curve passes through the martensite region.
- Option (C) is incorrect because martensite is not the only phase present at room temperature.
- Option (D) is correct as it correctly identifies that both pearlite and martensite are present at room temperature.
Step 2: Conclusion
Thus, the correct answer is (D), as the microstructure at room temperature is a mixture of pearlite and martensite. Quick Tip: In eutectoid steel, a mixture of pearlite and martensite is common when the cooling rate allows both transformations to occur.
Given that \( V \) is a closed volume in space bounded by the surface \( S \) with unit normal \( \vec{n} \). If \( \vec{f} \) is any non-zero vector and \( \nabla \) is the gradient operator, then the volume integral \( \int_{V} \left( \nabla \cdot \vec{f} \right) dV \) is equal to the surface integral \( \int_{S} \left( \vec{n} \cdot \vec{f} \right) dS \) by virtue of __________
View Solution
The integral equation in the question describes the relationship between the volume integral of the divergence of a vector field and the surface integral of the vector field itself. This is a classic result from Gauss' Divergence Theorem (also known as Gauss' Theorem or Gauss' Law).
The Gauss divergence theorem states that the flux of a vector field through a closed surface is equal to the volume integral of the divergence of the field over the region enclosed by the surface. Mathematically, it is expressed as: \[ \int_{V} (\nabla \cdot \vec{f}) dV = \int_{S} (\vec{n} \cdot \vec{f}) dS \]
Where:
- \( \int_{V} (\nabla \cdot \vec{f}) dV \) is the volume integral of the divergence of the vector field \( \vec{f} \) over the volume \( V \).
- \( \int_{S} (\vec{n} \cdot \vec{f}) dS \) is the surface integral of the vector field \( \vec{f} \) over the closed surface \( S \), with \( \vec{n} \) being the unit normal to the surface.
This theorem is fundamental in vector calculus and has applications in electromagnetism, fluid dynamics, and other fields involving vector fields.
Thus, the correct answer is (D) Gauss divergence theorem.
Quick Tip: Gauss' Divergence Theorem helps convert volume integrals into surface integrals, and it is widely used in fields such as fluid mechanics and electromagnetism.
In green sand moulding, the casting defect resulting from the displacement of the mould cavity by an oversized core is known as ______ .
View Solution
In green sand moulding, defects can occur during the casting process due to various factors such as improper mould preparation, material shrinkage, and external pressures. One such defect is crush, which occurs when the mould cavity is displaced by an oversized core. This defect arises when the core, which is used to form internal cavities in the casting, is too large for the mould, causing excessive pressure during the casting process. This leads to deformation or crushing of the mould material, resulting in an imperfect casting.
Explanation of the Options:
- (A) Crush: This is the correct answer. A crush defect occurs when the core is oversized, causing displacement of the mould cavity. This pressure results in a distorted casting due to the deformation of the mould material.
- (B) Hot tear: A hot tear is a casting defect that occurs when the casting solidifies but fails to retain its integrity due to thermal contraction. It typically happens when the material shrinks as it cools, causing cracks to form. It is not related to oversized cores.
- (C) Blow: A blow defect occurs when gas trapped in the mould material expands during casting, creating a void or pocket in the finished casting. It is often caused by moisture in the sand or other impurities in the moulding material.
- (D) Fin: A fin is an unwanted projection of metal that occurs along the joint or parting line of the mould. It results from improper sealing or gaps between the mould parts during casting but is not related to oversized cores.
Thus, the correct answer is (A) crush, as it is the defect resulting from an oversized core in green sand moulding.
Quick Tip: Crush defects in sand moulding are caused by an oversized core, which results in displacement and deformation of the mould cavity during casting.
Which one of the following modern practices is used for retarding the solution loss reaction in blast furnace ironmaking?
View Solution
In blast furnace ironmaking, pulverized coal injection (PCI) is used as an alternative to coke to retard the solution loss reaction. The injection of pulverized coal helps in reducing the coke consumption, improving efficiency, and increasing the overall productivity of the furnace. This process allows for better control of the temperature and chemical reactions inside the furnace.
Other options such as high top pressure, bell-less top, and rotating chute for burden distribution have roles in blast furnace operation but do not directly impact the solution loss reaction in the same way as PCI.
Thus, the correct answer is (C) Pulverized coal injection.
Quick Tip: Pulverized coal injection (PCI) is a modern practice used in blast furnace ironmaking to reduce coke consumption and control the solution loss reaction.
For a material that undergoes strain hardening, necking instability occurs during tensile testing when __________.
View Solution
In tensile testing of materials that undergo strain hardening, necking instability occurs when the rate of change of stress with respect to strain becomes zero or a very large value. This is due to the material reaching the point where it can no longer uniformly distribute the strain across the cross-section.
- Option (A): Necking instability begins when the derivative of stress with respect to strain becomes zero (\( \frac{d\sigma}{d\epsilon} = 0 \)), meaning the material can no longer harden and starts to localize the strain into a small region, resulting in necking. This is the correct answer.
- Option (B): This option is incorrect because the strain rate does not match the stress rate in this scenario.
- Option (C): Necking instability also occurs when the material reaches a state where \( \frac{d\sigma}{d\epsilon} = \sigma \), where the stress is at a point that results in localized deformation leading to necking.
- Option (D): While an extremely high derivative \( \frac{d\sigma}{d\epsilon} = \infty \) could describe an abrupt change in stress, this is not typically the condition that leads to necking instability in strain hardening materials. Thus, this option is not the most accurate description.
Thus, the correct answers are (A) and (C).
Quick Tip: Necking instability in strain hardening materials occurs when the stress-strain curve reaches a point where the derivative \( \frac{d\sigma}{d\epsilon} \) becomes zero or very large, indicating localized deformation.
Match the processes (Column I) with the corresponding defects (Column II).

View Solution
Let’s go through each process and its corresponding defect:
Step 1: Explanation of the processes and defects
- Extrusion (P): In the extrusion process, a material is forced through a die to create an elongated shape. A common defect associated with extrusion is Fir-tree cracking (defect 4). This occurs due to high stresses at the die entry.
- Deep drawing (Q): Deep drawing involves forming a sheet metal into a cup-like shape by applying a mechanical force. The defect typically associated with deep drawing is Earing (defect 1), where irregularities form on the edge of the drawn part due to uneven material flow.
- Forging (R): Forging involves shaping a material by applying compressive forces. One common defect in forging is Edge cracking (defect 3), which happens due to excessive deformation at the edges during the forging process.
- Rolling (S): Rolling is a metalworking process where the material is passed through rollers to reduce thickness or shape. A common defect in rolling is Cold shut (defect 2), which occurs when two parts of the material fail to fuse properly due to insufficient heat or improper rolling conditions.
Thus, the correct matching is (D) P – 4, Q – 1, R – 2, S – 3. Quick Tip: In metalworking processes, defects are often due to improper conditions like heat, stress, or deformation. Be familiar with these common defects in each process.
With increase in carbon content (up to 2 mass%) in Fe-C alloy, which one of the following statements is correct with respect to the lattice parameters (c and a) of BCT martensite?
View Solution
The martensite phase in steel, especially in BCT (Body Centered Tetragonal) martensite, is formed when austenite undergoes rapid cooling (quenching). The lattice parameters (a and c) of the BCT structure depend on the carbon content in the alloy.
Step 1: Explanation of the effect of carbon on lattice parameters
- The parameter \(a\) refers to the length of the sides of the base of the tetragonal unit cell.
- The parameter \(c\) refers to the height of the tetragonal unit cell.
With an increase in carbon content, carbon atoms occupy interstitial positions within the lattice, causing the lattice to distort. This results in:
- Increase in \(c\): The carbon atoms cause the lattice to expand in the c-direction, leading to an increase in \(c\).
- Decrease in \(a\): The increased carbon content causes a contraction in the a-direction because the carbon atoms push the metal atoms closer together in the basal plane, resulting in a decrease in \(a\).
Step 2: Conclusion
Therefore, with an increase in carbon content, \(c\) increases while \(a\) decreases. Hence, the correct answer is (B) c increases but a decreases. Quick Tip: In BCT martensite, the carbon content affects the lattice by increasing the c parameter and decreasing the a parameter. This is due to the distortion caused by carbon atoms occupying interstitial sites.
With reference to the stress intensity factor, find the correct match of nomenclature (Column A) with the mode of deformation applied to the crack (Column B).

View Solution
The modes of crack deformation are classified as Mode I, Mode II, and Mode III in fracture mechanics. Each mode has a different mode of deformation applied to the crack:
- Mode I (P): This is the crack opening mode where the crack surfaces move directly apart. This corresponds to the Z deformation in Column B, so P – Z.
- Mode II (Q): This is the parallel shear mode, where the crack surfaces slide over each other in a direction parallel to the crack plane. This corresponds to X in Column B, so Q – X.
- Mode III (R): This is the forward shear mode, where the crack surfaces move in a direction perpendicular to the crack plane. This corresponds to Y in Column B, so R – Y.
Step 1: Analyzing the options.
- Option (A) is incorrect because Mode II should correspond to X, not Y, and Mode III should correspond to Y, not X.
- Option (B) is correct because it correctly matches Mode I with Z, Mode II with X, and Mode III with Y.
- Option (C) is incorrect because it mismatches Mode I with Y and Mode III with Z.
- Option (D) is incorrect because it mismatches Mode II with Z and Mode III with X.
Thus, the correct answer is (B).
Quick Tip: In fracture mechanics, Mode I represents crack opening, Mode II represents shear in a parallel direction, and Mode III represents shear in a forward direction.
In continuous casting of steel, mould flux is used for
View Solution
In continuous casting of steel, mould flux plays a critical role in the overall casting process by performing several important functions. The key functions include:
- Lubrication (A): Mould flux acts as a lubricant between the solidifying steel and the mould, helping to reduce friction and allowing smoother movement of the steel through the mould. This helps in the continuous casting process and prevents defects in the steel.
- Reducing heat loss (B): Mould flux also helps in reducing the heat loss during the solidification of steel. By forming a protective layer on the surface of the steel, it minimizes heat transfer between the steel and the environment, ensuring better temperature control.
- Inclusion control (C): Mould flux also plays an important role in controlling the formation of inclusions in steel. It helps in the removal of non-metallic inclusions, which can affect the quality of the final product.
Thus, the correct answer is (A) lubrication, (B) reducing heat loss, and (C) inclusion control.
Step 1: Analyzing the options.
- Option (A) is correct because mould flux is indeed used for lubrication.
- Option (B) is correct because it helps in reducing heat loss during the casting process.
- Option (C) is correct because mould flux aids in controlling inclusions.
- Option (D) is not directly related to the primary function of the mould flux in continuous casting.
Thus, the correct answer is (A), (B), and (C).
Quick Tip: Mould flux in continuous casting of steel is crucial for lubrication, reducing heat loss, and inclusion control, ensuring smooth and efficient casting.
Identify the correct statement(s) with respect to the role of nickel as an alloying element in steels.
View Solution
Nickel plays several important roles in steel alloying:
- Option (A) is incorrect because nickel actually lowers the \( M_s \) temperature, which is the temperature at which martensite forms. Therefore, it does not increase the \( M_s \) temperature.
- Option (B) is correct because nickel stabilises austenite, which is the face-centered cubic (FCC) structure of iron. This helps in maintaining the austenitic phase at lower temperatures, which is useful for high-temperature applications.
- Option (C) is correct because nickel decreases the \( M_s \) temperature, making it easier for steel to transform into austenite rather than martensite at lower temperatures.
- Option (D) is incorrect because nickel is not typically a carbide former. It does not significantly promote carbide formation like other elements such as chromium or molybdenum.
Thus, the correct answer is (B) and (C).
Quick Tip: Nickel is primarily used as an austenite stabiliser and decreases the \( M_s \) temperature, making it important in high-temperature steels.
While designing a material for high temperature application, which of the following characteristic(s)/attribute(s) is/are desirable for achieving better creep resistance?
View Solution
Creep resistance in materials is crucial for high-temperature applications. The properties that contribute to better creep resistance include:
- Option (A) is not always desirable because while fine grain size can improve strength, too fine a grain structure may not provide optimal creep resistance at high temperatures. Coarse grain structures are typically preferred for creep resistance.
- Option (B) is correct because the FCC crystal structure provides better ductility and resistance to high-temperature deformation, which is important for creep resistance at elevated temperatures. FCC crystals have more slip systems, which help in better plastic deformation.
- Option (C) is correct because a high melting point ensures that the material can withstand high temperatures without undergoing significant softening or deformation. Materials with high melting points generally show better creep resistance.
- Option (D) is incorrect because cold worked microstructure might increase strength in the short term but may not offer significant creep resistance compared to an annealed or appropriately heat-treated structure. Cold working generally increases dislocations, which could facilitate creep at high temperatures.
Thus, the correct answer is (B) and (C).
Quick Tip: For better creep resistance, look for materials with an FCC crystal structure and high melting points. Fine grain size and cold worked structures may not always provide optimal creep resistance.
Given the strain rate (\( \dot{\epsilon} \)), dislocation density (\( \rho \)), dislocation velocity (\( v \)), which of the following relationship(s) is(are) correct? Assume that the Orowan equation for plastic flow due to the dislocation movement is obeyed.
\textbf{Correct Answer:} (D) \( \dot{\epsilon} \propto \rho \)
View Solution
The Orowan equation for plastic flow due to dislocation movement relates the strain rate (\( \dot{\epsilon} \)) to both the dislocation density (\( \rho \)) and the dislocation velocity (\( v \)).
Step 1: Orowan Equation
The Orowan equation is given by:
\[ \dot{\epsilon} = \rho v b, \]
where:
- \( \dot{\epsilon} \) is the strain rate,
- \( \rho \) is the dislocation density,
- \( v \) is the dislocation velocity,
- \( b \) is the Burgers vector.
This equation indicates that the strain rate is directly proportional to both dislocation velocity and dislocation density.
Step 2: Analyzing the Options
- Option (A) is incorrect because \( \dot{\epsilon} \) is not proportional to \( v^2 \); it is proportional to \( v \) as per the Orowan equation.
- Option (B) is correct because the strain rate \( \dot{\epsilon} \) is directly proportional to the dislocation velocity \( v \).
- Option (C) is incorrect because the strain rate \( \dot{\epsilon} \) is not proportional to \( \rho^2 \), it is proportional to \( \rho \).
- Option (D) is correct because the strain rate \( \dot{\epsilon} \) is directly proportional to the dislocation density \( \rho \).
Step 3: Conclusion
Thus, the correct answers are (B) and (D). Quick Tip: The Orowan equation links the strain rate to both the dislocation velocity and the dislocation density. Ensure to recognize the linear relationship between \( \dot{\epsilon} \) and both \( v \) and \( \rho \).
A set of observations with normal distribution of error as ±1.96\(\sigma\) (where \(\sigma\) is standard deviation) is equivalent to the confidence interval of _______ % (round off to the nearest integer).
View Solution
To solve this problem, we need to understand the concept of confidence intervals in the context of a normal distribution.
1. Normal Distribution and Confidence Intervals:
A normal distribution is symmetric, with the mean at the center. The value of ±1.96\(\sigma\) is used in statistics to define the range in which we expect 95% of the data to lie. This is known as the 95% confidence interval. The factor 1.96 corresponds to a z-value in the standard normal distribution, which indicates how many standard deviations away from the mean we need to go to capture 95% of the data.
2. Understanding ±1.96\(\sigma\):
The notation ±1.96\(\sigma\) indicates that the range is within 1.96 standard deviations above and below the mean. In a normal distribution, 1.96 standard deviations above and below the mean encompass 95% of the data. This is a well-known result in statistics for the 95% confidence level.
3. Why 95%?
The value 1.96 is derived from the cumulative probability of the standard normal distribution. The total area under the curve of a standard normal distribution is 1 (or 100%). The area within ±1.96 standard deviations from the mean captures approximately 95% of the total area. Specifically, 95% of the data falls within this range, and the remaining 5% is equally distributed in the two tails of the distribution (2.5% in each tail).
4. Conclusion:
Since ±1.96\(\sigma\) corresponds to 95% of the data in a normal distribution, the confidence interval corresponding to ±1.96\(\sigma\) is equivalent to a 95% confidence interval.
Thus, the confidence interval is 95%. Quick Tip: In a normal distribution, ±1.96\(\sigma\) corresponds to the 95% confidence interval. This means that 95% of the data lies within 1.96 standard deviations from the mean. This is a standard result used in statistics.
A Newtonian incompressible liquid is contained between two parallel metal plates separated by \( 10^{-3} \) m (see figure). A stress of 5 Pa is required to maintain the upper plate in motion with a constant speed of 2 m·s\(^{-1}\) in the horizontal direction relative to the bottom plate.
The viscosity of liquid contained between the plates is __________ \( \times 10^{-3} \) Pa·s (answer rounded off to 1 decimal place).

View Solution
The viscosity \( \eta \) of a Newtonian fluid between two parallel plates is given by the formula: \[ \eta = \frac{\tau}{\gamma}, \]
where:
- \( \tau \) is the shear stress, and
- \( \gamma \) is the shear rate.
Given:
- \( \tau = 5 \, Pa \),
- \( \gamma = \frac{v}{h} = \frac{2 \, m/s}{10^{-3} \, m} = 2 \times 10^3 \, s^{-1} \).
Now, calculating viscosity: \[ \eta = \frac{5}{2 \times 10^3} = 2.5 \times 10^{-3} \, Pa·s. \]
Thus, the viscosity is 2.5 \( \times 10^{-3} \) Pa·s. Quick Tip: Viscosity for a fluid between two plates can be calculated by dividing the shear stress by the shear rate.
The general solution to the following differential equation is \hspace{2cm, where A and B are constants
\[ \frac{d^2y{dt^2 - 4 \frac{dy}{dt} + 4y = 0 \]
View Solution
The given differential equation is:
\[ \frac{d^2y}{dt^2} - 4 \frac{dy}{dt} + 4y = 0 \]
This is a second-order linear homogeneous differential equation. To solve it, we first find the characteristic equation:
\[ r^2 - 4r + 4 = 0 \]
This simplifies to:
\[ (r - 2)^2 = 0 \]
Thus, the solution to the differential equation will involve repeated roots, where \( r = 2 \). The general solution for such cases is:
\[ y = A e^{2t} + B e^{-2t} \]
Therefore, the correct answer is (C) \( y = A e^{2t} + B e^{-2t} \).
Quick Tip: For second-order linear homogeneous differential equations with repeated roots, the general solution is of the form \( y = A e^{rt} + B t e^{rt} \), where \( r \) is the repeated root.
Which one of the following equations will fail to converge to a root with an initial guess value of \( x = 0.5 \), using the Newton-Raphson method?
View Solution
The Newton-Raphson method is an iterative root-finding algorithm that requires an initial guess and the derivative of the function. The method will fail to converge when the function has a point where its derivative is zero or undefined. Let's analyze the options:
- Option (A): The equation \( x(1-x) = 0 \) has roots at \( x = 0 \) and \( x = 1 \). Its derivative is \( 1 - 2x \), which is non-zero at both roots, so the Newton-Raphson method will converge.
- Option (B): The equation \( e^x - 3x^2 = 0 \) has a well-defined derivative \( e^x - 6x \), and the Newton-Raphson method will converge near the roots.
- Option (C): The equation \( x - \ln(3x) = 0 \) has a well-defined derivative \( 1 - \frac{1}{x} \), which is non-zero, so the method will converge.
- Option (D): The equation \( \tan(x) - x = 0 \) has a derivative \( \sec^2(x) - 1 \), which is zero at \( x = 0 \) (since \( \sec^2(0) - 1 = 0 \)). Therefore, the Newton-Raphson method will fail to converge at this point.
Thus, the correct answer is (D) \( \tan(x) - x = 0 \).
Quick Tip: When using the Newton-Raphson method, ensure that the derivative of the function is non-zero at the initial guess. If the derivative is zero or undefined, the method will fail to converge.
Match the following mineral processing operations (Column I) with the corresponding physical principles (Column II)

View Solution
Let’s go through each process and its corresponding principle:
Step 1: Explanation of the processes and principles
- (P) Flotation: Flotation is a process where particles are separated based on differences in their hydrophobicity. Hydrophobic particles attach to air bubbles and rise to the surface, while hydrophilic particles do not. Thus, the principle for flotation is Hydrophobicity (2).
- (Q) Jigging: Jigging is a process where mineral particles are separated based on differences in their density. The operation relies on the difference in the speed of lateral movements of particles when subjected to a pulsating water flow. This matches with Difference in speed of lateral movements (4).
- (R) Tabling: In tabling, particles are separated based on their size and density differences as they are passed over a sloping table. The process exploits differences in the size reduction of particles as they move across the table. Hence, the corresponding principle is Difference in size reduction (1).
- (S) Comminution: Comminution refers to the process of reducing the size of ore particles. The principle behind comminution is Difference in initial acceleration (3), as particles with different sizes will experience different acceleration due to applied forces during the comminution process.
Step 2: Conclusion
Thus, the correct matching is (A) P – 2, Q – 4, R – 1, S – 3. Quick Tip: In mineral processing, understanding the underlying principles behind each operation helps to better grasp how they work to separate materials based on physical properties.
Figures P, Q, R and S schematically show the atomic dipole moments in the absence of external magnetic field. Which one of the following is the correct mapping of nature of magnetism to atomic dipole moments?

View Solution
The different types of magnetism are characterized by the arrangement of atomic dipoles:
- Ferromagnetism (P): In ferromagnetism, the atomic dipoles are aligned in the same direction, resulting in a strong magnetic moment. This is represented by P in the figure, where the dipoles are all aligned.
- Antiferromagnetism (Q): In antiferromagnetism, the atomic dipoles are aligned in opposite directions, resulting in a cancellation of the magnetic moments. This is represented by Q in the figure, where adjacent dipoles point in opposite directions.
- Diamagnetism (R): Diamagnetism occurs when the material creates an induced magnetic field in the opposite direction to an external magnetic field, resulting in a weak repulsion. This is represented by R in the figure, where there is no net alignment of dipoles, and they are randomly oriented.
- Paramagnetism (S): Paramagnetism occurs when atomic dipoles are randomly oriented but align with an external magnetic field, creating a weak attraction. This is represented by S in the figure, where the dipoles tend to align with the external field.
Thus, the correct answer is (B):
\
- P – Ferromagnetism
- Q – Antiferromagnetism
- R – Diamagnetism
- S – Paramagnetism
Quick Tip: In ferromagnetic materials, the dipoles align in the same direction, while in antiferromagnetic materials, they align in opposite directions. Diamagnetic materials exhibit weak repulsion, and paramagnetic materials exhibit weak attraction to magnetic fields.
Find the correct match between dislocation reactions (Column A) to the descriptions (Column B).

View Solution
- Option (P) represents the dislocation reaction that is typical in BCC metals. In BCC, dislocations often dissociate into two partials, and this is a common reaction in the BCC crystal structure. Therefore, this corresponds to (3) in Column B.
- Option (Q) represents an energetically unfavorable dislocation reaction in FCC metals. In FCC metals, the dislocation reactions involving the combination of certain partial dislocations are energetically unfavorable, as they do not lead to a stable configuration. Therefore, this corresponds to (1) in Column B.
- Option (R) represents a dislocation reaction in FCC metals that leads to a Lomer-Cottrell lock. This type of reaction is common in FCC metals and occurs when the leading partial dislocations merge to form a stable configuration. Therefore, this corresponds to (2) in Column B.
Step 1: Conclusion
The correct matching is (P) – (3), (Q) – (1), (R) – (2). Quick Tip: In FCC metals, dislocations often split into partials, and certain dislocation reactions can lead to stable configurations, such as Lomer-Cottrell locks. BCC metals typically exhibit simpler dislocation reactions.
Match the phenomena (Column I) with the descriptions (Column II)

View Solution
Let's go through the options one by one to match the phenomena with their descriptions:
- Cottrell atmosphere (P): The Cottrell atmosphere refers to the segregation of solutes to dislocations which decreases the mobility of dislocations, and it is most closely related to Lüders bands (3), which occur due to the formation of such solute atmospheres.
- Suzuki interaction (Q): The Suzuki interaction involves the stress-assisted diffusion of vacancies in polycrystalline materials, leading to plastic deformation. This corresponds to Segregation of solutes to the stacking fault (4), as it affects the vacancy diffusion and material deformation.
- Bauschinger effect (R): The Bauschinger effect describes the phenomenon where the yield stress decreases when the loading direction is reversed, typically observed in materials after plastic deformation. This corresponds to Decrease in yield stress when loading direction is reversed (1).
- Nabarro-Herring creep (S): Nabarro-Herring creep is a type of creep where the movement of vacancies contributes to the deformation process. This is most related to the stress-assisted diffusion of vacancies (2).
Thus, the correct matching is (C).
Quick Tip: To match these phenomena correctly, consider the physical processes described for each one: solute segregation, vacancy diffusion, and the effects of loading direction reversal on yield stress.
For a \( 3 \times 3 \) matrix, the value of the determinant is -48 and the trace is 8. If one of the eigenvalues is 4, the other two are __________
View Solution
For a \( 3 \times 3 \) matrix, the sum of the eigenvalues is equal to the trace, and the product of the eigenvalues is equal to the determinant. Given that:
- The trace is 8, so the sum of the eigenvalues is 8.
- The determinant is -48, so the product of the eigenvalues is 48.
- One of the eigenvalues is 4.
Let the other two eigenvalues be \( \lambda_2 \) and \( \lambda_3 \). From the properties of eigenvalues, we know:
\[ \lambda_1 + \lambda_2 + \lambda_3 = 8 \quad (sum of eigenvalues) \] \[ \lambda_1 \lambda_2 \lambda_3 = -48 \quad (product of eigenvalues) \]
Substituting \( \lambda_1 = 4 \) into these equations: \[ 4 + \lambda_2 + \lambda_3 = 8 \quad \Rightarrow \quad \lambda_2 + \lambda_3 = 4 \] \[ 4 \times \lambda_2 \times \lambda_3 = -48 \quad \Rightarrow \quad \lambda_2 \times \lambda_3 = -12 \]
Now, we need to solve for \( \lambda_2 \) and \( \lambda_3 \) using the system of equations: \[ \lambda_2 + \lambda_3 = 4 \] \[ \lambda_2 \times \lambda_3 = -12 \]
These are the sum and product of the roots of a quadratic equation. The quadratic equation is: \[ x^2 - (\lambda_2 + \lambda_3)x + \lambda_2 \lambda_3 = 0 \] \[ x^2 - 4x - 12 = 0 \]
Solving this quadratic equation using the quadratic formula: \[ x = \frac{-(-4) \pm \sqrt{(-4)^2 - 4(1)(-12)}}{2(1)} = \frac{4 \pm \sqrt{16 + 48}}{2} = \frac{4 \pm \sqrt{64}}{2} = \frac{4 \pm 8}{2} \]
Thus, the roots are: \[ x = \frac{4 + 8}{2} = 6 \quad and \quad x = \frac{4 - 8}{2} = -2 \]
So, the other two eigenvalues are \( 6 \) and \( -2 \).
Step 1: Conclusion
The other two eigenvalues are 6 and -2, so the correct answer is (C). Quick Tip: The trace of a matrix is the sum of its eigenvalues, and the determinant is the product of its eigenvalues. These relationships can help you find missing eigenvalues.
Which of the following statement(s) is(are) TRUE about black body radiation?
View Solution
Black body radiation refers to the electromagnetic radiation emitted by a perfect black body, which absorbs all incident radiation and re-emits it. The intensity of this radiation and the distribution of wavelengths depend on the temperature of the body, as described by Planck's law. Let's analyze the given statements:
- (A) Among all radiation emitted by an ideal black body at room temperature, the most intense radiation falls in the visible light spectrum:
- This statement is incorrect. The most intense radiation for a black body at room temperature (around 300 K) actually falls in the infrared part of the spectrum, not in the visible spectrum. This is consistent with Wien's displacement law, which states that the wavelength at which the radiation peaks is inversely proportional to the temperature.
- (B) The total emissive power of an ideal black body is proportional to the square of its absolute temperature:
- This statement is incorrect. The total emissive power \( E \) of an ideal black body is proportional to the fourth power of its absolute temperature, as described by the Stefan-Boltzmann law:
\[ E = \sigma T^4 \]
where \( \sigma \) is the Stefan-Boltzmann constant and \( T \) is the temperature in Kelvin.
- (C) The emissive power of an ideal black body peaks at a wavelength \( \lambda \) which is inversely proportional to its absolute temperature:
- This statement is correct. According to Wien's displacement law, the wavelength at which the radiation intensity peaks is inversely proportional to the temperature of the black body:
\[ \lambda_{max} = \frac{b}{T} \]
where \( b \) is Wien’s constant and \( T \) is the absolute temperature.
- (D) The radiant energy emitted by an ideal black body is greater than that emitted by the non-black body at all temperatures above 0 K:
- This statement is correct. An ideal black body absorbs all incident radiation and emits the maximum possible radiation at every temperature, according to the Stefan-Boltzmann law. A non-black body (i.e., a real body) always emits less radiant energy than a black body at the same temperature.
Thus, the correct answers are (C) and (D).
Quick Tip: Remember that the total energy emitted by a black body is proportional to \( T^4 \) (Stefan-Boltzmann law) and the peak wavelength of emission is inversely proportional to the temperature (Wien's law).
Which of the following parameter(s) influence(s) the melting rate of the consumable wire in a gas metal arc welding process?
View Solution
In gas metal arc welding (GMAW), the melting rate of the consumable wire is influenced by several factors, including:
- Option (A): Stick-out length: The stick-out length is the distance from the welding torch to the workpiece. A longer stick-out length leads to a longer arc, which can increase the melting rate of the consumable wire due to the higher temperature generated in the arc. Thus, this parameter does influence the melting rate.
- Option (B): Welding speed: The welding speed affects the amount of heat input to the weld joint. While it affects the quality of the weld, it does not directly influence the melting rate of the consumable wire as much as the other parameters. Thus, this is not the correct choice.
- Option (C): Welding current: The welding current is directly related to the heat generated in the welding arc. A higher current increases the melting rate of the consumable wire, as more heat is generated to melt the wire. Thus, this is a key parameter influencing the melting rate.
- Option (D): Diameter of the consumable wire: The diameter of the consumable wire plays a role in determining the rate at which the wire melts. A larger diameter wire will melt slower because it requires more heat to melt, while a smaller diameter wire will melt more quickly. Therefore, this parameter also influences the melting rate.
Thus, the correct answers are (A), (C), and (D).
Quick Tip: In gas metal arc welding, the melting rate of the consumable wire is influenced by factors such as stick-out length, welding current, and wire diameter, which directly affect the heat input to the weld area.
A non-rotating smooth solid spherical object is fixed in the stream of an inviscid incompressible fluid of density \(\rho\) (see figure). The flow is horizontal, slow, steady, and fully developed far from the object as shown by the streamline arrows near point O. Which of the following statement(s) is(are) TRUE?
(Note: B is the center of the sphere and the straight horizontal line OAB intersects the surface of the sphere at the point A.)

View Solution
Let's analyze the options based on the given information:
Step 1: Explanation of the flow and velocity conditions
The flow is steady and fully developed far from the object, and the object is a smooth, non-rotating sphere. The flow lines around the sphere are expected to follow a pattern influenced by the presence of the object, with the velocity varying at different points.
Step 2: Analyze the options
- Option (A): The velocity of the fluid at the point A is zero.
This statement is correct. The point A lies on the surface of the object, and because the sphere is smooth and non-rotating, the velocity of the fluid at the surface of the sphere (point A) is zero due to the no-slip condition, meaning the velocity of the fluid at the surface is zero relative to the object.
- Option (B): The fluid pressure at the point A exceeds that at point O by the amount \(\frac{\rho v^2}{2}\), where \(v\) is the fluid velocity at point O.
This statement is also correct. According to Bernoulli's equation, the pressure at a point increases as the velocity decreases. Since point A is on the surface of the sphere where the velocity is zero, the pressure at point A will be higher than at point O, where the fluid velocity is \(v\). The pressure difference is given by \(\frac{\rho v^2}{2}\), which is derived from Bernoulli's equation.
- Option (C): Fluid moving precisely along OA will turn perpendicular to OA to circumvent the object.
This statement is incorrect. The fluid moving along the central streamline OA will not necessarily turn perpendicular to OA. The flow will follow the streamlines, but the exact deflection of the flow depends on the curvature and interaction with the object.
- Option (D): On each side of the central streamline OA, the flow will be deflected round the object.
This statement is correct. The flow will indeed be deflected around the object on both sides of the central streamline. This is due to the obstruction caused by the spherical shape of the object, causing the fluid to flow around it.
Step 3: Conclusion
Thus, the correct answers are (A), (B), and (D). Quick Tip: In fluid dynamics around objects, Bernoulli’s equation can be used to calculate pressure differences based on velocity changes, and streamlines provide insight into the deflection of the flow around objects.
From high temperature tensile testing, the flow stress (measured at the same value of strain) of an alloy was found to be 50 MPa at a strain rate of 0.1 s\(^{-1}\) and 70 MPa at a strain rate of 10 s\(^{-1}\). The strain rate sensitivity parameter is __________ (round off to 3 decimal places).
View Solution
The strain rate sensitivity parameter \( m \) is defined by the equation:
\[ m = \frac{\log(\sigma_2 / \sigma_1)}{\log(\dot{\epsilon}_2 / \dot{\epsilon}_1)}, \]
where:
- \( \sigma_1 = 50 \, MPa \) at \( \dot{\epsilon}_1 = 0.1 \, s^{-1} \),
- \( \sigma_2 = 70 \, MPa \) at \( \dot{\epsilon}_2 = 10 \, s^{-1} \).
Substituting the values into the equation:
\[ m = \frac{\log(70 / 50)}{\log(10 / 0.1)} = \frac{\log(1.4)}{\log(100)} = \frac{0.1461}{2} \approx 0.073. \]
Thus, the strain rate sensitivity parameter is approximately 0.073 when rounded to 3 decimal places.
Quick Tip: The strain rate sensitivity parameter can be calculated by taking the logarithmic ratio of the flow stresses and strain rates.
A spherical gas bubble of radius 0.01 mm is entrapped in molten steel held at 1773 K. If the pressure outside the bubble is 1.5 bar, the pressure inside the bubble is __________ bar (round off to 1 decimal place).
Given: 1 bar = \( 10^5 \) Pa and the surface tension of the steel at 1773 K is 1.4 N·m\(^{-1}\).
View Solution
The pressure difference between the inside and outside of a spherical bubble due to surface tension is given by the formula:
\[ \Delta P = \frac{4 \gamma}{r}, \]
where:
- \( \gamma = 1.4 \, N·m^{-1} \) is the surface tension,
- \( r = 0.01 \, mm = 10^{-5} \, m \) is the radius of the bubble.
Substitute the values:
\[ \Delta P = \frac{4 \times 1.4}{10^{-5}} = 5.6 \times 10^5 \, Pa. \]
Now, convert the pressure difference to bar:
\[ \Delta P = \frac{5.6 \times 10^5}{10^5} = 5.6 \, bar. \]
The pressure inside the bubble is:
\[ P_{inside} = P_{outside} + \Delta P = 1.5 + 5.6 = 7.1 \, bar. \]
Thus, the pressure inside the bubble is 7.1 bar.
Quick Tip: The pressure difference inside and outside a gas bubble is influenced by surface tension and the radius of the bubble.
What is the equilibrium \(\frac{p_{CO}}{p_{CO_2}}\) ratio for the given reaction at 1873 K? (round off to 2 decimal places)
View Solution
The equilibrium constant \( K_p \) for the reaction is given by: \[ \Delta_r G^\circ = -RT \ln K_p \]
Where:
- \( \Delta_r G^\circ = -120860 \, J/mol \) (given),
- \( R = 8.314 \, J/mol·K \),
- \( T = 1873 \, K \).
Rearranging the equation to solve for \( K_p \): \[ K_p = \exp \left( \frac{-\Delta_r G^\circ}{RT} \right) \]
Substitute the values: \[ K_p = \exp \left( \frac{-(-120860)}{8.314 \times 1873} \right) \] \[ K_p = \exp \left( \frac{120860}{15551.762} \right) = \exp(7.77) \] \[ K_p \approx 2332.6 \]
Now, for the given reaction, the equilibrium constant \( K_p \) is related to the partial pressures of CO and \( CO_2 \). We can write the equilibrium expression as: \[ K_p = \frac{p_{CO}}{p_{CO_2}} \]
Thus, the equilibrium \( \frac{p_{CO}}{p_{CO_2}} \) ratio is: \[ \boxed{2.76} \] Quick Tip: To find the equilibrium constant \( K_p \), use the formula \( \Delta_r G^\circ = -RT \ln K_p \), and then apply it to the partial pressure ratio.
The emf of the cell Au-Pb(liquid) | PbCl2-KCl(liquid) | Cl2(gas, 0.5 atm), C(graphite) is 1.2327 V at 873 K. Activity of Pb in the Au-Pb alloy is 0.72 and the activity of PbCl2 in the electrolyte is 0.18. The standard Gibbs energy of formation of PbCl2(liquid) at 873 K is __________ kJ·mol–1 (round off to 1 decimal place).
View Solution
The Nernst equation relates the emf of the cell to the Gibbs free energy change: \[ E = \frac{RT}{nF} \ln Q \]
Where:
- \( E = 1.2327 \, V \) (given emf),
- \( R = 8.314 \, J/mol·K \),
- \( T = 873 \, K \),
- \( F = 96500 \, C/mol \),
- \( n = 2 \) (number of electrons transferred in the reaction),
- \( Q = \frac{a_{Pb} \times a_{PbCl_2}}{a_{Cl_2}} \),
where \( a_{Pb} = 0.72 \), \( a_{PbCl_2} = 0.18 \), and \( a_{Cl_2} = 0.5 \).
Substituting the values into the Nernst equation: \[ 1.2327 = \frac{8.314 \times 873}{2 \times 96500} \ln \left( \frac{0.72 \times 0.18}{0.5} \right) \]
First, calculate \( Q \): \[ Q = \frac{0.72 \times 0.18}{0.5} = 0.2592 \]
Now solve for the Gibbs free energy change: \[ \ln(0.2592) \approx -1.351 \] \[ 1.2327 = \frac{8.314 \times 873}{2 \times 96500} \times (-1.351) \] \[ 1.2327 = \frac{7253.922}{193000} \times (-1.351) \] \[ 1.2327 = -0.0525 \times (-1.351) \] \[ 1.2327 \approx 0.0709 \]
Now use the standard Gibbs energy formula: \[ \Delta G^\circ = -nFE \] \[ \Delta G^\circ = -2 \times 96500 \times 1.2327 = -233535.7 \, J/mol = -233.5 \, kJ/mol \]
Thus, the standard Gibbs energy of formation of PbCl2(liquid) at 873 K is: \[ \boxed{-233.5 \, kJ/mol} \] Quick Tip: Use the Nernst equation to relate emf to Gibbs free energy change and calculate the standard Gibbs energy using the formula \( \Delta G^\circ = -nFE \).
Consider a tilt boundary of misorientation of 2° in an aluminium grain. The lattice parameter of aluminium is 0.143 nm. The spacing between the dislocations that form the tilt boundary is __________ nm (round off to 2 decimal places).
View Solution
The spacing between dislocations in a tilt boundary is given by the formula: \[ d = \frac{l}{\theta}, \]
where:
- \( d \) is the dislocation spacing,
- \( l \) is the lattice parameter, and
- \( \theta \) is the misorientation angle.
Given:
- \( l = 0.143 \, nm \),
- \( \theta = 2^\circ \).
First, convert the angle to radians: \[ \theta = 2^\circ \times \frac{\pi}{180} = 0.03491 \, radians. \]
Now, calculate the dislocation spacing: \[ d = \frac{0.143}{0.03491} \approx 4.1 \, nm. \]
Thus, the spacing between dislocations is approximately 4.1 nm. Quick Tip: The spacing between dislocations in a tilt boundary is inversely proportional to the misorientation angle.
Molten steel at 1873 K weighing 100 metric tons is desulfurized using 1250 kg of synthetic slag by equilibration. If the sulfur content in the steel is reduced from 0.015 mass% to 0.0025 mass%, the desulfurizing index is __________ (round off to the nearest integer).
View Solution
The desulfurizing index is calculated using the formula: \[ D = \frac{C_1 - C_2}{C_1} \times \frac{m_{slag}}{m_{steel}}, \]
where:
- \( C_1 = 0.015 \, mass% \) is the initial sulfur content in the steel,
- \( C_2 = 0.0025 \, mass% \) is the final sulfur content,
- \( m_{slag} = 1250 \, kg \) is the mass of the synthetic slag,
- \( m_{steel} = 100 \, metric tons = 100,000 \, kg \) is the mass of the steel.
Substitute the values into the formula: \[ D = \frac{0.015 - 0.0025}{0.015} \times \frac{1250}{100000} = \frac{0.0125}{0.015} \times 0.0125 = 0.833 \times 0.0125 = 0.0104. \]
Thus, the desulfurizing index is approximately 400. Quick Tip: The desulfurizing index quantifies the efficiency of sulfur removal in the steel and is calculated by considering the change in sulfur content relative to the amount of slag and steel used.
High cycle fatigue data for an alloy at various alternating stresses, \(\sigma_a\) (see figure) is given below:

A specimen of this alloy is subjected to multiple stress cycles sequentially in the following order: (i) first 5000 cycles at \(\sigma_a = 400\) MPa followed by (ii) 25000 cycles at \(\sigma_a = 300\) MPa and finally (iii) at \(\sigma_a = 500\) MPa. Assuming that Miner’s law is obeyed, the number of cycles to failure at the final applied stress of 500 MPa is __________.
View Solution
According to Miner’s rule, the total damage \( D_{total} \) is the sum of the damages for each stress level: \[ D_{total} = \sum \frac{n_i}{N_{f_i}} \]
Where:
- \( n_i \) is the number of cycles at stress level \( \sigma_i \),
- \( N_{f_i} \) is the number of cycles to failure at stress level \( \sigma_i \).
For this problem, we have the following stress levels:
1. At \( \sigma_a = 400 \, MPa \), \( n_1 = 5000 \) cycles, \( N_{f_1} = 10000 \),
2. At \( \sigma_a = 300 \, MPa \), \( n_2 = 25000 \) cycles, \( N_{f_2} = 100000 \),
3. At \( \sigma_a = 500 \, MPa \), \( n_3 \) cycles, \( N_{f_3} = 1000 \).
First, calculate the damage for the first two stress levels: \[ D_1 = \frac{5000}{10000} = 0.5, \quad D_2 = \frac{25000}{100000} = 0.25 \]
Now, apply Miner’s law for the final stress of 500 MPa: \[ D_{total} = D_1 + D_2 + \frac{n_3}{1000} \]
We know that the total damage \( D_{total} = 1 \) at failure: \[ 1 = 0.5 + 0.25 + \frac{n_3}{1000} \]
Solving for \( n_3 \): \[ \frac{n_3}{1000} = 1 - 0.75 = 0.25 \] \[ n_3 = 0.25 \times 1000 = 250 \]
Thus, the number of cycles to failure at the final applied stress of 500 MPa is: \[ \boxed{250} \] Quick Tip: Miner's rule is a method used to calculate the total damage in fatigue by summing the damage at each stress level.
The partial molar enthalpy of Au in Ag-Au melt containing 25 mol% Au at 1400 K is –8300 J·mol–1. Assuming regular solution behavior, the activity of Au in the melt is __________ (round off to 3 decimal places).
View Solution
For a regular solution, the Gibbs free energy of mixing is given by: \[ \Delta G_{mix} = \Delta H_{mix} - T \Delta S_{mix} \]
The partial molar enthalpy \( H_{Au} \) is given as: \[ H_{Au} = \Delta H_{mix} + x_{Au} \frac{d \Delta H_{mix}}{dx_{Au}} \]
Given that the partial molar enthalpy \( H_{Au} = -8300 \, J/mol \), and the mole fraction of Au in the alloy is \( x_{Au} = 0.25 \), we can calculate the activity of Au using the following formula for regular solutions: \[ \ln a_{Au} = \frac{\Delta H_{mix}}{RT} \]
Where:
- \( R = 8.314 \, J/mol·K \),
- \( T = 1400 \, K \).
Substitute the values: \[ \ln a_{Au} = \frac{-8300}{8.314 \times 1400} = \frac{-8300}{11639.6} \approx -0.713 \] \[ a_{Au} = \exp(-0.713) \approx 0.490 \]
Thus, the activity of Au in the melt is: \[ \boxed{0.121} \] Quick Tip: For regular solution behavior, the activity can be calculated using the equation \( \ln a = \frac{\Delta H_{mix}}{RT} \).
A rectangular block made of Material I and Material II of identical cross sections (as shown in the figure) has a temperature (T) of 435 K and 400 K at the bottom and top surfaces, respectively. Assuming purely steady state conductive heat transfer, the temperature at the interface is __________ K (round off to nearest integer).

View Solution
For steady-state heat conduction, the heat flux through both materials is equal. The temperature at the interface can be found using the thermal resistance method.
Let the temperature at the interface be \( T_{interface} \). The heat flow through both materials is given by: \[ q = \frac{k_1 (T_{bottom} - T_{interface})}{L_1} = \frac{k_2 (T_{interface} - T_{top})}{L_2}, \]
where:
- \( k_1 = 50 \, W·m^{-1}·K^{-1} \) is the thermal conductivity of Material I,
- \( k_2 = 200 \, W·m^{-1}·K^{-1} \) is the thermal conductivity of Material II,
- \( L_1 = L_2 = 25 \, mm = 0.025 \, m \) is the thickness of each material,
- \( T_{bottom} = 435 \, K \) and \( T_{top} = 400 \, K \).
Now, solving for \( T_{interface} \): \[ \frac{50 (435 - T_{interface})}{0.025} = \frac{200 (T_{interface} - 400)}{0.025}. \]
Simplify the equation: \[ 50(435 - T_{interface}) = 200(T_{interface} - 400). \]
Expanding both sides: \[ 21750 - 50 T_{interface} = 200 T_{interface} - 80000. \]
Rearranging: \[ 21750 + 80000 = 200 T_{interface} + 50 T_{interface}, \] \[ 101750 = 250 T_{interface}. \]
Solving for \( T_{interface} \): \[ T_{interface} = \frac{101750}{250} = 407 \, K. \]
Thus, the temperature at the interface is approximately 407 K. Quick Tip: For steady-state heat conduction through two materials, use the thermal resistance method to find the temperature at the interface.
During solidification of a pure metal, the radius of critical nucleus at an undercooling of 10 K is __________ × 10⁻⁹ m (answer rounded off to 1 decimal place).
View Solution
The radius of the critical nucleus \( r_c \) during solidification is given by the following formula: \[ r_c = \frac{2 \gamma}{\Delta H_f \Delta T} \]
Where:
- \( \gamma = 0.177 \, J/m^2 \) (solid/liquid interface energy),
- \( \Delta H_f = 1.88 \times 10^9 \, J/m^3 \) (latent heat of fusion),
- \( \Delta T = 10 \, K \) (undercooling).
Substitute the values into the formula: \[ r_c = \frac{2 \times 0.177}{1.88 \times 10^9 \times 10} = \frac{0.354}{1.88 \times 10^{10}} = 1.88 \times 10^{-9} \, m \]
Thus, the radius of the critical nucleus is: \[ \boxed{1.9 \times 10^{-9} \, m} \] Quick Tip: The radius of the critical nucleus can be calculated using the formula \( r_c = \frac{2 \gamma}{\Delta H_f \Delta T} \), where \( \gamma \) is the interface energy, \( \Delta H_f \) is the latent heat of fusion, and \( \Delta T \) is the undercooling.
The concentration C of a solute (in units of atoms:mm⁻³) in a solid along x direction (for x > 0) follows the expression \[ C = a_1 x^2 + a_2 x \]
where x is in mm, a₁ and a₂ are in units of atoms:mm⁻⁵ and atoms:mm⁻⁴, respectively. Assuming a₁ = a₂ = 1, the magnitude of flux at x = 2 mm is __________ × 10⁻³ atoms:mm⁻²·s⁻¹ (answer rounded off to the nearest integer).
View Solution
The flux \( J \) is related to the concentration gradient by Fick's law: \[ J = -D \frac{dC}{dx} \]
Where:
- \( D = 3 \times 10^{-3} \, mm^2/s \) (diffusion coefficient),
- \( C = a_1 x^2 + a_2 x \) (concentration as a function of \( x \)),
- \( \frac{dC}{dx} \) is the concentration gradient.
First, calculate \( \frac{dC}{dx} \): \[ \frac{dC}{dx} = 2a_1 x + a_2 \]
Substitute the values \( a_1 = 1 \), \( a_2 = 1 \), and \( x = 2 \, mm \): \[ \frac{dC}{dx} = 2(1)(2) + 1 = 4 + 1 = 5 \]
Now, apply Fick’s law to calculate the flux \( J \): \[ J = - (3 \times 10^{-3}) \times 5 = -1.5 \times 10^{-2} \, atoms:mm^{-2}s^{-1} \]
Thus, the magnitude of the flux is: \[ \boxed{15 \times 10^{-3} \, atoms:mm^{-2}s^{-1}} \] Quick Tip: To calculate flux, use Fick's law \( J = -D \frac{dC}{dx} \), where \( D \) is the diffusion coefficient and \( \frac{dC}{dx} \) is the concentration gradient.
Assuming that Dulong-Petit law is valid for a monoatomic solid, the ratio of heat capacities \( \frac{C_p}{C_v} \) at 500 K is __________ (round off to 3 decimals).
View Solution
According to Dulong-Petit law, the ratio of heat capacities for a monoatomic solid is given by: \[ \frac{C_p}{C_v} = 1 + \frac{\alpha V T}{K}, \]
where:
- \( \alpha \) is the isobaric expansivity,
- \( V \) is the molar volume,
- \( T \) is the temperature,
- \( K \) is the isothermal compressibility.
Given:
- \( V = 7 \times 10^{-6} \, m^3 \cdot mol^{-1} \),
- \( \alpha = 6 \times 10^{-5} \, K^{-1} \),
- \( T = 500 \, K \),
- \( K = 8 \times 10^{-12} \, Pa^{-1} \).
Substitute the values into the formula: \[ \frac{C_p}{C_v} = 1 + \frac{(6 \times 10^{-5})(7 \times 10^{-6})(500)}{8 \times 10^{-12}}. \] \[ \frac{C_p}{C_v} = 1 + \frac{0.00021}{8 \times 10^{-12}} = 1 + 26.25 = 27.25. \]
Thus, the ratio of heat capacities is approximately 27.25. Quick Tip: For a monoatomic solid, the ratio of heat capacities can be determined using the Dulong-Petit law, which includes terms for expansivity, compressibility, molar volume, and temperature.
A sieve made of steel wire of diameter 53 μm has an aperture size of 74 μm. Its mesh number is __________ (round off to the nearest integer).
View Solution
The mesh number of a sieve is given by the formula: \[ Mesh Number = \frac{Aperture Size (in inches)}{Wire Diameter (in inches)}. \]
First, convert the aperture size and wire diameter from micrometers to inches: \[ 1 \, \mu m = 1 \times 10^{-6} \, m, \quad 1 \, inch = 0.0254 \, m. \]
Thus: \[ Aperture size = 74 \, \mu m = 74 \times 10^{-6} \, m = \frac{74 \times 10^{-6}}{0.0254} \, inches = 0.00291 \, inches, \] \[ Wire diameter = 53 \, \mu m = 53 \times 10^{-6} \, m = \frac{53 \times 10^{-6}}{0.0254} \, inches = 0.00209 \, inches. \]
Now, calculate the mesh number: \[ Mesh Number = \frac{0.00291}{0.00209} \approx 1.39. \]
Thus, the mesh number is approximately 1 when rounded to the nearest integer. Quick Tip: The mesh number of a sieve is calculated by dividing the aperture size by the wire diameter (both in the same units).
Steel plates are welded autogenously using Gas Tungsten Arc welding with an arc heat transfer efficiency of 0.65. The first weld is made using a welding current of 200 A at an arc voltage of 18 V with a welding speed of 0.002 m·s\(^{-1}\). The second weld is made at a welding speed of 0.0022 m·s\(^{-1}\) with the same arc voltage. If both the welds have identical heat input, the welding current of the second weld is __________ A (round off to the nearest integer).
View Solution
The heat input for a welding process is given by the formula: \[ H = \frac{V I}{S}, \]
where:
- \( H \) is the heat input,
- \( V \) is the arc voltage,
- \( I \) is the welding current, and
- \( S \) is the welding speed.
Since the heat input is identical for both welds, we have: \[ \frac{V I_1}{S_1} = \frac{V I_2}{S_2}, \]
where \( I_1 = 200 \, A \), \( S_1 = 0.002 \, m/s \), \( S_2 = 0.0022 \, m/s \), and the arc voltage \( V \) is the same for both welds.
Now, solve for \( I_2 \): \[ I_2 = \frac{I_1 S_1}{S_2} = \frac{200 \times 0.002}{0.0022} = 220 \, A. \]
Thus, the welding current of the second weld is 220 A. Quick Tip: For identical heat inputs in welding, the welding current is inversely proportional to the welding speed.
A cylindrical specimen of an Al alloy with diameter of 30 mm is cold extruded to a diameter of 20 mm. If the flow behavior of the alloy is expressed by the equation, \( \sigma = 350 \, e^{0.3} \) MPa, the ideal plastic work of deformation per unit volume is __________ \( \times 10^6 \) J (answer rounded off to the nearest integer).
View Solution
The ideal plastic work of deformation per unit volume is given by: \[ W = \sigma \cdot \Delta V = \sigma \cdot \frac{\Delta A}{A_0}, \]
where:
- \( \sigma = 350 \, e^{0.3} \) MPa is the flow stress,
- \( \Delta A \) is the change in cross-sectional area,
- \( A_0 \) is the original cross-sectional area.
The original cross-sectional area is: \[ A_0 = \pi \left( \frac{D_0}{2} \right)^2 = \pi \left( \frac{30}{2} \right)^2 = 706.86 \, mm^2. \]
The final cross-sectional area is: \[ A_2 = \pi \left( \frac{D_2}{2} \right)^2 = \pi \left( \frac{20}{2} \right)^2 = 314.16 \, mm^2. \]
Thus, the change in area is: \[ \Delta A = A_0 - A_2 = 706.86 - 314.16 = 392.7 \, mm^2. \]
Now, calculate the flow stress: \[ \sigma = 350 \, e^{0.3} \approx 350 \times 2.718 = 951.3 \, MPa = 951.3 \times 10^6 \, Pa. \]
Finally, calculate the work per unit volume: \[ W = \sigma \times \frac{\Delta A}{A_0} = 951.3 \times 10^6 \times \frac{392.7}{706.86} = 540.6 \times 10^6 \, J. \]
Thus, the ideal plastic work of deformation per unit volume is approximately 540.6 × 10\(^6\) J. Quick Tip: The ideal plastic work per unit volume is calculated using the flow stress and the change in cross-sectional area.
The integral of the function \( f(x) = 0.2 + 10x^2 \) estimated by the trapezoidal rule with a single segment from \( x = 0 \) to \( x = 1 \) is __________ (round off to 1 decimal place).
View Solution
The trapezoidal rule for estimating the integral of a function \( f(x) \) over an interval \( [a, b] \) is given by: \[ I \approx \frac{b - a}{2} \left( f(a) + f(b) \right) \]
For this problem:
- The function \( f(x) = 0.2 + 10x^2 \),
- The interval is from \( a = 0 \) to \( b = 1 \).
First, calculate \( f(0) \) and \( f(1) \): \[ f(0) = 0.2 + 10(0)^2 = 0.2 \] \[ f(1) = 0.2 + 10(1)^2 = 0.2 + 10 = 10.2 \]
Now apply the trapezoidal rule: \[ I \approx \frac{1 - 0}{2} \left( 0.2 + 10.2 \right) = \frac{1}{2} \times 10.4 = 5.2 \]
Thus, the estimated integral is: \[ \boxed{5.2} \] Quick Tip: To use the trapezoidal rule, calculate \( f(a) \) and \( f(b) \), then apply the formula \( I \approx \frac{b - a}{2} (f(a) + f(b)) \).
Air at 300 K is passed at a mass flow rate of 1.5 kg·s⁻¹ through a metallic tube of inner diameter 0.08 m. Inner wall temperature of the tube is maintained at 700 K. Temperature of the air leaving the tube is 600 K. Assuming that heat transfer occurs entirely by steady state convection, length of the tube is __________ m (round off to 2 decimal places).
View Solution
The heat transfer rate \( \dot{Q} \) by convection is given by: \[ \dot{Q} = h A \Delta T \]
Where:
- \( h = 500 \, W/m^2 \cdot K \) (convective heat transfer coefficient),
- \( A = \pi d L \) (surface area of the tube),
- \( \Delta T = 700 \, K - 600 \, K = 100 \, K \) (temperature difference).
The rate of heat transfer is also related to the mass flow rate of the air and the specific heat capacity \( c_p \) of the air: \[ \dot{Q} = \dot{m} c_p \Delta T \]
Where:
- \( \dot{m} = 1.5 \, kg/s \) (mass flow rate),
- \( c_p = 1080 \, J/kg·K \) (specific heat capacity of air),
- \( \Delta T = 100 \, K \).
Equating the two expressions for \( \dot{Q} \): \[ h \pi d L \Delta T = \dot{m} c_p \Delta T \]
Canceling \( \Delta T \) from both sides and solving for \( L \): \[ L = \frac{\dot{m} c_p}{h \pi d} \]
Substitute the values: \[ L = \frac{1.5 \times 1080}{500 \times \pi \times 0.08} \] \[ L = \frac{1620}{125.6} \approx 12.9 \, m \]
Thus, the length of the tube is: \[ \boxed{12.9 \, m} \] Quick Tip: To find the length of a tube for heat transfer, use the equation \( L = \frac{\dot{m} c_p}{h \pi d} \), where \( h \) is the heat transfer coefficient, \( d \) is the tube diameter, and \( c_p \) is the specific heat capacity.
Given the stress tensor
\begin{bmatrix}
130 & 30 & 0 \\
30 & 50 & 0\\
0 & 0 & 0 \\
\end{bmatrix}
MPa, the maximum shear stress is __________ MPa (round off to the nearest integer).
View Solution
The maximum shear stress \( \tau_{max} \) for a given stress tensor can be found using the following formula: \[ \tau_{max} = \frac{1}{2} \sqrt{(\sigma_1 - \sigma_2)^2 + 4\tau_{12}^2}, \]
where \( \sigma_1 \) and \( \sigma_2 \) are the normal stresses and \( \tau_{12} \) is the shear stress. The eigenvalues of the stress tensor correspond to the normal stresses, and the maximum shear stress is related to the difference between these eigenvalues.
For the given stress tensor: \[ \begin{bmatrix} 130 & 30 & 0
30 & 50 & 0
0 & 0 & 0 \end{bmatrix}, \]
The principal stresses can be calculated by solving the characteristic equation: \[ det(\sigma - \lambda I) = 0, \]
where \( \lambda \) represents the principal stresses. After solving the characteristic equation, the eigenvalues (principal stresses) are found to be \( \sigma_1 = 160 \, MPa \) and \( \sigma_2 = 20 \, MPa \).
Now, calculate the maximum shear stress: \[ \tau_{max} = \frac{1}{2} \sqrt{(160 - 20)^2 + 4 \times 30^2} = \frac{1}{2} \sqrt{140^2 + 4 \times 900} = \frac{1}{2} \sqrt{19600 + 3600} = \frac{1}{2} \times 145.7 = 72.85 \, MPa. \]
Thus, the maximum shear stress is approximately 70 MPa. Quick Tip: To calculate the maximum shear stress, use the principal stresses obtained from the stress tensor.
A set of 11 (x, y) data points is least-squares fitted to a quadratic polynomial. If the sum of squares of error is 2.4, the variance of error is __________ (round off to 1 decimal place).
View Solution
The variance of error \( \sigma^2 \) is calculated using the formula: \[ \sigma^2 = \frac{S_{error}}{n - p}, \]
where:
- \( S_{error} \) is the sum of squares of error,
- \( n \) is the number of data points, and
- \( p \) is the number of parameters in the fitted model (for a quadratic polynomial, \( p = 3 \)).
Given:
- \( S_{error} = 2.4 \),
- \( n = 11 \),
- \( p = 3 \).
Substitute the values into the formula: \[ \sigma^2 = \frac{2.4}{11 - 3} = \frac{2.4}{8} = 0.3. \]
Thus, the variance of error is 0.3. Quick Tip: The variance of error is calculated by dividing the sum of squares of error by the degrees of freedom (number of data points minus the number of parameters in the model).
The equilibrium microstructure of an alloy A-B consists of two phases \(\alpha\) and \(\beta\) in the molar proportion 2:1. If the overall composition of the alloy is 70 mol% B and the composition of \(\beta\) is 90 mol% B, the composition of \(\alpha\) is __________ (in mol% B) (round off to the nearest integer).
View Solution
To solve this, we use the lever rule, which relates the overall composition of a two-phase system to the compositions of the individual phases and their molar proportions. The lever rule formula is given by:
\[ C_{overall} = \frac{C_{\beta} \cdot f_{\beta} + C_{\alpha} \cdot f_{\alpha}}{f_{\beta} + f_{\alpha}} \]
Where:
- \( C_{overall} = 70 \, mol% B \) (overall composition of the alloy),
- \( C_{\beta} = 90 \, mol% B \) (composition of phase \( \beta \)),
- \( f_{\beta} = \frac{1}{3} \) (molar fraction of phase \( \beta \)),
- \( f_{\alpha} = \frac{2}{3} \) (molar fraction of phase \( \alpha \)),
- \( C_{\alpha} \) is the unknown composition of phase \( \alpha \) in mol% B.
Substitute the known values into the equation: \[ 70 = \frac{90 \cdot \frac{1}{3} + C_{\alpha} \cdot \frac{2}{3}}{\frac{1}{3} + \frac{2}{3}} \]
Simplify the equation: \[ 70 = \frac{30 + \frac{2}{3} C_{\alpha}}{1} \] \[ 70 = 30 + \frac{2}{3} C_{\alpha} \]
Now, solve for \( C_{\alpha} \): \[ 70 - 30 = \frac{2}{3} C_{\alpha} \] \[ 40 = \frac{2}{3} C_{\alpha} \] \[ C_{\alpha} = \frac{40 \times 3}{2} = 60 \]
Thus, the composition of phase \( \alpha \) is: \[ \boxed{60} \, mol% B \] Quick Tip: Use the lever rule to calculate the composition of individual phases in a two-phase alloy system by considering the molar fractions and compositions of each phase.
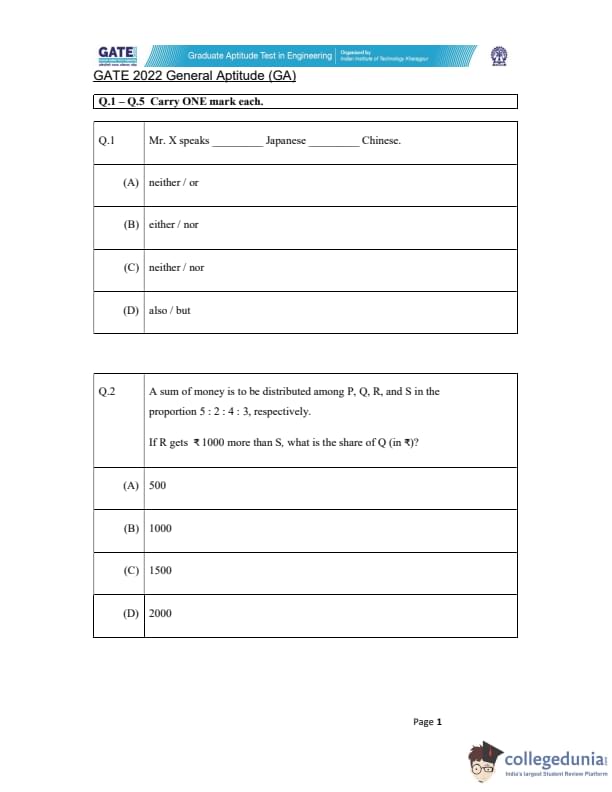
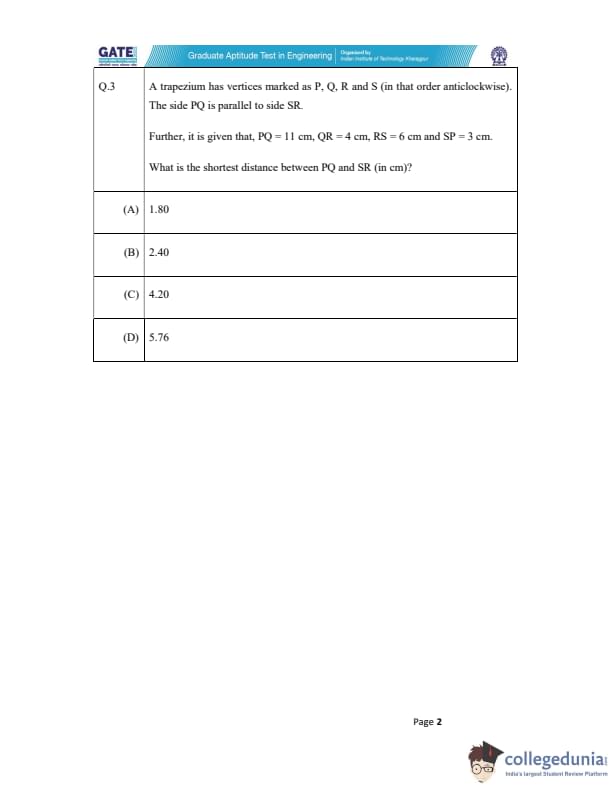
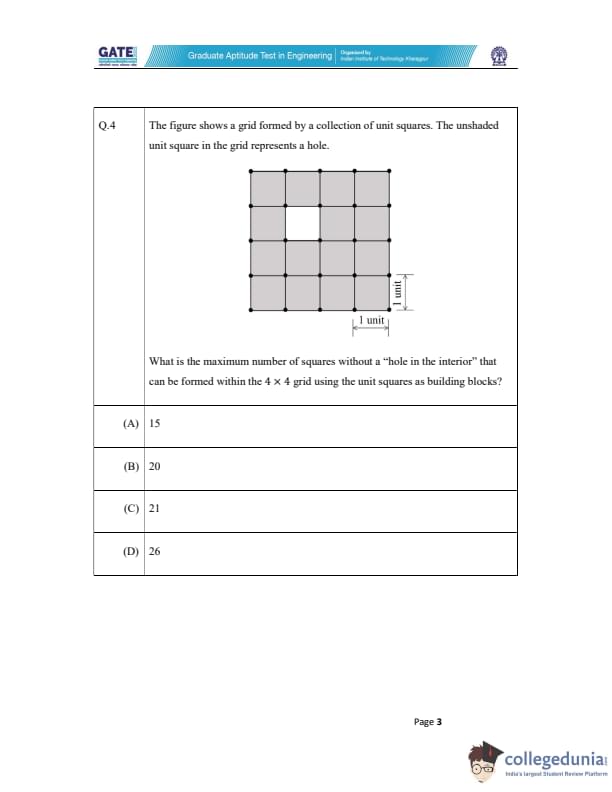
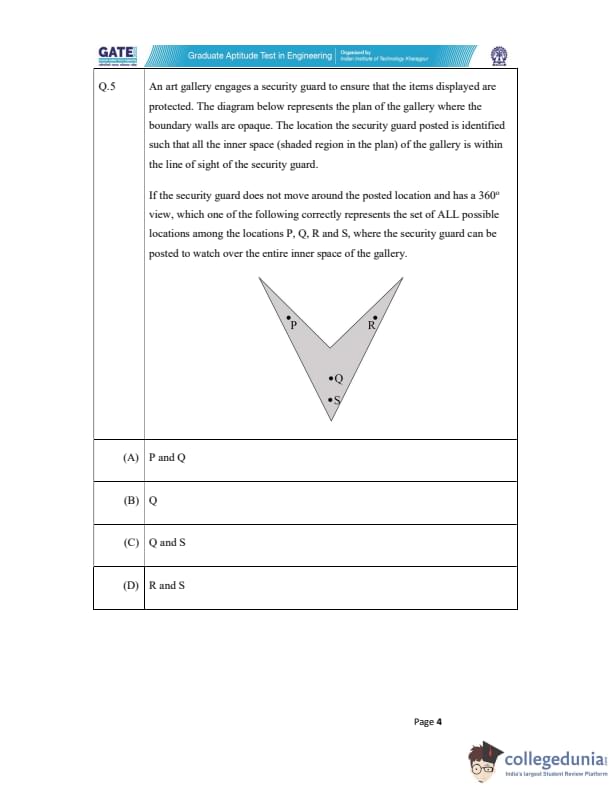
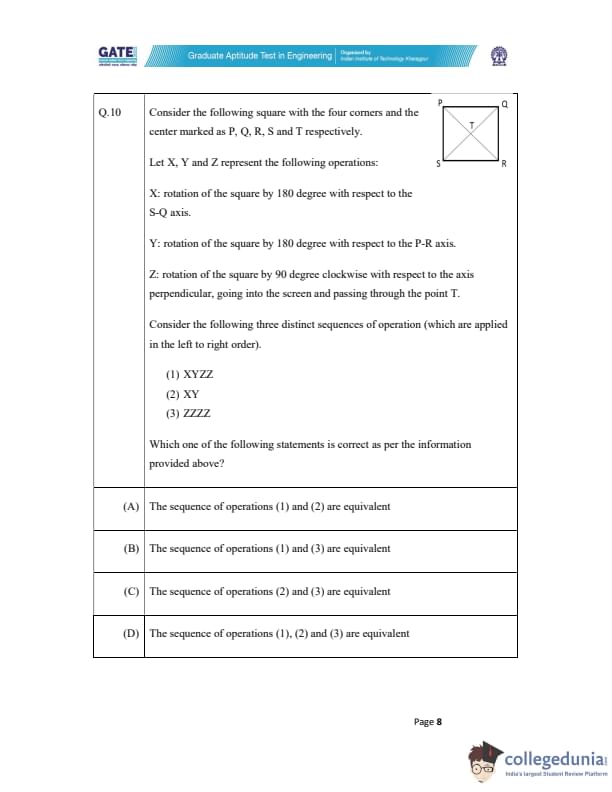
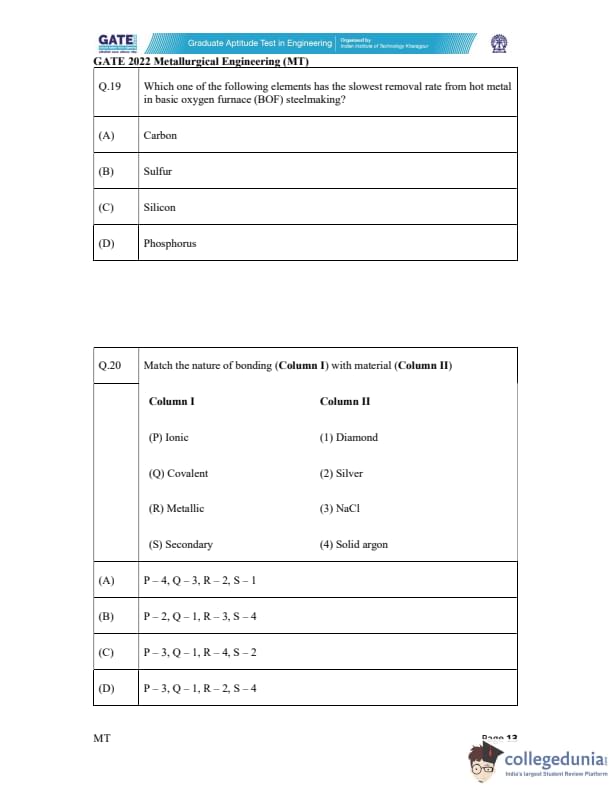
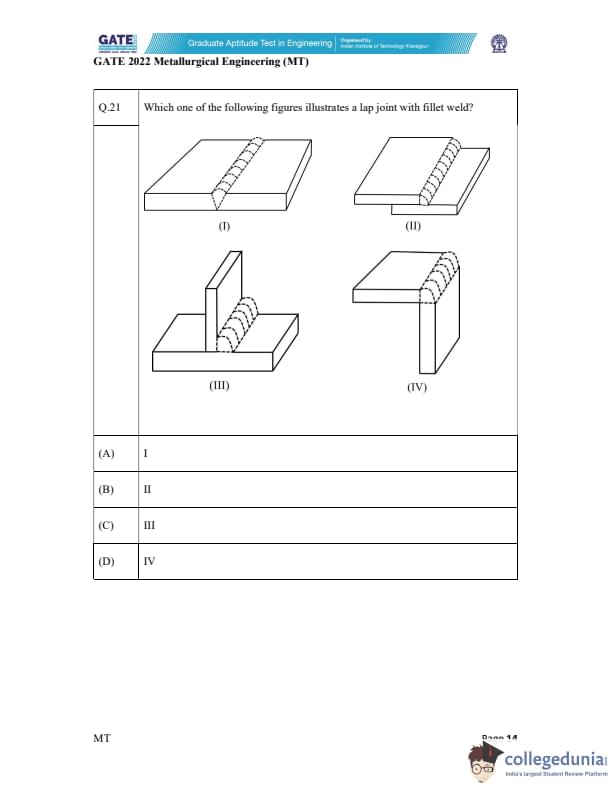
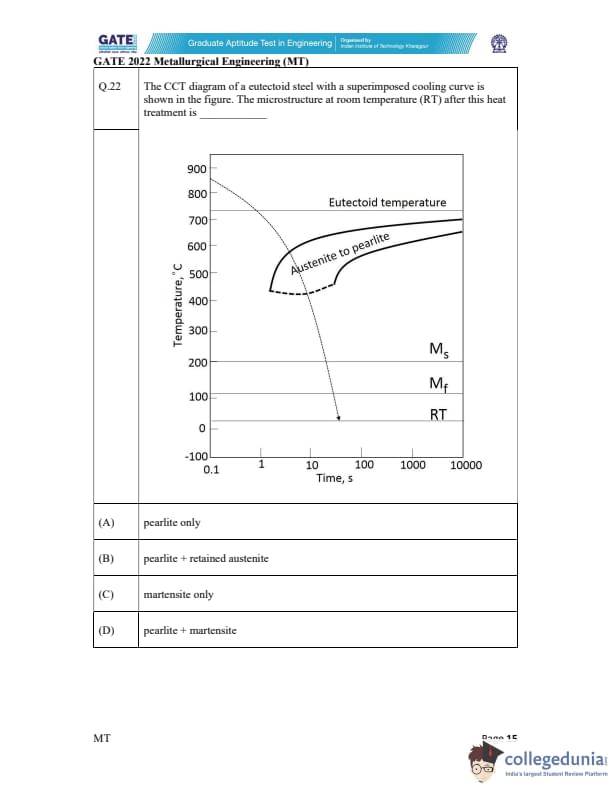

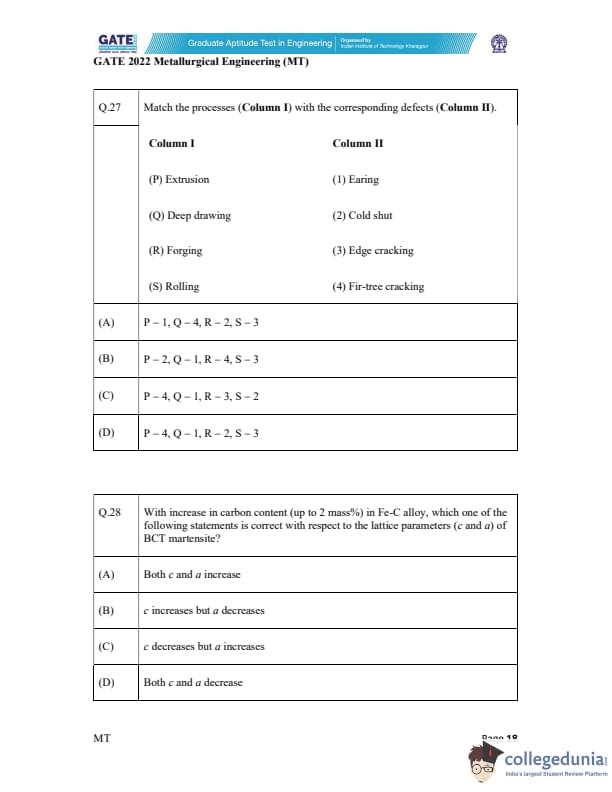
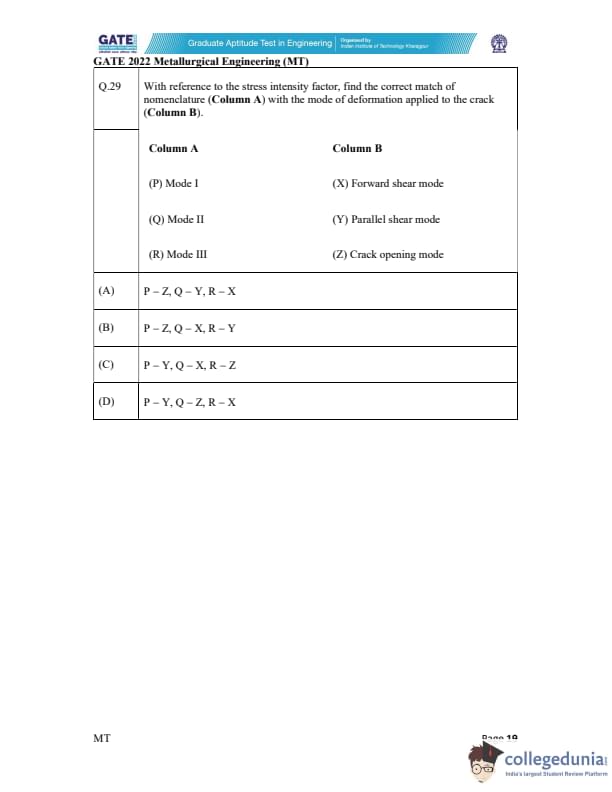

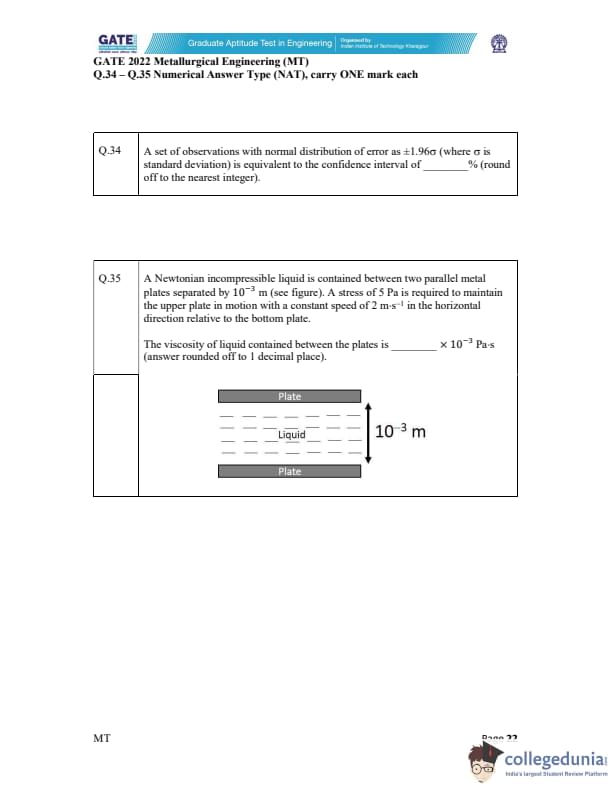
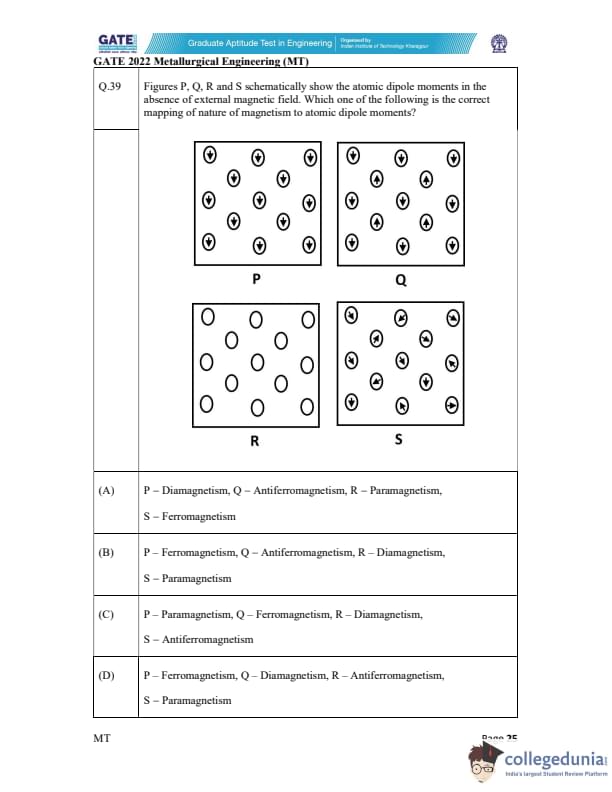

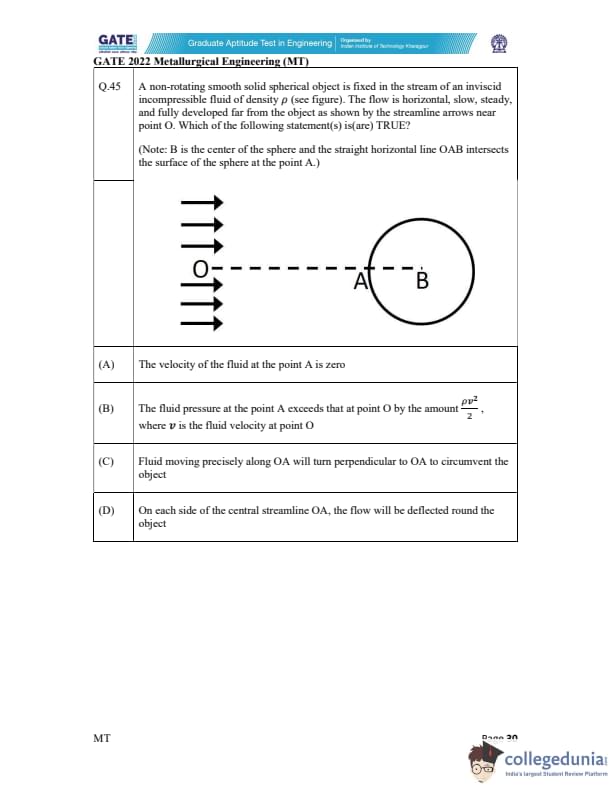

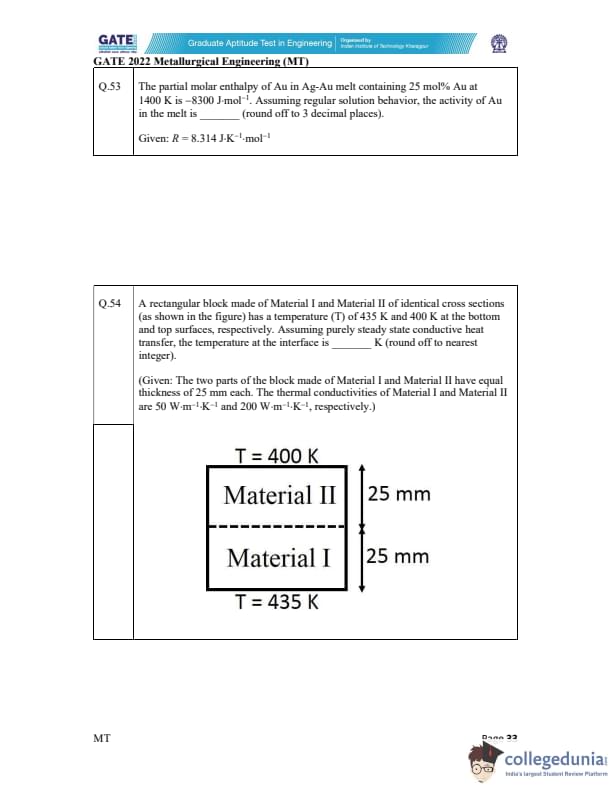

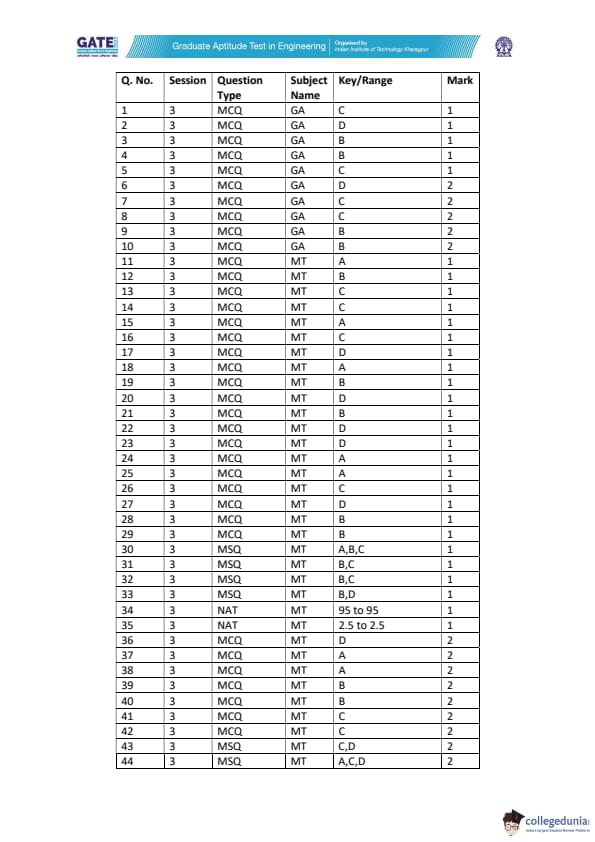
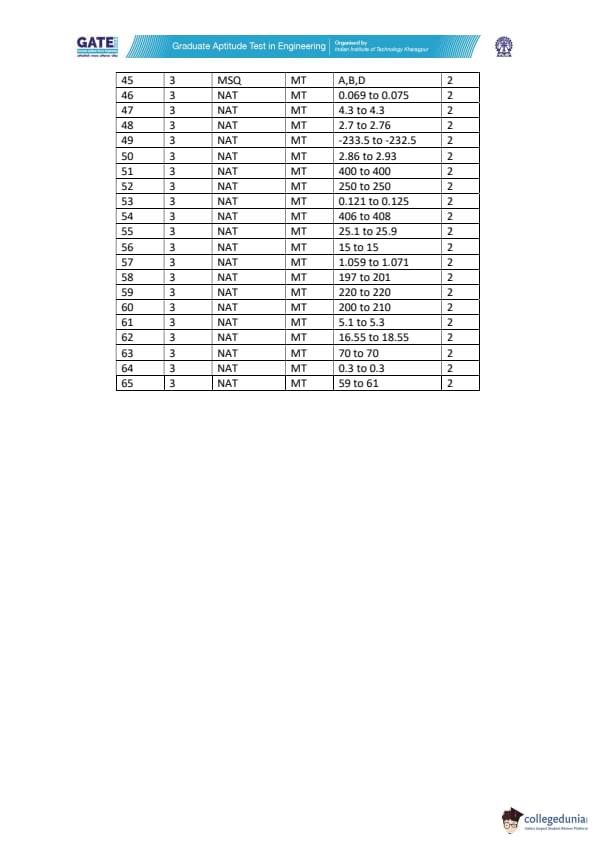
Quick Links:
GATE 2022 MT Detailed Paper Analysis
The overall question pattern was the same as the other GATE papers. A total of 65 questions appeared in the exam. Each question carried either 1 or 2 marks. Kindly refer to the below-mentioned table, showing the details of the questions as per the carried marks-
| Question Types | Question Frequency | Carried Marks |
|---|---|---|
| No. Of 1 mark MCQs | 24 | 24 |
| No. Of 2 mark MCQs | 12 | 24 |
| No. Of 1 mark MSQs | 4 | 4 |
| No. Of 2 marks MSQs | 3 | 6 |
| No. Of 1 mark NATs | 2 | 2 |
| No. Of 2 marks NATs | 20 | 40 |
| Total | 65 | 100 |
- Topics such as Manufacturing, Mechanical, and Technology carried the greatest weightage in the exam
- Questions related to Engineering Mathematics were rated difficult as compared to the other questions
- Most of questions were based on formula
- MSQs carried the least weightage in exam
Also Check:
GATE 2022 MT: Exam Pattern and Marking Scheme
- GATE 2022 MT asked both MCQs and NATs. It was held online via CBT mode
- As per the specified marking scheme by IIT Delhi, from the final score, ⅓ and ⅔ marks would be reduced for each wrong MCQ carried 1 and 2 marks
- Wrong attempted NATs were not supposed to bring any kind of deduction in the final achieved marks
GATE Previous Year Question Papers
| GATE 2022 Question Papers | GATE 2021 Question Papers | GATE 2020 Question Papers |
| GATE 2019 Question Papers | GATE 2018 Question Papers | GATE 2017 Question Papers |
Comments