


ICSE Board has conducted the Class 10 Physics – Science Paper 1 Board Exam 2026 on March 9, 2026. Class 10 Physics – Science Paper 1 Question Paper with Solution PDF is available here for download.
The ICSE Board conducts the Class 10 Physics – Science Paper 1 exam covering important topics such as force, work, energy and power, light, sound, heat, electricity and magnetism, and modern physics. The paper includes objective questions, short-answer questions, and long-answer questions to test conceptual understanding and numerical problem-solving skills. Students focus on understanding key concepts, formulas, diagrams, and practical applications. The official question paper is available in PDF format for reference.
ICSE Board Class 10 2026 Physics – Science Paper 1 Question Paper with Solution PDF
| ICSE Board Class 10 2026 Physics – Science Paper 1 Question Paper with Solution PDF | Download PDF | Check Solutions |
For a body to be in dynamic equilibrium, its:
View Solution
Step 1: Understanding the Question:
The question asks for the condition required for a body to be in dynamic equilibrium.
Step 2: Detailed Explanation:
Equilibrium refers to a state where the net force acting on a body is zero.
There are two types of equilibrium:
1. Static Equilibrium: The body is at rest (velocity is zero).
2. Dynamic Equilibrium: The body is moving with a constant velocity.
According to Newton's Second Law of Motion, the net force \(F_{net}\) acting on a body is equal to the product of its mass (m) and acceleration (a), i.e., \(F_{net} = ma\).
For any type of equilibrium, the net force must be zero (\(F_{net} = 0\)).
Therefore, \(ma = 0\). Since the mass (m) of the body is non-zero, its acceleration (a) must be zero.
Let's analyze the given options:
(A) Momentum should be zero: Momentum (\(p = mv\)). In dynamic equilibrium, velocity (v) is constant but not zero, so momentum is also constant but not zero. This is incorrect.
(B) Acceleration should be zero: If acceleration is zero, the velocity is constant. This is the definition of dynamic equilibrium. This is correct.
(C) Kinetic energy should be zero: Kinetic energy (\(KE = \frac{1}{2}mv^2\)). In dynamic equilibrium, velocity (v) is non-zero, so kinetic energy is also non-zero. This is incorrect.
(D) Velocity should be zero: Zero velocity corresponds to static equilibrium, not dynamic equilibrium. This is incorrect.
Step 3: Final Answer:
The condition for a body to be in dynamic equilibrium is that its acceleration must be zero, which means it moves at a constant velocity.
Quick Tip: Remember that "dynamic" implies motion, and "equilibrium" implies zero net force. Zero net force always means zero acceleration, which in turn means constant velocity.
The energy transformation taking place during photosynthesis in plants is:
View Solution
Step 1: Understanding the Question:
The question asks to identify the type of energy conversion that occurs during the process of photosynthesis in plants.
Step 2: Detailed Explanation:
Photosynthesis is a biological process used by plants, algae, and some bacteria to convert light energy into chemical energy.
During this process, plants capture sunlight (light energy) using chlorophyll, a green pigment found in chloroplasts.
This captured light energy is then used to convert carbon dioxide (\(CO_2\)) and water (\(H_2O\)) into glucose (\(C_6H_{12}O_6\)), a sugar molecule that stores energy in its chemical bonds (chemical energy), and oxygen (\(O_2\)) as a byproduct.
The overall chemical equation for photosynthesis is:
\[ 6CO_2 + 6H_2O + Light Energy \rightarrow C_6H_{12}O_6 + 6O_2 \]
Thus, the fundamental energy transformation is from light energy to chemical energy.
Let's evaluate the options:
(A) heat to chemical: While some heat may be involved, the primary energy source is light, not heat. Incorrect.
(B) chemical to light: This describes processes like bioluminescence, which is the reverse of what happens in photosynthesis. Incorrect.
(C) light to chemical: This accurately describes the conversion of sunlight into the chemical energy stored in glucose. Correct.
(D) chemical to heat: This describes cellular respiration or combustion, where stored chemical energy is released as heat. Incorrect.
Step 3: Final Answer:
Photosynthesis converts light energy from the sun into chemical energy stored in glucose molecules.
Quick Tip: Think of the inputs and outputs of photosynthesis. Input is sunlight (light energy), and the main output for the plant is food/glucose (chemical energy).
The Velocity Ratio (VR) of a block and tackle system of two pulleys with the effort in the upward direction is:
View Solution
Step 1: Understanding the Question:
The question asks for the Velocity Ratio (VR) of a block and tackle system that has a total of two pulleys.
Step 2: Key Formula or Approach:
In an ideal block and tackle system, the Velocity Ratio (VR) is defined as the ratio of the distance moved by the effort (\(d_E\)) to the distance moved by the load (\(d_L\)).
\[ VR = \frac{d_E}{d_L} \]
For a block and tackle system, the VR is equal to the total number of pulleys in the system, which is also equal to the number of rope segments supporting the load.
\[ VR = n \]
where \(n\) is the total number of pulleys.
Step 3: Detailed Explanation:
The problem states that the block and tackle system has a total of two pulleys (\(n=2\)).
In a typical setup with two pulleys, there would be one fixed pulley in the upper block and one movable pulley in the lower block. The load is supported by two segments of the rope.
When the effort end of the rope is pulled by a distance \(d_E\), each of the two supporting rope segments shortens by \(d_L\). Therefore, the load moves up by a distance \(d_L\), and \(d_E = 2 \times d_L\).
Using the formula for VR:
\[ VR = \frac{d_E}{d_L} = \frac{2 \times d_L}{d_L} = 2 \]
Alternatively, using the direct relationship for a block and tackle system:
\[ VR = total number of pulleys = 2 \]
The phrase "effort in the upward direction" describes a specific arrangement, but in a standard block and tackle, the VR depends only on the number of pulleys.
Step 4: Final Answer:
Given that there are two pulleys in the system, the Velocity Ratio is 2.
Quick Tip: For any block and tackle pulley system, the Velocity Ratio (VR) is simply equal to the total number of pulleys used in the system.
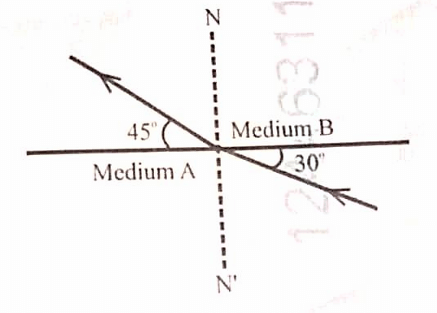
From the figure given below, the refractive index of medium B with respect to medium A (\(_{A}\mu_{B}\)) is:
View Solution
Step 1: Understanding the Question:
The question asks to find the refractive index of medium B relative to medium A, using the angles of incidence and refraction shown in the diagram.
Step 2: Key Formula or Approach:
We will use Snell's Law of refraction, which relates the angles of incidence and refraction to the refractive indices of the two media. Snell's Law is stated as:
\[ n_1 \sin(i) = n_2 \sin(r) \]
where:
\(n_1\) = refractive index of the first medium (medium A, denoted as \(n_A\)).
\(n_2\) = refractive index of the second medium (medium B, denoted as \(n_B\)).
\(i\) = angle of incidence.
\(r\) = angle of refraction.
The refractive index of medium B with respect to medium A is given by \(_{A}\mu_{B} = \frac{n_B}{n_A}\).
Step 3: Detailed Explanation:
From the given figure:
The light ray travels from Medium A to Medium B.
The angle of incidence (\(i\)) is the angle between the incident ray and the normal (N). From the diagram, \(i = 45^\circ\).
The angle of refraction (\(r\)) is the angle between the refracted ray and the normal (N'). From the diagram, \(r = 30^\circ\).
Applying Snell's Law:
\[ n_A \sin(i) = n_B \sin(r) \]
Substituting the given values:
\[ n_A \sin(45^\circ) = n_B \sin(30^\circ) \]
We need to find the refractive index of medium B with respect to medium A (\(_{A}\mu_{B}\)), which is the ratio \(\frac{n_B}{n_A}\).
Rearranging the equation to solve for \(\frac{n_B}{n_A}\):
\[ \frac{n_B}{n_A} = \frac{\sin(45^\circ)}{\sin(30^\circ)} \]
So, \(_{A}\mu_{B} = \frac{\sin(45^\circ)}{\sin(30^\circ)}\).
Step 4: Final Answer:
Comparing our result with the given options, the correct choice is (A).
Quick Tip: Snell's Law can be remembered as \(n_{incident} \sin(i) = n_{refracted} \sin(r)\). The relative refractive index \(_{1}\mu_{2}\) is always \(\frac{\sin(i)}{\sin(r)}\).
When a blackened bulb thermometer is moved beyond the red region of the visible spectrum, there is a rapid rise in the temperature. This is due to the presence of:
View Solution
Step 1: Understanding the Question:
The question describes an experiment where a thermometer shows a temperature increase when placed in the region just beyond the red end of the visible light spectrum. We need to identify the type of electromagnetic radiation responsible for this heating effect.
Step 2: Detailed Explanation:
The visible spectrum of light consists of colors arranged from violet to red (VIBGYOR).
The region of the electromagnetic spectrum just beyond the red light has wavelengths longer than red light. This region is called the infrared region.
Infrared (IR) radiations are primarily responsible for the heating effect of sunlight. They are readily absorbed by most materials, causing an increase in the internal energy and temperature of the material.
A blackened bulb is used because black surfaces are good absorbers of all types of radiation, making the temperature change more noticeable.
Ultraviolet (UV) radiation is found beyond the violet end of the spectrum and has more energy per photon, but infrared radiation carries more of the sun's heat energy. X-rays and Radio waves are other parts of the electromagnetic spectrum, but they are not located adjacent to the red region and are not the primary cause of heating in this experiment.
Step 3: Final Answer:
The rapid rise in temperature beyond the red region is caused by the absorption of Infrared radiations.
Quick Tip: Remember the order of the electromagnetic spectrum around visible light: Ultraviolet \(\rightarrow\) Visible (Violet to Red) \(\rightarrow\) Infrared. Infrared radiation is often called "heat radiation".
A fast-moving cyclist stops pedalling on reaching a hilly track. If he continues to move with the acquired energy, then assuming no loss of energy:
View Solution
Step 1: Understanding the Question:
The question describes a cyclist moving up a hill without pedaling, and we must consider the situation under the assumption of "no loss of energy" (i.e., no friction or air resistance). We need to determine what happens to the cyclist's energy.
Step 2: Key Formula or Approach:
The Principle of Conservation of Mechanical Energy states that if there are no non-conservative forces (like friction or air resistance) doing work, the total mechanical energy of a system remains constant.
Total Mechanical Energy (TME) = Kinetic Energy (KE) + Potential Energy (PE).
\[ TME = KE + PE = constant \] \[ KE = \frac{1}{2}mv^2 \] \[ PE = mgh \]
Step 3: Detailed Explanation:
The problem explicitly states to assume "no loss of energy". This means we can apply the Principle of Conservation of Mechanical Energy.
As the cyclist moves up the hilly track, his height (h) above the starting point increases.
- Because height (h) increases, his potential energy (\(PE = mgh\)) increases.
- Since the total mechanical energy (\(TME = KE + PE\)) must remain constant, and PE is increasing, his kinetic energy (\(KE = \frac{1}{2}mv^2\)) must decrease. This means his speed (v) decreases.
- Let's analyze the options:
(A) his kinetic energy remains constant: Incorrect. It decreases as he goes up.
(B) his potential energy remains constant: Incorrect. It increases as he goes up.
(C) his total mechanical energy continuously increases: Incorrect. It is conserved (remains constant).
(D) his total mechanical energy remains constant: Correct. This is the direct consequence of the conservation of energy principle.
Step 4: Final Answer:
According to the law of conservation of energy, with no energy loss, the total mechanical energy of the cyclist remains constant. The energy transforms from kinetic to potential energy as he moves uphill.
Quick Tip: Whenever a problem states "no loss of energy," "smooth surface," or "no friction," immediately think of the Principle of Conservation of Mechanical Energy.
The distance (v) of a virtual image formed by a lens of focal length 15 cm can never exceed a certain finite value, then this value will be:
(Note: The question is rephrased for clarity from the original OCR which was ambiguous. The likely intent is to ask for the maximum possible distance of a virtual image for a specific type of lens.)
View Solution
Step 1: Understanding the Question:
The question asks for the limit on the distance of a virtual image formed by a lens. A convex lens can form a virtual image whose distance can be very large (approaching infinity). However, a concave lens always forms a virtual image within a specific range. Given the options, the question is likely about a concave lens.
Step 2: Key Formula or Approach:
We will analyze the image formation by a concave lens using the lens formula:
\[ \frac{1}{f} = \frac{1}{v} - \frac{1}{u} \]
For a concave lens, the focal length (\(f\)) is negative. By convention, the object distance (\(u\)) is also negative. The image formed is always virtual, so the image distance (\(v\)) will also be negative.
Step 3: Detailed Explanation:
Let the focal length be \(f = -15\) cm.
The lens formula is \(\frac{1}{v} = \frac{1}{f} + \frac{1}{u}\).
Substituting \(f = -15\):
\[ \frac{1}{v} = \frac{1}{-15} + \frac{1}{u} \]
Since the object is real, \(u\) can range from 0 to \(-\infty\).
Case 1: Object is at infinity (\(u \rightarrow -\infty\)).
\[ \frac{1}{v} = \frac{1}{-15} + \frac{1}{-\infty} = -\frac{1}{15} + 0 \] \[ v = -15 cm \]
This means the image is formed at the focus. The image distance is 15 cm.
Case 2: Object is at the optical center (\(u \rightarrow 0\)).
\[ \frac{1}{v} = \frac{1}{-15} + \frac{1}{0} \rightarrow \infty \]
This limit is not practical, but as the object moves from infinity towards the lens, the image moves from the focus towards the optical center.
For any real object placed in front of a concave lens, the virtual image is always formed between the optical center (O) and the principal focus (F).
Therefore, the image distance |v| will always be less than the focal length |f|.
So, \(0 < |v| \leq |f|\).
Given \(f=15\) cm, the image distance \(v\) will be less than or equal to 15 cm.
Step 4: Final Answer:
For a concave lens of focal length 15 cm, the virtual image is always formed between the optical center and the focus, so its distance from the lens can never exceed 15 cm.
Quick Tip: A key property to remember: A concave lens always forms a virtual, erect, and diminished image, located between the focus and the optical center.
Assertion (A): Tiny air molecules scatter blue light more than red light.
Reason (R): The refractive index of a medium is greater for blue light than red light.
View Solution
Step 1: Understanding the Question:
We need to evaluate the truthfulness of an Assertion and a Reason related to the scattering of light, and then determine if the Reason correctly explains the Assertion.
Step 2: Detailed Explanation:
Analysis of Assertion (A):
"Tiny air molecules scatter blue light more than red light." This phenomenon is known as Rayleigh scattering. According to Rayleigh's law of scattering, the intensity of scattered light (\(I_s\)) is inversely proportional to the fourth power of the wavelength (\(\lambda\)) of the light, provided the scatterer's size is much smaller than the wavelength.
\[ I_s \propto \frac{1}{\lambda^4} \]
Since blue light has a shorter wavelength (\(\lambda_{blue} < \lambda_{red}\)), it is scattered much more strongly than red light by the air molecules. Thus, Assertion (A) is true.
Analysis of Reason (R):
"The refractive index of a medium is greater for blue light than red light." This phenomenon is called dispersion. According to Cauchy's relation, the refractive index (n) of a transparent medium depends on the wavelength (\(\lambda\)), approximately as \(n(\lambda) = A + \frac{B}{\lambda^2}\), where A and B are constants. Since \(\lambda_{blue} < \lambda_{red}\), the refractive index for blue light (\(n_{blue}\)) is greater than for red light (\(n_{red}\)). Thus, Reason (R) is true.
Relating Reason and Assertion:
The scattering of light by molecules is due to the absorption and re-radiation of light by the electrons in the molecules. The molecules behave like oscillating dipoles under the influence of the light's electric field. The polarizability of the molecules, which determines how strongly they interact with light, is related to the refractive index of the medium. A higher refractive index (as for blue light) implies a stronger interaction between light and the medium, leading to more scattering. Therefore, the fact that the refractive index is wavelength-dependent is the underlying physical cause for Rayleigh scattering. Hence, (R) is the correct explanation for (A).
Step 3: Final Answer:
Both Assertion (A) and Reason (R) are true statements, and the Reason provides the correct physical explanation for the Assertion.
Quick Tip: Remember Rayleigh scattering: \(I \propto 1/\lambda^4\). Shorter wavelength (blue/violet) scatters most, which is why the sky is blue. Longer wavelength (red/orange) scatters least, which is why sunsets are red.
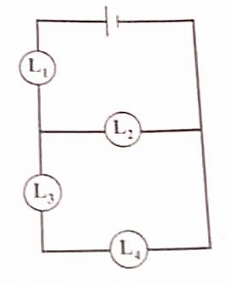
In the circuit given below, identify the lamp (L1, L2, L3 or L4) whose failure would not interrupt the power supply to the other lamps.
View Solution
Step 1: Understanding the Question:
We need to analyze the given electrical circuit and determine which single lamp's failure (becoming an open circuit) would still allow current to flow to the other lamps in the circuit.
Step 2: Detailed Explanation:
Let's analyze the circuit configuration:
- Lamp L1 is in series with the rest of the circuit.
- The rest of the circuit consists of two parallel branches.
- Branch 1 contains only lamp L2.
- Branch 2 contains lamps L3 and L4 connected in series.
Now let's consider the failure of each lamp one by one:
- If L1 fails: It is in series with the entire combination. An open circuit at L1 would break the main path for the current from the power supply. No current would flow to L2, L3, or L4. All other lamps would go out.
- If L2 fails: The parallel branch containing L2 would become an open circuit. Current would stop flowing through this branch. However, the main circuit is still complete. Current would flow from the supply, through L1, and then through the other parallel branch containing L3 and L4. So, L1, L3, and L4 would remain lit. The power supply to these lamps is not interrupted.
- If L3 fails: The series combination of L3 and L4 would become an open circuit. No current would flow through this branch, so L4 would also go out. However, current would still flow from the supply, through L1, and then through the parallel branch containing L2. So, L1 and L2 would remain lit. The power supply to L4 is interrupted.
- If L4 fails: This is similar to L3 failing. The series branch containing L3 and L4 would open. L3 would go out. Current would still flow through L1 and L2. The power supply to L3 is interrupted.
Step 3: Final Answer:
The failure of L2 is the only case where all the other lamps (L1, L3, and L4) continue to receive power and stay lit. Therefore, the failure of L2 does not interrupt the power supply to the other lamps.
Quick Tip: In a combined series-parallel circuit, the failure of a component in a parallel branch only affects that branch. The failure of a component in the main series part affects the entire circuit.
Equal volumes of water are added to three cylindrical jars A, B and C of the same height and radii \(r_A\), \(r_B\) and \(r_C\) respectively with \(r_A < r_B < r_C\). If you blow across the mouth of these jars, which tube will produce the shrillest note?
View Solution
Step 1: Understanding the Question:
The question is about the sound produced by blowing over the top of three cylindrical jars with different radii but filled with the same volume of water. We need to find which jar produces the shrillest note (highest frequency).
Step 2: Key Formula or Approach:
The sound is produced by the resonance of the air column above the water. The pitch (frequency) of the sound produced by a vibrating air column in a closed pipe (like a jar) is inversely proportional to the length of the air column.
\[ f \propto \frac{1}{L} \]
where \(f\) is the frequency and \(L\) is the length of the air column. A shriller note corresponds to a higher frequency.
Step 3: Detailed Explanation:
Let H be the total height of each cylindrical jar.
Let V be the equal volume of water added to each jar.
The volume of water in a cylinder is given by \(V = base area \times height of water = \pi r^2 h_w\).
Since V is the same for all jars, the height of the water (\(h_w\)) is \(h_w = \frac{V}{\pi r^2}\).
This means \(h_w \propto \frac{1}{r^2}\).
We are given the radii are in the order \(r_A < r_B < r_C\).
Therefore, the heights of the water will be in the reverse order: \(h_{wA} > h_{wB} > h_{wC}\).
The length of the vibrating air column (\(L\)) in each jar is the total height minus the water height: \(L = H - h_w\).
Since \(h_{wA}\) is the largest water height, the corresponding air column length \(L_A = H - h_{wA}\) will be the smallest.
So, the lengths of the air columns are in the order \(L_A < L_B < L_C\).
The frequency is inversely proportional to the length of the air column (\(f \propto 1/L\)).
Therefore, the frequencies will be in the order \(f_A > f_B > f_C\).
A higher frequency means a shriller note. Since \(f_A\) is the highest frequency, jar A will produce the shrillest note.
Step 4: Final Answer:
Jar A has the smallest radius, so for the same volume of water, it will have the highest water level, leaving the shortest air column. A shorter air column vibrates at a higher frequency, producing a shriller sound.
Quick Tip: For resonance in air columns, remember: Short air column = High frequency = Shrill sound. Long air column = Low frequency = Grave sound.
A metallic wire is stretched in such a way that its new length becomes double its original length. How does its specific heat capacity change?
View Solution
Step 1: Understanding the Question:
The question asks about the change in the specific heat capacity of a metallic wire when it is stretched to twice its original length.
Step 2: Detailed Explanation:
Specific heat capacity is an intrinsic property of a substance. This means it depends on the nature of the material itself (i.e., the type of atoms/molecules and their bonding) and not on the mass, shape, or dimensions of the object.
Properties like resistance, length, and volume are extrinsic properties, as they depend on the size and shape of the object.
When the metallic wire is stretched, its length, cross-sectional area, and resistance will change. However, the material of the wire remains the same. Since specific heat capacity is a characteristic of the material, it does not change.
Therefore, even after being stretched, the specific heat capacity of the metallic wire will remain the same as it was originally.
Step 3: Final Answer:
Stretching the wire changes its physical dimensions but not the substance it is made of. Specific heat capacity is a property of the substance, hence it remains unchanged.
Quick Tip: Remember to distinguish between intrinsic properties (like density, resistivity, specific heat capacity) which depend only on the material, and extrinsic properties (like mass, volume, resistance) which depend on the amount or shape of the material.
The correct formula to calculate the equivalent resistance of R\(_1\) and R\(_2\) when connected in parallel, is:
View Solution
Step 1: Understanding the Question:
The question asks for the standard formula for the equivalent resistance (\(R_{eq}\)) of two resistors, R\(_1\) and R\(_2\), connected in a parallel arrangement.
Step 2: Key Formula or Approach:
For resistors connected in parallel, the reciprocal of the equivalent resistance is equal to the sum of the reciprocals of the individual resistances.
\[ \frac{1}{R_{eq}} = \frac{1}{R_1} + \frac{1}{R_2} + \frac{1}{R_3} + \dots \]
Step 3: Detailed Explanation:
For two resistors R\(_1\) and R\(_2\) in parallel, the formula is:
\[ \frac{1}{R_{eq}} = \frac{1}{R_1} + \frac{1}{R_2} \]
To find \(R_{eq}\), we first need to combine the fractions on the right side. The common denominator is \(R_1 R_2\).
\[ \frac{1}{R_{eq}} = \frac{R_2}{R_1 R_2} + \frac{R_1}{R_1 R_2} \] \[ \frac{1}{R_{eq}} = \frac{R_2 + R_1}{R_1 R_2} \]
Now, to solve for \(R_{eq}\), we take the reciprocal of both sides of the equation:
\[ R_{eq} = \frac{R_1 R_2}{R_1 + R_2} \]
This is often referred to as the "product over sum" rule for two parallel resistors.
Comparing this result with the given options, it matches option (B).
Step 4: Final Answer:
The correct formula for the equivalent resistance of two resistors in parallel is the product of their resistances divided by the sum of their resistances.
Quick Tip: For resistors in series, you add them: \(R_{eq} = R_1 + R_2\). For two resistors in parallel, remember the shortcut: "product over sum", \(R_{eq} = \frac{R_1 \times R_2}{R_1 + R_2}\).
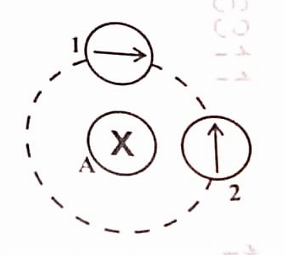
The diagram below shows the top view of the Wire A shown by a cross (X) carrying current into the plane of the paper. Which of the compasses is correctly aligned with the magnetic field, produced by the current carrying wire?
View Solution
Step 1: Understanding the Question:
The question asks to identify which compass needle correctly shows the direction of the magnetic field around a straight wire carrying current into the page.
Step 2: Key Formula or Approach:
We use the Right-Hand Thumb Rule to determine the direction of the magnetic field lines around a current-carrying conductor.
Rule: If you point the thumb of your right hand in the direction of the current, the direction in which your fingers curl gives the direction of the magnetic field lines.
Step 3: Detailed Explanation:
1. The symbol \(\otimes\) (a cross) represents a current flowing into the plane of the paper.
2. Applying the Right-Hand Thumb Rule, point your thumb into the page.
3. Your fingers will curl in the clockwise direction.
4. This means the magnetic field lines are concentric circles around the wire, directed clockwise.
5. A compass needle always aligns itself tangentially to the magnetic field line at its location, with the north pole (arrowhead) pointing in the direction of the field.
Analysis of Compass 1:
- At the position of compass 1 (top of the circle), the tangent to the clockwise circle points to the right. The image seems to show compass 1 is on the left of the wire. At this position, the tangent to the clockwise circle points downwards. The compass needle 1 is shown pointing downwards. Thus, compass 1 is correctly aligned.
Analysis of Compass 2:
- At the position of compass 2 (bottom of the circle), the tangent to the clockwise circle points to the left. The compass needle 2 is shown pointing upwards. This is incorrect.
Step 4: Final Answer:
Based on the Right-Hand Thumb Rule, the magnetic field is clockwise. Only compass 1 is correctly aligned with the clockwise magnetic field direction at its location.
Quick Tip: Remember the conventions for current direction: \(\otimes\) (cross) is current going INto the page (like the tail of an arrow), and \(\odot\) (dot) is current coming OUt of the page (like the tip of an arrow).
Three substances A, B and C of same mass are present at their respective melting points. On heating, if they melt completely in 5 minutes, 7 minutes and 3 minutes respectively, then which substance has the highest specific latent heat? (Assume heat is absorbed at the same rate)
View Solution
Step 1: Understanding the Question:
The question asks to identify which substance has the highest specific latent heat of fusion, given that all substances have the same mass and are heated at the same rate, but take different times to melt completely.
Step 2: Key Formula or Approach:
The heat energy (\(Q\)) required to melt a substance at its melting point is given by the formula:
\[ Q = m \times L \]
where \(m\) is the mass and \(L\) is the specific latent heat of fusion.
Also, if heat is supplied at a constant rate (\(P\)), then the heat absorbed in time (\(t\)) is:
\[ Q = P \times t \]
Step 3: Detailed Explanation:
By equating the two expressions for heat (\(Q\)), we get:
\[ P \times t = m \times L \]
The problem states that:
- The mass (\(m\)) is the same for all three substances.
- The rate of heat absorption (\(P\)) is the same for all three substances.
From the equation, we can write the specific latent heat (\(L\)) as:
\[ L = \frac{P \times t}{m} \]
Since \(P\) and \(m\) are constants for this comparison, the specific latent heat (\(L\)) is directly proportional to the time (\(t\)) taken to melt.
\[ L \propto t \]
This means the substance that takes the longest time to melt will have the highest specific latent heat.
The melting times are:
- Substance A: \(t_A = 5\) minutes
- Substance B: \(t_B = 7\) minutes
- Substance C: \(t_C = 3\) minutes
Since \(t_B > t_A > t_C\), it follows that \(L_B > L_A > L_C\).
Therefore, Substance B has the highest specific latent heat.
Step 4: Final Answer:
The substance that takes the longest time to melt (Substance B) has absorbed the most heat, and therefore has the highest specific latent heat.
Quick Tip: For a phase change at a constant rate of heating, the time taken is directly proportional to the specific latent heat of the substance.
An atom of lithium contains 3 electrons, 3 protons and 4 neutrons. Its mass number is:
View Solution
Step 1: Understanding the Question:
The question asks for the mass number of a lithium atom, given the number of its subatomic particles.
Step 2: Key Formula or Approach:
The mass number (\(A\)) of an atom is defined as the total number of protons (\(Z\)) and neutrons (\(N\)) in the nucleus.
\[ A = Z + N \]
Step 3: Detailed Explanation:
From the problem statement, we have:
- Number of protons (\(Z\)) = 3
- Number of neutrons (\(N\)) = 4
- Number of electrons = 3
The number of electrons does not contribute to the mass number, as the mass of an electron is negligible compared to that of a proton or a neutron.
Using the formula for the mass number:
\[ A = 3 (protons) + 4 (neutrons) \] \[ A = 7 \]
Step 4: Final Answer:
The mass number of the lithium atom is the sum of its protons and neutrons, which is 7.
Quick Tip: The mass number is the total count of nucleons (protons and neutrons). The number of electrons determines the charge, not the mass number.
Complete the following: A car is moving in uniform circular motion. The direction of friction between the tyres and the path is _____________.
View Solution
For an object to move in a circle, it must have a net force acting on it that is directed towards the center of the circle. This force is called the centripetal force. In the case of a car turning on a flat road, the static friction between the tires and the road provides the necessary centripetal force. Therefore, the direction of friction is towards the centre of the circular path.
Quick Tip: In circular motion, always identify the force acting as the centripetal force. For a car on a flat road, it's friction; for a planet orbiting the sun, it's gravity.
Complete the following: When a ray of light passes from a denser to a rarer medium, its wavelength __________.
View Solution
When a wave, including light, passes from one medium to another, its frequency remains constant. The speed of light is greater in a rarer medium than in a denser medium. The relationship between speed (\(v\)), frequency (\(f\)), and wavelength (\(\lambda\)) is \(v = f\lambda\). Since \(f\) is constant and \(v\) increases as light enters the rarer medium, the wavelength (\(\lambda\)) must also increase to maintain the equality.
Quick Tip: Frequency is the "DNA" of a wave; it never changes when the medium changes. Speed and wavelength change together. Denser to Rarer: Speed and Wavelength both INcrease.
Complete the following: The lid of a calorimeter minimises heat loss by __________.
View Solution
A calorimeter is designed to minimize heat exchange with the surroundings. The primary modes of heat loss are conduction, convection, and radiation. The lid covers the top opening of the calorimeter. This traps the air (or vapor) above the hot liquid, preventing it from rising and being replaced by cooler air from the surroundings. This process of heat transfer through fluid movement is called convection. Therefore, the lid's main function is to minimize heat loss by convection.
Quick Tip: In a calorimeter: The vacuum flask design minimizes conduction and convection. The silvered surfaces minimize radiation. The lid primarily stops convection.
Complete the following: Quality of sound depends on its __________.
View Solution
The characteristics of sound are pitch, loudness, and quality (or timbre).
- Pitch depends on the fundamental frequency.
- Loudness depends on the amplitude of the wave.
- Quality or timbre is the characteristic that allows us to distinguish between two sounds of the same pitch and loudness, produced by different instruments or voices. This difference is due to the presence of various overtones (harmonics) and their relative intensities, which together determine the overall shape of the sound wave, known as the waveform.
Quick Tip: Remember the three characteristics of sound: Pitch \(\leftrightarrow\) Frequency, Loudness \(\leftrightarrow\) Amplitude, Quality \(\leftrightarrow\) Waveform (or Harmonics).
Complete the following: A substance whose resistance becomes almost negligible at a temperature near absolute zero is called a __________.
View Solution
The phenomenon where certain materials exhibit zero electrical resistance when cooled below a characteristic critical temperature is called superconductivity. A material that exhibits this property is called a superconductor. Semiconductors, on the other hand, have resistance that decreases with increasing temperature (opposite to metals), but it does not become negligible.
Quick Tip: Superconductor = SUPER CONDuctor = zero resistance. Semiconductor = SEMI (partially) conductor = resistance between a conductor and an insulator.
Complete the following: __________ radiation deviates minimum in a magnetic field.
View Solution
The force experienced by a charged particle moving in a magnetic field is given by \(F = qvB\). The subsequent acceleration is \(a = F/m = (qvB)/m\). The amount of deviation or the radius of the circular path depends on the charge-to-mass ratio (\(q/m\)).
- Alpha particles (\(He^{2+}\)) are relatively heavy (4 amu) and have a charge of +2e.
- Beta particles (\(e^-\)) are extremely light (approx 1/1836 amu) and have a charge of -1e.
The charge-to-mass ratio for a beta particle is much larger than for an alpha particle. Due to their much larger mass (and thus inertia), alpha particles are deflected much less than beta particles for a given magnetic field and velocity. Therefore, alpha radiation deviates the minimum.
Quick Tip: Think of it like throwing a bowling ball (Alpha) and a ping-pong ball (Beta) through a strong cross-wind (magnetic field). The much heavier bowling ball will deviate far less.
State two factors on which the position of the Center of Gravity of a body depends.
View Solution
The position of the Center of Gravity (C.G.) of a body depends on:
1. The distribution of mass in the body: The C.G. is located where the mass is more concentrated. If the mass distribution changes (e.g., by bending an object), the position of the C.G. also changes.
2. The shape or geometry of the body: The C.G. is determined by the shape of the body. For symmetrical bodies with uniform density, the C.G. is at their geometric center.
Quick Tip: The center of gravity is the average location of the weight of an object. Anything that affects how the weight is spread out (mass distribution and shape) will affect the C.G.
Case 1: Lata cuts a potato into two halves, using a cutter which belongs to a Class II lever. She needed effort E\(_1\).
Case 2: Then she cuts one half of this potato again, but this time she needed effort E\(_2\).
If E\(_1\) \(>\) E\(_2\) then:
(a) In which case (1st or 2nd) was the potato closer to her hand applying the effort? (Assume normal reaction of the surface of the potato is same in both cases)
(b) Give a reason for your answer in (a) above.
View Solution
(a) In which case was the potato closer to her hand?
The potato was closer to her hand in Case 1.
(b) Reason:
Step 1: Understanding the Lever System:
A cutter is a Class II lever, where the Load (the resistance from the potato) is between the Fulcrum (the pivot of the cutter) and the Effort (the force applied by the hand).
Step 2: Principle of Levers:
The principle of moments for a lever in equilibrium is:
\[ Effort \times Effort Arm = Load \times Load Arm \]
This can be rearranged to find the effort required:
\[ Effort = \frac{Load \times Load Arm}{Effort Arm} \]
Step 3: Applying the given conditions:
- The Effort Arm is the distance from the fulcrum to the hand, which we can assume remains constant.
- The question states to assume the normal reaction (which is the Load) is the same in both cases. So, Load\(_1\) = Load\(_2\).
- With the Load and Effort Arm being constant, the formula simplifies to:
\[ Effort \propto Load Arm \]
- We are given that \(E_1 > E_2\). Since the effort is directly proportional to the load arm, this implies that the Load Arm in Case 1 was greater than the Load Arm in Case 2.
\[ Load Arm_1 > Load Arm_2 \]
Step 4: Conclusion:
The Load Arm is the distance from the fulcrum to the potato. A larger load arm means the potato is placed further from the fulcrum. Since the hand is at the other end of the lever, placing the potato further from the fulcrum means placing it closer to the hand. Therefore, the potato was closer to the hand in Case 1, which required a greater effort.
Quick Tip: For a Class II lever (like a bottle opener or wheelbarrow), moving the load closer to the effort (away from the fulcrum) decreases your mechanical advantage, forcing you to apply more effort.
The graph below shows the variation of image distance (v) with the object distance (u) when an object is kept in front of a lens. Identify the type of lens used.
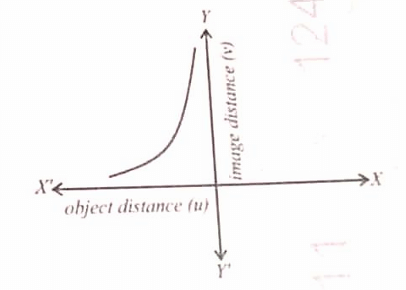
View Solution
Step 1: Analyzing the Graph:
The graph shows the relationship between the object distance (\(u\)) and the image distance (\(v\)).
- Object distance (\(u\)) is plotted on the negative X-axis, which is consistent with the sign convention that real objects have a negative object distance.
- Image distance (\(v\)) is plotted on the positive Y-axis. A positive image distance signifies that a real image is formed.
- As the magnitude of the object distance \(|u|\) decreases (i.e., the object moves closer to the lens), the image distance \(v\) increases.
Step 2: Relating Graph to Lens Properties:
- A lens that forms a real image for a real object must be a converging lens. A concave (diverging) lens always forms a virtual image for a real object, for which \(v\) would be negative.
- The behavior shown in the graph (real image formation, with \(v\) increasing as \(u\) decreases towards the focal point) is the characteristic property of a convex lens.
Step 3: Final Answer:
Since the lens forms a real image (\(v > 0\)) for a real object (\(u < 0\)), the lens used is a convex lens.
Quick Tip: Remember the key difference from graphs: A convex lens can form real images (\(v > 0\)), while a concave lens always forms virtual images (\(v < 0\)) for real objects. A positive v on the graph immediately points to a convex lens.
What would be the magnification (more than 1 / less than 1 / equal to 1) if the object is placed between F and 2F of the above lens?
View Solution
Step 1: Recall Image Formation by a Convex Lens:
For a convex lens, when an object is placed between the focal point (F) and twice the focal length (2F), the image is formed beyond 2F. The image is real, inverted, and magnified.
Step 2: Define Magnification:
The linear magnification (\(m\)) produced by a lens is given by the ratio of the image distance (\(v\)) to the object distance (\(u\)).
\[ m = \frac{v}{u} \]
The size of the magnification (magnitude) is given by \(|m| = \frac{|v|}{|u|}\).
Step 3: Apply the Condition:
When the object is placed between F and 2F:
- Object distance: \(F < |u| < 2F\)
- Image distance: \(|v| > 2F\)
Comparing the magnitudes, we clearly see that the image distance is greater than the object distance:
\[ |v| > |u| \]
Therefore, the magnitude of the magnification will be:
\[ |m| = \frac{|v|}{|u|} > 1 \]
Step 4: Final Answer:
Since the image is magnified, the magnification is more than 1.
Quick Tip: Memorize the image formation table for a convex lens. Object at 2F \(\rightarrow\) Image at 2F, \(m=1\). Object between F and 2F \(\rightarrow\) Image beyond 2F, \(m>1\). Object beyond 2F \(\rightarrow\) Image between F and 2F, \(m<1\).
A resistance R is connected across a cell with a switch and a rheostat in series. A voltmeter is connected parallel across the cell. Current in the circuit is increased using the rheostat.
(a) How will the voltmeter reading change? (increase / decrease / remain the same)
(b) Justify your answer stated in (a) above.
View Solution
(a) How will the voltmeter reading change?
The voltmeter reading will decrease.
(b) Justification:
Step 1: Understanding the Measurement:
The voltmeter connected in parallel across the cell measures the terminal voltage (\(V\)) of the cell.
Step 2: The Terminal Voltage Formula:
The terminal voltage (\(V\)) of a cell is related to its electromotive force (e.m.f. or \(E\)) and internal resistance (\(r\)) by the equation:
\[ V = E - Ir \]
where \(I\) is the current drawn from the cell. The term \(Ir\) represents the potential drop across the internal resistance of the cell, often called "lost volts".
Step 3: Analyzing the Change:
The problem states that the current (\(I\)) in the circuit is increased (by adjusting the rheostat).
According to the equation \(V = E - Ir\):
- \(E\) (the e.m.f. of the cell) is a constant.
- \(r\) (the internal resistance) is a constant.
- As the current \(I\) increases, the product \(Ir\) (the lost volts) also increases.
- Since we are subtracting a larger value (\(Ir\)) from a constant value (\(E\)), the resulting terminal voltage (\(V\)) must decrease.
Quick Tip: Think of terminal voltage as the "usable voltage" from a cell. The more current you draw, the more voltage is "lost" inside the cell itself, so the less is available to the external circuit.
(a) Define natural vibrations.
(b) How is this vibration different from damped vibrations in terms of their amplitudes?
View Solution
(a) Definition of Natural Vibrations:
Natural vibrations (or free vibrations) are the periodic vibrations of a body that occur in the complete absence of any external resistive or driving forces. The body vibrates at its own characteristic frequency, known as its natural frequency.
(b) Difference from Damped Vibrations:
The key difference between natural vibrations and damped vibrations lies in the behavior of their amplitudes over time:
- Natural Vibrations: In an ideal scenario of natural vibrations, there is no energy loss. As a result, the amplitude of vibration remains constant indefinitely.
- Damped Vibrations: In damped vibrations, resistive forces (like friction or air resistance) are present. These forces dissipate the energy of the vibrating system. Consequently, the amplitude of vibration continuously decreases over time, eventually becoming zero.
Quick Tip: Natural = Ideal, Constant Amplitude. Damped = Real-world, Decreasing Amplitude. Forced = External driver, Constant Amplitude (at steady state).
A metal piece of thermal capacity 40 JK\(^{-1}\), absorbs 800 J of heat. Calculate the rise in the temperature of this metal piece.
View Solution
Step 1: Identify the given quantities:
- Heat absorbed (\(Q\)) = 800 J
- Thermal capacity (\(C'\)) = 40 J K\(^{-1}\)
Step 2: Recall the relevant formula:
The relationship between heat absorbed (\(Q\)), thermal capacity (\(C'\)), and the change in temperature (\(\Delta T\)) is given by:
\[ Q = C' \times \Delta T \]
Step 3: Rearrange the formula to solve for the rise in temperature (\(\Delta T\)):
\[ \Delta T = \frac{Q}{C'} \]
Step 4: Substitute the given values and calculate:
\[ \Delta T = \frac{800 J}{40 J K^{-1}} \] \[ \Delta T = 20 K \]
Since a change of 1 K is equal to a change of 1\(^{\circ}\)C, the rise in temperature can also be expressed as 20\(^{\circ}\)C.
Quick Tip: Distinguish between specific heat capacity (per unit mass, \(c\)) and thermal capacity (for the whole object, \(C'\)). The formulas are \(Q=mc\Delta T\) and \(Q=C'\Delta T\). Here, the problem gives thermal capacity directly, making the calculation simpler.
In an AC generator, name the part which has the following functions:
(a) intensifies the magnetic field.
(b) maintains electrical contact between the rotating parts and the external circuit.
View Solution
(a) Intensifies the magnetic field:
The part that intensifies the magnetic field is the soft iron core. The insulated copper coil (armature) is wound on a soft iron core. This core becomes a strong electromagnet when current is induced, greatly strengthening the overall magnetic field and leading to a higher induced e.m.f.
(b) Maintains electrical contact between the rotating parts and the external circuit:
This function is performed by two components working together: the slip rings and the carbon brushes.
- The slip rings are two continuous metal rings that are attached to the ends of the armature coil and rotate with it.
- The carbon brushes are stationary blocks of carbon that press lightly against the rotating slip rings, conducting the current from the coil to the external circuit.
Quick Tip: Remember the difference for generators: AC Generator uses \textbf{Slip Rings} (for alternating current). DC Generator uses a \textbf{Split-Ring Commutator} (to reverse the current every half rotation and produce direct current).
Give two differences between nuclear fission and nuclear fusion.
View Solution
Here are two key differences between nuclear fission and nuclear fusion:
1. Nature of the Process:
- Nuclear Fission: It is the process where a single heavy, unstable nucleus (like Uranium-235) splits into two or more smaller, lighter nuclei.
- Nuclear Fusion: It is the process where two or more very light nuclei (like hydrogen isotopes) combine or 'fuse' together to form a single, heavier nucleus.
2. Conditions Required:
- Nuclear Fission: This process can occur at normal temperatures and pressures. It can be initiated by bombarding a heavy nucleus with a slow-moving neutron, leading to a chain reaction.
- Nuclear Fusion: This process requires extremely high temperatures (of the order of \(10^7\) K) and immense pressure to overcome the strong electrostatic repulsion between the positively charged nuclei and force them to fuse.
Quick Tip: Think of the words: Fission sounds like "fissure" (a split). Fusion sounds like "fuse" (to join together). This can help you remember the basic definition of each process.
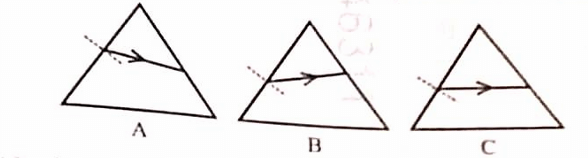
A monochromatic ray strikes the surface of identical prisms (A, B and C) at different angles of incidence. The diagram below shows their refracted rays. Study the path of these refracted rays and identify in which of the diagrams
(a) the angle of incidence is maximum.
(b) the angle of incidence is minimum.
(c) the angle of incidence is equal to the angle of emergence.
View Solution
(a) The angle of incidence is maximum:
The angle of incidence is maximum in Diagram C. In this diagram, the incident ray is bent the least upon entering the prism (it is furthest from the normal), which corresponds to the largest angle of incidence.
(b) The angle of incidence is minimum:
The angle of incidence is minimum in Diagram B. In this diagram, the incident ray is bent the most upon entering the prism (it is closest to the normal), which corresponds to the smallest angle of incidence.
(c) The angle of incidence is equal to the angle of emergence:
The angle of incidence is equal to the angle of emergence in Diagram A. This is the specific condition for the angle of minimum deviation. A key feature of this condition is that the refracted ray inside the prism travels parallel to the base of the prism, which is clearly depicted in Diagram A.
Quick Tip: For a prism, the condition of minimum deviation is special because it's symmetric: angle of incidence (\(i\)) equals the angle of emergence (\(e\)). Visually, this is when the light ray inside the prism is parallel to the prism's base.
A ray of light enters a glass block from air and comes out from the opposite surface. If the angle of refraction at the first surface is not the same as the angle of incidence at the second surface, then:
(a) What is the product of the ratio \(\frac{\sin i}{\sin r}\) at the first surface and at the second surface?
(b) State whether the opposite surfaces are parallel or not parallel.
(c) How did you reach the conclusion in (b) above?
View Solution
(a) Product of the ratios:
Let \(n_a\) be the refractive index of air (\(\approx 1\)) and \(n_g\) be the refractive index of glass.
- At the first surface (air to glass): Let the angle of incidence be \(i_1\) and the angle of refraction be \(r_1\). According to Snell's law: \[ \frac{\sin i_1}{\sin r_1} = \frac{n_g}{n_a} = n_g \]
- At the second surface (glass to air): Let the angle of incidence be \(i_2\) and the angle of refraction (emergence) be \(r_2\). According to Snell's law: \[ \frac{\sin i_2}{\sin r_2} = \frac{n_a}{n_g} = \frac{1}{n_g} \]
The question asks for the product of the ratio \(\frac{\sin i}{\sin r}\) at the first surface and at the second surface. \[ Product = \left( \frac{\sin i_1}{\sin r_1} \right) \times \left( \frac{\sin i_2}{\sin r_2} \right) = n_g \times \frac{1}{n_g} = 1 \]
The product is 1.
(b) Parallel or not parallel:
The opposite surfaces are not parallel.
(c) Conclusion:
If the opposite surfaces of the glass block were parallel, then the normal to the first surface would be parallel to the normal to the second surface. In this case, the refracted ray from the first surface and the incident ray at the second surface would form alternate interior angles with the parallel normals. Therefore, the angle of refraction at the first surface (\(r_1\)) would be equal to the angle of incidence at the second surface (\(i_2\)).
The question explicitly states that \(r_1 \neq i_2\). Since this geometric condition for parallel lines is not met, we can conclude that the surfaces are not parallel.
Quick Tip: For a rectangular (parallel-sided) glass slab, the emergent ray is parallel to the incident ray. This only happens if \(r_1 = i_2\). If this condition is not met, the surfaces cannot be parallel.
A type of glass block has a refractive index of 1.8.
(a) Calculate the speed of light in this glass. (Given speed of light in air \(c = 3 \times 10^8\) ms\(^{-1}\))
(b) If the width of this block is doubled, then what will be the speed of light in the block?
View Solution
(a) Calculation of speed of light in glass:
Step 1: Formula for Refractive Index
The refractive index (\(n\)) of a medium is the ratio of the speed of light in a vacuum/air (\(c\)) to the speed of light in the medium (\(v\)). \[ n = \frac{c}{v} \]
Step 2: Given values
- Refractive index of glass, \(n = 1.8\)
- Speed of light in air, \(c = 3 \times 10^8\) m/s
Step 3: Calculation
Rearranging the formula to find the speed of light in glass (\(v\)): \[ v = \frac{c}{n} = \frac{3 \times 10^8}{1.8} \] \[ v = \frac{30}{18} \times 10^8 = \frac{5}{3} \times 10^8 \approx 1.67 \times 10^8 m/s \]
The speed of light in the glass is \(1.67 \times 10^8\) m/s.
(b) Effect of doubling the width:
The speed of light in a medium is an intrinsic property of that medium. It depends only on the optical density of the material, not on its physical dimensions like width, length, or thickness. Therefore, if the width of the block is doubled, the speed of light inside the block will remain the same (\(1.67 \times 10^8\) m/s).
Quick Tip: The speed of light changes only when it enters a different medium. Within the same uniform medium, its speed is constant regardless of the path length.
(a) Name the electromagnetic radiation used to detect fake currency.
(b) Redraw the diagram given below and complete the path of the light ray AB through the glass prism till it emerges out of the prism. Critical angle of the glass is 42\(^\circ\).
View Solution
(a) Electromagnetic Radiation:
Ultraviolet (UV) radiation is used to detect fake currency. Genuine banknotes often have fluorescent security features that are invisible in normal light but glow under UV light.
(b) Path of the light ray:
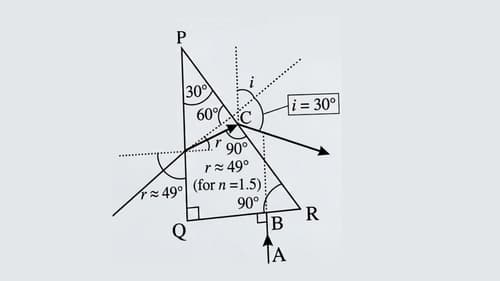
Explanation of the path:
1. Entry at the first surface: The light ray AB strikes the vertical face of the prism normally (at 90\(^\circ\)). Therefore, its angle of incidence is 0\(^\circ\), and it passes into the prism without any deviation.
2. Incidence at the hypotenuse: The ray travels horizontally inside the prism and strikes the hypotenuse. The angles of the prism are 90\(^\circ\), 30\(^\circ\), and 60\(^\circ\). The angle of incidence (\(i\)) at the hypotenuse is 60\(^\circ\).
3. Check for Total Internal Reflection (TIR): The critical angle (\(c\)) for the glass is given as 42\(^\circ\). Since the angle of incidence (\(i = 60^\circ\)) is greater than the critical angle (\(c = 42^\circ\)), the ray undergoes Total Internal Reflection.
4. Reflection: The ray reflects from the hypotenuse following the laws of reflection, so the angle of reflection is also 60\(^\circ\).
5. Emergence from the base: The reflected ray travels downwards and strikes the horizontal base of the prism at 90\(^\circ\) (normally). Therefore, it emerges from the prism without any deviation.
Quick Tip: When a ray hits a boundary, always find the angle of incidence and compare it to the critical angle. If \(i > c\), TIR occurs. If \(i < c\), refraction occurs. If \(i = c\), the ray grazes the surface.
An object placed in front of a convex lens, forms an image of same size on a screen. Moving the object 12 cm closer to the lens results in the formation of a real image which is three times the size of the object. Calculate the focal length of the lens.
View Solution
Step 1: Analyze the initial condition.
A convex lens forms a real image of the same size as the object only when the object is placed at a distance of twice the focal length (2f) from the optical center.
Initial object distance, \(u = -2f\).
The image is also formed at 2f on the other side.
Step 2: Analyze the second condition.
The object is moved 12 cm closer to the lens.
New object distance, \(u' = u + 12 = -2f + 12\). (The negative sign is included in the value).
A real image is formed, which is three times the size. For a real image from a convex lens, the magnification (\(m\)) is negative (inverted).
Magnification, \(m = -3\).
Step 3: Use the magnification formula.
\(m = \frac{v'}{u'}\) \[ -3 = \frac{v'}{-2f + 12} \] \[ v' = -3(-2f + 12) = 6f - 36 \]
This is the new image distance. Since \(v'\) is positive, the image is real, which matches the problem description.
Step 4: Use the lens formula.
\[ \frac{1}{f} = \frac{1}{v'} - \frac{1}{u'} \]
Substitute the expressions for \(u'\) and \(v'\): \[ \frac{1}{f} = \frac{1}{6f - 36} - \frac{1}{-2f + 12} \] \[ \frac{1}{f} = \frac{1}{6f - 36} + \frac{1}{2f - 12} \]
Find a common denominator: \[ \frac{1}{f} = \frac{1}{3(2f - 12)} + \frac{1}{2f - 12} \] \[ \frac{1}{f} = \frac{1 + 3}{3(2f - 12)} \] \[ \frac{1}{f} = \frac{4}{3(2f - 12)} \]
Cross-multiply: \[ 3(2f - 12) = 4f \] \[ 6f - 36 = 4f \] \[ 2f = 36 \] \[ f = 18 cm \]
The focal length of the lens is 18 cm.
Quick Tip: The condition "image of same size" for a convex lens is a strong hint that the object is at 2f. This is often the starting point for solving such problems.
(a) Atmospheric temperature after a hailstorm is greater than the temperature during the hailstorm. State True or False.
(b) Which thermal physical quantity of a frying pan changes by making the base heavier?
(c) State the principle of Calorimetry.
View Solution
(a) True or False:
The statement is False. After a hailstorm, the hailstones on the ground start to melt. Melting is a process that requires energy, specifically the latent heat of fusion. The hailstones absorb this heat from the surrounding atmosphere, causing the atmospheric temperature to drop further. Therefore, the temperature after a hailstorm is generally lower, not greater.
(b) Thermal Physical Quantity:
Making the base of a frying pan heavier means increasing its mass (\(m\)).
- Specific heat capacity (\(c\)) is an intrinsic property of the material and does not change with mass.
- Heat capacity (or Thermal capacity, \(C'\)) is the product of mass and specific heat capacity (\(C' = m \times c\)). Since the mass (\(m\)) increases, the heat capacity also increases.
The quantity that changes is the heat capacity.
(c) Principle of Calorimetry:
The principle of calorimetry, also known as the law of heat exchange, states that when two bodies at different temperatures are in thermal contact, the heat lost by the hotter body is equal to the heat gained by the colder body, provided there is no heat loss to the surroundings.
\[ Heat Lost = Heat Gained \] Quick Tip: Remember the difference: Specific heat capacity is "per kg" of a substance, while heat capacity is for the "entire object". Heavier object = more heat capacity.
The given graph represents the cooling curve of a liquid.
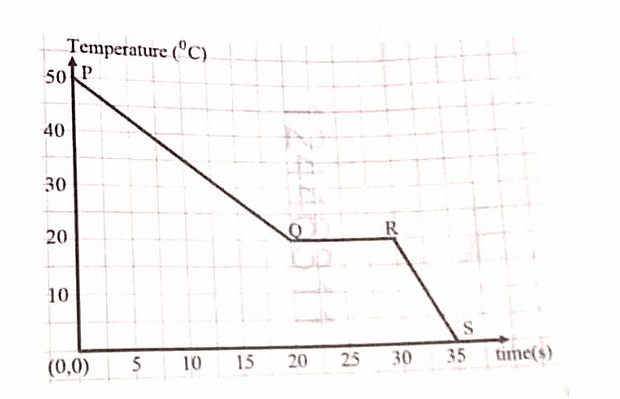
(a) State the freezing temperature of the liquid.
(b) Name the phase change happening at the region QR.
(c) In which state (solid / liquid) does the above substance liberate heat at a faster rate? Justify.
View Solution
(a) Freezing Temperature:
The freezing temperature is the temperature at which the liquid turns into a solid. During this phase change, the temperature remains constant even as heat is being liberated. The horizontal section of the graph, QR, represents this phase change. The temperature corresponding to this section is 20 \(^\circ\)C.
(b) Phase Change at QR:
The substance is cooling. At the constant temperature region QR, the liquid is changing its state to solid. This process is called freezing or solidification.
(c) State with faster heat liberation:
The substance liberates heat at a faster rate in the liquid state (region PQ).
Justification: The rate of heat liberation is proportional to the rate of cooling. The rate of cooling is represented by the slope (steepness) of the temperature-time graph. The slope of the graph in the region PQ (liquid state) is steeper than the slope in the region RS (solid state). A steeper slope means a larger change in temperature per unit time, indicating a faster rate of heat loss.
Quick Tip: On a cooling curve, the slope tells you the rate of cooling. Steeper slope = faster cooling. A flat plateau = phase change at a constant temperature.
The diagram shows a wheel with a handle. Two forces, F\(_1\) and F\(_2\) of equal magnitudes are acting on the handle as shown in the diagram.
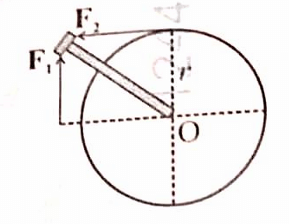
(a) Which force produces negative moment?
(b) Is the wheel in equilibrium? (Yes or No)
(c) Justify your answer stated in (b).
(a) F\(_1\) produces a negative moment.
(b) Yes.
(c) The wheel is in equilibrium because both the net force and the net moment (torque) acting on it are zero.
View Solution
(a) Which force produces negative moment?
By convention, a moment that tends to cause clockwise rotation is considered negative, and a moment that tends to cause anti-clockwise rotation is positive.
- Force F\(_1\) tends to rotate the wheel in the clockwise direction. Therefore, F\(_1\) produces a negative moment.
- Force F\(_2\) tends to rotate the wheel in the anti-clockwise direction. Therefore, F\(_2\) produces a positive moment.
(b) Is the wheel in equilibrium?
Yes, the wheel is in equilibrium.
(c) Justification:
For a body to be in rotational equilibrium, two conditions must be met:
1. Translational Equilibrium: The net force acting on the body must be zero. The forces F\(_1\) and F\(_2\) are equal in magnitude and opposite in direction. Thus, the net force is \( F_{net} = F_2 - F_1 = F - F = 0 \).
2. Rotational Equilibrium: The net moment (or torque) about the pivot point (O) must be zero.
- Moment due to F\(_1\) is \(\tau_1 = -F_1 \times r = -Fr\) (clockwise, hence negative).
- Moment due to F\(_2\) is \(\tau_2 = +F_2 \times r = +Fr\) (anti-clockwise, hence positive).
- The net moment is \(\tau_{net} = \tau_1 + \tau_2 = -Fr + Fr = 0\).
Since both the net force and the net moment are zero, the wheel is in a state of rotational equilibrium.
Quick Tip: Equilibrium always requires two conditions: net force = 0 AND net torque = 0. A pair of equal and opposite forces that do not act along the same line is called a couple, and it produces a net torque. In this special case, the forces act at the same point from the pivot, so their torques cancel out.
Name the unit of work done, used in subatomic scale.
View Solution
Step 1: Understanding the Scale:
The subatomic scale refers to particles smaller than an atom, like electrons, protons, and neutrons. The energies and work done involved at this level are extremely small compared to macroscopic standards.
Step 2: Defining the Unit:
The standard SI unit for work and energy is the Joule (J). However, the Joule is too large for convenient use on the subatomic scale. A more practical unit is the electron-volt (eV).
One electron-volt is defined as the amount of kinetic energy gained (or work done) by a single electron when it is accelerated through an electric potential difference of one volt.
\(1 eV \approx 1.602 \times 10^{-19} J\).
Quick Tip: When dealing with atomic or nuclear physics, always expect energies to be expressed in electron-volts (eV) or its multiples like keV (kilo-eV), MeV (mega-eV), and GeV (giga-eV).
To which class of lever does a pair of scissors belong?
View Solution
Step 1: Identifying the Components of a Lever:
A lever has three main components:
- Fulcrum (F): The pivot point.
- Effort (E): The point where force is applied.
- Load (L): The point where the resistance (or object to be moved) is located.
Step 2: Analyzing a Pair of Scissors:
In a pair of scissors:
- The Fulcrum is the pin or screw that joins the two blades.
- The Effort is applied by the fingers on the handles.
- The Load is the object (e.g., paper or cloth) being cut by the blades.
Step 3: Classifying the Lever:
Levers are classified based on the relative positions of F, L, and E.
- Class I: The Fulcrum is between the Effort and the Load (E-F-L).
- Class II: The Load is between the Fulcrum and the Effort (F-L-E).
- Class III: The Effort is between the Fulcrum and the Load (F-E-L).
Since the fulcrum (pivot) of the scissors is located between the effort (handles) and the load (material being cut), a pair of scissors is an example of a Class I lever. In fact, it is a double Class I lever.
Quick Tip: Remember the classes of levers with the mnemonic "FLE" for the component in the middle: Class 1 has F in the middle, Class 2 has L in the middle, and Class 3 has E in the middle.
A stone is tied to a string and displaced from A to B by application of a constant force F in three different ways as shown in the diagram below. Arrange the three cases in ascending order of the work done by the force. (Given AJB is a semi-circle, 0\(^\circ\) < \(\theta\) < 90\(^\circ\) and AB = 20 m)
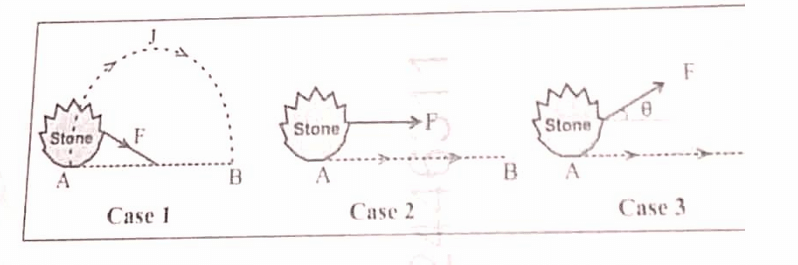
View Solution
Step 1: Understanding Work Done:
Work done (\(W\)) by a force depends on the force applied and the displacement of the object along the direction of the force.
- If the force vector \(\vec{F}\) is constant and the displacement is \(\vec{d}\), then work done is \(W = \vec{F} \cdot \vec{d} = Fd\cos\phi\), where \(\phi\) is the angle between the force and displacement vectors.
- If the force is applied along a path, the work done is the integral of the force component along the path, \(W = \int \vec{F} \cdot d\vec{s}\).
Step 2: Calculating Work Done for Each Case:
The net displacement from A to B is a straight line of length \(d = 20\) m.
Case 1: The force F is applied tangentially along the semi-circular path AJB.
The length of the path is the circumference of the semi-circle, \(s = \pi r\). The radius is \(r = AB/2 = 20/2 = 10\) m.
So, path length \(s = \pi \times 10 = 10\pi\) m.
Since the force is always in the direction of motion, the work done is force \(\times\) distance. \[ W_1 = F \times s = F \times 10\pi \approx 31.4 F \]
Case 2: The constant force F is applied horizontally, parallel to the displacement AB.
The displacement is \(d = 20\) m. The angle between force and displacement is \(\phi = 0^\circ\). \[ W_2 = F \times d \times \cos(0^\circ) = F \times 20 \times 1 = 20 F \]
Case 3: The constant force F is applied at an angle \(\theta\) to the horizontal displacement AB.
The displacement is \(d = 20\) m. The angle between force and displacement is \(\theta\). \[ W_3 = F \times d \times \cos\theta = F \times 20 \times \cos\theta \]
Given that \(0^\circ < \theta < 90^\circ\), we know that \(0 < \cos\theta < 1\).
Therefore, \(W_3\) is less than \(20F\). For example, if \(\theta = 60^\circ\), \(W_3 = 20F \times 0.5 = 10F\).
Step 3: Comparing the Work Done:
We have:
- \(W_1 \approx 31.4 F\)
- \(W_2 = 20 F\)
- \(W_3 = (20 \cos\theta) F\), which is less than \(20F\).
Comparing the three values, we get: \(W_3 < W_2 < W_1\).
The ascending order is Case 3, Case 2, Case 1.
Quick Tip: Work done is maximized when the force is applied exactly along the path of motion. Any angle between the force and the direction of motion reduces the effective work done for a given displacement.
A ball of mass 20 g falls from a height of 45 m. It rebounds from the ground to a height of 40 m. Calculate:
(a) the initial potential energy of the ball.
(b) the speed of the ball at which it hits the ground.
(c) the loss in kinetic energy on striking the ground.
[g = 10 m/s\(^2\)]
(a) 9 J
(b) 30 m/s
(c) 1 J
View Solution
Step 1: List the given data and convert units:
- Mass (\(m\)) = 20 g = 0.02 kg
- Initial height (\(h_1\)) = 45 m
- Rebound height (\(h_2\)) = 40 m
- Acceleration due to gravity (\(g\)) = 10 m/s\(^2\)
(a) Initial Potential Energy:
The potential energy (PE) of an object is given by the formula \(PE = mgh\). \[ PE_{initial} = m \times g \times h_1 = 0.02 kg \times 10 m/s^2 \times 45 m \] \[ PE_{initial} = 9 J \]
(b) Speed on hitting the ground:
By the principle of conservation of energy (assuming no air resistance), the initial potential energy is completely converted into kinetic energy (KE) just before the ball hits the ground. \[ KE_{before} = PE_{initial} \] \[ \frac{1}{2}mv^2 = 9 J \] \[ v^2 = \frac{2 \times 9}{m} = \frac{18}{0.02} = 900 \] \[ v = \sqrt{900} = 30 m/s \]
(c) Loss in kinetic energy:
The loss in kinetic energy during the collision is the difference between the kinetic energy just before hitting the ground and the kinetic energy just after rebounding.
- Kinetic energy just before impact: \(KE_{before} = PE_{initial} = 9\) J.
- The kinetic energy just after rebound is equal to the potential energy it gains on reaching the rebound height \(h_2\). \[ KE_{after} = PE_{rebound} = m \times g \times h_2 = 0.02 \times 10 \times 40 = 8 J \]
- The loss in kinetic energy is: \[ \Delta KE_{loss} = KE_{before} - KE_{after} = 9 J - 8 J = 1 J \] Quick Tip: The energy lost during an inelastic collision (like a ball bouncing) is the difference between the potential energies at the initial height and the rebound height: \( \Delta E_{loss} = mg(h_{initial} - h_{rebound}) \).
To lift a load of 30 kgf, Suhas uses a single fixed pulley, while Radha uses a single movable pulley. The displacement of efforts in both the cases are equal. In an ideal situation calculate the ratio of:
(a) the efforts in the two cases.
(b) the potential energy gained by the loads in the two cases.
(c) the efficiencies in the two cases.
(a) 2 : 1
(b) 2 : 1
(c) 1 : 1
View Solution
Step 1: Analyze the setup for Suhas and Radha:
- Load (\(L\)) = 30 kgf
- Suhas: Single fixed pulley. Ideal Mechanical Advantage (\(MA_S\)) = 1. Velocity Ratio (\(VR_S\)) = 1.
- Radha: Single movable pulley. Ideal Mechanical Advantage (\(MA_R\)) = 2. Velocity Ratio (\(VR_R\)) = 2.
- Let the displacement of effort be \(d_E\) for both.
(a) Ratio of efforts:
Effort (\(E\)) = Load (\(L\)) / MA.
- Effort by Suhas: \(E_S = L / MA_S = 30 kgf / 1 = 30 kgf\)
- Effort by Radha: \(E_R = L / MA_R = 30 kgf / 2 = 15 kgf\)
- The ratio \(E_S : E_R = 30 : 15 = 2 : 1\).
(b) Ratio of potential energy gained:
Potential Energy Gained (\(PE\)) = Work done on Load = \(L \times d_L\), where \(d_L\) is the displacement of the load.
From the Velocity Ratio formula, \(d_L = d_E / VR\).
- Displacement of Suhas's load: \(d_{LS} = d_E / VR_S = d_E / 1 = d_E\).
- Displacement of Radha's load: \(d_{LR} = d_E / VR_R = d_E / 2\).
Now, calculate the potential energy gained:
- \(PE_S = L \times d_{LS} = 30 \times d_E\).
- \(PE_R = L \times d_{LR} = 30 \times (d_E / 2)\).
- The ratio \(PE_S : PE_R = (30 \times d_E) : (30 \times d_E / 2) = 1 : 1/2 = 2 : 1\).
(c) Ratio of efficiencies:
The problem states it is an "ideal situation". In an ideal situation, there is no energy loss due to friction or other factors. The efficiency of any ideal machine is 100%, or 1.
- Efficiency for Suhas (\(\eta_S\)) = 1.
- Efficiency for Radha (\(\eta_R\)) = 1.
- The ratio \(\eta_S : \eta_R = 1 : 1\).
Quick Tip: For pulleys, remember: a single fixed pulley only changes the direction of effort (MA=1), while a single movable pulley halves the effort (MA=2).
(a) One end of a plastic foot ruler is held tightly at the edge of a table and the other end is plucked. Name the vibrations produced in the ruler.
(b) Now the ruler is pushed inside partially and plucked again from its free end. State with a reason whether the frequency of vibration increases or decreases.
(b) The frequency increases because the vibrating length of the ruler has decreased.
View Solution
(a) Name the vibrations:
When the ruler is plucked and then allowed to vibrate on its own, it undergoes free vibrations. However, in reality, forces like air resistance and internal friction in the material will cause the amplitude of these vibrations to gradually decrease. Therefore, the vibrations produced are more accurately called damped vibrations.
(b) Change in frequency:
Statement: The frequency of vibration increases.
Reason: The frequency of vibration of a cantilever (like a ruler held at one end) is inversely related to the square of its vibrating length (\(L\)), i.e., \(f \propto 1/L^2\). When the ruler is pushed inside, its effective vibrating length (\(L\)) decreases. Since the frequency is inversely proportional to the length squared, a shorter length results in a significantly higher frequency of vibration. A higher frequency corresponds to a shriller sound.
Quick Tip: For vibrating strings or rulers, remember this simple rule: shorter length = higher frequency = higher pitch/shriller sound.
Two persons A and B are standing in front of a cliff in the same line 170 m apart as shown in the diagram. Person B fires the gun and hears the echo in 3 s. Then the person A standing in front of the person B fires the gun. (The speed of sound in air is 340 m/s.)
(a) Calculate:
1. the distance of the person B from the cliff.
2. the minimum time in which B hears the gunshot fired by A.
(b) Fill in the blank. The echo is softer (less loud) than the original sound due to the decrease in __________ of the wave. (amplitude / frequency)
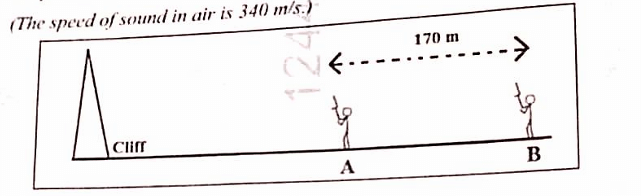
(a) 1. 510 m
(a) 2. 0.5 s
(b) amplitude
View Solution
(a) 1. Distance of person B from the cliff:
Let the distance of person B from the cliff be \(d\). When B fires a gun, the sound travels to the cliff and reflects back to B. The total distance traveled by the sound is \(d + d = 2d\).
- Time taken for the echo, \(t = 3\) s.
- Speed of sound, \(v = 340\) m/s.
Using the formula, Distance = Speed \(\times\) Time: \[ 2d = v \times t \] \[ 2d = 340 m/s \times 3 s = 1020 m \] \[ d = \frac{1020}{2} = 510 m \]
So, person B is 510 m from the cliff.
(a) 2. Minimum time for B to hear gunshot from A:
The minimum time is the time taken for the sound to travel directly from person A to person B.
- Distance between A and B = 170 m.
- Speed of sound = 340 m/s. \[ Time = \frac{Distance}{Speed} = \frac{170 m}{340 m/s} = 0.5 s \]
(b) Fill in the blank:
The loudness of a sound wave is determined by its amplitude. An echo is the reflection of sound. During reflection, some of the sound energy is absorbed by the reflecting surface, and the energy also spreads out over a larger area. This results in the reflected wave having a smaller amplitude than the original wave. Therefore, the echo is softer due to the decrease in amplitude.
Quick Tip: For echo problems, remember the distance traveled by the sound is twice the distance to the reflector (2d).
Bulb A rated 160 W, 40 V and Bulb B rated 40 W, 40 V are connected as shown in the diagram.
(a) Calculate the ratio V\(_1\) : V\(_2\)
(b) If the bulb A fuses, the current in the circuit remains the same. State True or False.
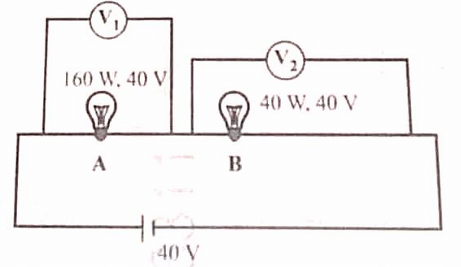
(a) 1 : 4
(b) False
View Solution
Step 1: Calculate the resistance of each bulb.
The resistance (\(R\)) of a bulb can be calculated from its power (\(P\)) and voltage (\(V\)) rating using the formula \(P = V^2 / R\), so \(R = V^2 / P\).
- For Bulb A: \(R_A = \frac{(40 V)^2}{160 W} = \frac{1600}{160} = 10 \, \Omega\)
- For Bulb B: \(R_B = \frac{(40 V)^2}{40 W} = \frac{1600}{40} = 40 \, \Omega\)
(a) Calculate the ratio V\(_1\) : V\(_2\):
The bulbs A and B are connected in series. In a series circuit, the same current (\(I\)) flows through all components. The voltage across each component is given by Ohm's law, \(V = IR\).
- Voltage across A: \(V_1 = I \times R_A\)
- Voltage across B: \(V_2 = I \times R_B\)
The ratio of the voltages is: \[ \frac{V_1}{V_2} = \frac{I \times R_A}{I \times R_B} = \frac{R_A}{R_B} \] \[ \frac{V_1}{V_2} = \frac{10 \, \Omega}{40 \, \Omega} = \frac{1}{4} \]
So, the ratio \(V_1 : V_2\) is 1 : 4.
(b) True or False:
The statement is False. The bulbs are connected in a series circuit. If bulb A fuses, its filament breaks, creating an open circuit. In an open circuit, no current can flow. Therefore, the current in the circuit will drop to zero, not remain the same.
Quick Tip: In a series circuit, voltage divides in the ratio of the resistances (\(V \propto R\)), while current is constant. In a parallel circuit, current divides in the inverse ratio of the resistances (\(I \propto 1/R\)), while voltage is constant.
The reverse side of a three-pin plug with incorrect connection of wires is shown in the diagram below.
(a) Identify the fault in the above connection.
(b) Mention a risk factor involved, if the user operates the appliance with correcting it.
(c) Will the appliance function in the present situation? (Yes or No)
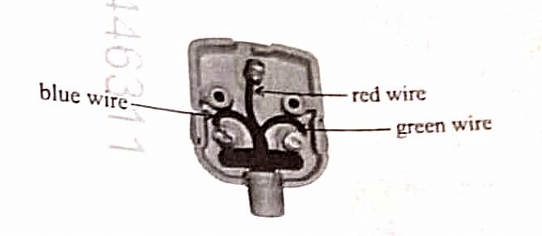
(a) The Live (red) and Neutral (blue) wires have been interchanged.
(b) A severe electric shock risk is created because the appliance remains live even when its switch is off.
(c) Yes
View Solution
(a) Identify the fault:
The standard wiring convention for a three-pin plug is:
- Live wire (Red or Brown) to the right pin (marked L).
- Neutral wire (Blue or Black) to the left pin (marked N).
- Earth wire (Green or Yellow/Green) to the top pin (marked E).
In the given diagram, the blue wire (Neutral) is connected to the live pin and the red wire (Live) is connected to the neutral pin. The fault is that the Live and Neutral wires have been swapped.
(b) Mention a risk factor:
The switch of an appliance is always placed in the live wire to disconnect the high potential from the appliance's circuit when it is turned off. With the wires swapped, the neutral wire is now switched, while the live wire is permanently connected to the appliance's circuitry. This means that even when the appliance switch is in the 'off' position, the internal components are still at a high potential (live). If a user touches any part of the internal circuit (e.g., during cleaning or minor repair), they could complete the circuit to the earth and receive a severe or fatal electric shock.
(c) Will the appliance function?
Yes. An AC appliance requires a potential difference across its terminals to function. Since there is still a potential difference between the live and neutral pins of the socket, the appliance will function. However, it will be extremely unsafe.
Quick Tip: Always remember the wiring code: Live on the right (fused pin), Neutral on the left, and Earth at the top. Incorrect wiring is a serious safety hazard.
In the combinations of resistors shown below, calculate:
(a) the resistance across AB when the switch S is open.
(b) the resistance across AB when the switch S is closed.
(a) 9 \(\Omega\)
(b) 8 \(\Omega\)
View Solution
(a) Resistance when switch S is open:
When the switch S is open, there is no connection between the upper and lower branches at the center. The circuit consists of two parallel branches between points A and B.
- Upper branch: A 12 \(\Omega\) resistor and a 6 \(\Omega\) resistor are in series.
\(R_{upper} = 12 \, \Omega + 6 \, \Omega = 18 \, \Omega\).
- Lower branch: A 6 \(\Omega\) resistor and a 12 \(\Omega\) resistor are in series.
\(R_{lower} = 6 \, \Omega + 12 \, \Omega = 18 \, \Omega\).
The total resistance across AB (\(R_{AB}\)) is the equivalent resistance of these two branches in parallel.
\[ \frac{1}{R_{AB}} = \frac{1}{R_{upper}} + \frac{1}{R_{lower}} = \frac{1}{18} + \frac{1}{18} = \frac{2}{18} = \frac{1}{9} \] \[ R_{AB} = 9 \, \Omega \]
(b) Resistance when switch S is closed:
When the switch S is closed, it connects the midpoint of the upper branch to the midpoint of the lower branch. This reconfigures the circuit into two parallel combinations connected in series. This is a Wheatstone bridge configuration.
- Left side of S: The 12 \(\Omega\) resistor and the 6 \(\Omega\) resistor are in parallel.
\[ R_{left} = \frac{12 \times 6}{12 + 6} = \frac{72}{18} = 4 \, \Omega \]
- Right side of S: The 6 \(\Omega\) resistor and the 12 \(\Omega\) resistor are in parallel.
\[ R_{right} = \frac{6 \times 12}{6 + 12} = \frac{72}{18} = 4 \, \Omega \]
The total resistance across AB is the sum of these two combinations in series. \[ R_{AB} = R_{left} + R_{right} = 4 \, \Omega + 4 \, \Omega = 8 \, \Omega \] Quick Tip: When analyzing complex resistor networks, first simplify series and parallel combinations. Closing a switch can completely change the circuit's topology, often turning series paths into parallel ones, as seen in this Wheatstone bridge example.
An electric iron rated 1100 W, 220 V is operated for 5 hours.
Calculate:
(a) the minimum rating of the fuse required.
(b) the energy consumed in kWh.
(c) the cost of the energy consumed, if the rate is Rupees 10 per unit.
(a) 5 A
(b) 5.5 kWh
(c) Rupees 55
View Solution
(a) Minimum rating of the fuse required:
Step 1: Formula to find the current.
The current (\(I\)) drawn by the iron can be calculated from its power (\(P\)) and voltage (\(V\)) rating using the formula: \[ P = V \times I \]
Step 2: Calculation.
Given \(P = 1100\) W and \(V = 220\) V. \[ I = \frac{P}{V} = \frac{1100 W}{220 V} = 5 A \]
A fuse is a safety device with a rating slightly higher than the normal operating current of the appliance. Therefore, the minimum standard fuse rating required would be just above 5 A. However, the safe current limit for the appliance is 5 A.
(b) Energy consumed in kWh:
Step 1: Formula for energy consumption.
The electrical energy (\(E\)) consumed is given by: \[ E = Power \times Time \]
To get the energy in kWh (kilowatt-hours), the power must be in kilowatts (kW) and time in hours (h).
Step 2: Unit conversion and calculation.
- Power = 1100 W = \(\frac{1100}{1000}\) kW = 1.1 kW.
- Time = 5 hours. \[ E = 1.1 kW \times 5 h = 5.5 kWh \]
(c) Cost of the energy consumed:
Step 1: Formula for cost. \[ Cost = Energy Consumed (in units) \times Rate per unit \]
One unit of electrical energy is equal to 1 kWh.
Step 2: Calculation.
- Energy consumed = 5.5 units.
- Rate = Rupees 10 per unit. \[ Cost = 5.5 \times 10 = Rupees \; 55 \] Quick Tip: To calculate electricity bills, always convert the power from Watts to Kilowatts (by dividing by 1000) before multiplying by the time in hours.
When the magnet as shown in the diagram, is moved towards the coil at a speed of 5 ms\(^{-1}\), the galvanometer shows a certain deflection to the right.
How will the direction and magnitude of deflection change when the coil also moves with a speed of 5 ms\(^{-1}\):
(a) in the direction of the motion of the magnet?
(b) in the opposite direction of the motion of the magnet?
(b) Direction: To the right (same as before). Magnitude: Deflection will be larger (doubled).
View Solution
Step 1: Understanding Electromagnetic Induction:
According to Faraday's law of electromagnetic induction, an electromotive force (e.m.f.) and hence a current is induced in a coil only when there is a change in the magnetic flux linked with it. This change in flux is caused by the relative motion between the magnet and the coil. The magnitude of the induced current is proportional to the rate of change of flux, which depends on the relative speed. The direction is given by Lenz's law.
(a) Coil moves in the same direction as the magnet:
- Speed of magnet = 5 ms\(^{-1}\) (let's say, to the left).
- Speed of coil = 5 ms\(^{-1}\) (also to the left).
- The relative speed between the magnet and the coil is \(5 - 5 = 0\).
- Since there is no relative motion, the magnetic flux linked with the coil does not change.
- Therefore, no current is induced, and the galvanometer shows zero deflection.
(b) Coil moves in the opposite direction of the magnet:
- Speed of magnet = 5 ms\(^{-1}\) (to the left).
- Speed of coil = 5 ms\(^{-1}\) (to the right, i.e., in the opposite direction).
- The magnet and coil are moving towards each other. Their relative speed of approach is \(5 + 5 = 10\) ms\(^{-1}\).
- This relative speed (10 ms\(^{-1}\)) is double the original relative speed (5 ms\(^{-1}\)).
- Magnitude: Since the rate of change of flux is now doubled, the magnitude of the induced current and the resulting deflection will be larger (specifically, double the original deflection).
- Direction: The magnet is still approaching the coil, which is the same direction of relative motion as the initial case. According to Lenz's law, the direction of the induced current depends on whether the flux is increasing or decreasing. Since the relative motion is still 'approaching', the direction of the induced current will be the same as before (to the right).
Quick Tip: Induced current depends only on the *relative* motion between the magnet and the coil. No relative motion means no induced current.
(a) 1. Which element is used in the lining of the special aprons worn by workers in nuclear power plants?
2. Why is this element preferred?
(b) \(^{24}_{11}\)Na emits a nuclear radiation which does not alter the mass number and is deflected by a magnetic field.
1. Name the type of nuclear radiation emitted by \(^{24}_{11}\)Na.
2. Write the equation for this radioactive decay.
(a) 1. Lead (Pb)
2. It has a high atomic number and high density, making it very effective at absorbing gamma and X-ray radiation.
(b) 1. Beta radiation (\(\beta\)-particle)
2. \(^{24}_{11}\text{Na} \rightarrow ^{24}_{12}\text{Mg} + ^{0}_{-1}\beta\)
View Solution
(a) 1. Element for shielding aprons:
The element used for lining radiation-shielding aprons is Lead (Pb).
(a) 2. Reason for preference:
Lead is preferred for radiation shielding for two main reasons:
- High Density and High Atomic Number: Lead has a very high density and a large number of electrons per atom. This dense structure is extremely effective at absorbing the energy of high-energy photons like gamma rays and X-rays, significantly reducing their intensity.
- Cost-Effectiveness and Malleability: It is relatively inexpensive, abundant, and easy to work with, making it practical for constructing shielding materials.
(b) 1. Type of nuclear radiation:
We are given two clues:
1. The radiation does not alter the mass number (A).
2. The radiation is deflected by a magnetic field, which means it consists of charged particles.
Let's analyze the common types of radiation:
- Alpha (\(\alpha\)) decay: Emits a helium nucleus (\(^{4}_{2}He\)). It is charged but changes the mass number by -4. So, it's not alpha.
- Gamma (\(\gamma\)) decay: Emits a high-energy photon. It does not change the mass number but is not charged, so it is not deflected. So, it's not gamma.
- Beta (\(\beta\)) decay: Emits an electron (\(^{0}_{-1}\beta\)). An electron is a charged particle, so it will be deflected. Its mass number is 0, so emitting it does not alter the mass number of the nucleus.
This matches both conditions. Therefore, the radiation is a Beta particle.
(b) 2. Equation for the decay:
In beta decay, a neutron within the nucleus converts into a proton and an electron. The electron is ejected as a beta particle.
- The mass number (A) remains unchanged: \(A = 24\).
- The atomic number (Z) increases by 1: \(Z_{new} = 11 + 1 = 12\).
- The element with atomic number 12 is Magnesium (Mg).
The balanced nuclear equation is:
\[ ^{24}_{11}Na \rightarrow ^{24}_{12}Mg + ^{0}_{-1}\beta + \bar{\nu}_e \]
(where \(\bar{\nu}_e\) is an electron antineutrino, often omitted in introductory-level equations).
The required equation is: \(^{24}_{11}Na \rightarrow ^{24}_{12}Mg + ^{0}_{-1}\beta\).
Quick Tip: Remember the changes for nuclear decays: Alpha decay (\(A-4, Z-2\)), Beta decay (\(A\) unchanged, \(Z+1\)), Gamma decay (\(A, Z\) unchanged).


Comments