


CEED 2021 Question paper with answer key pdf conducted on January 17, 2021 is available for download. The exam was successfully organized by IIT Bombay. The question paper comprised a total of 46 questions.
CEED 2021 Question Paper with Solutions PDF
| CEED 2021 Question Paper with Solutions PDF | Check Solutions |

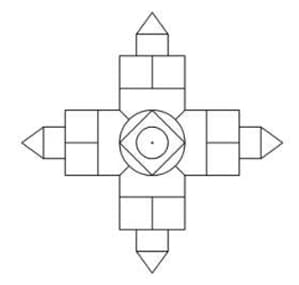
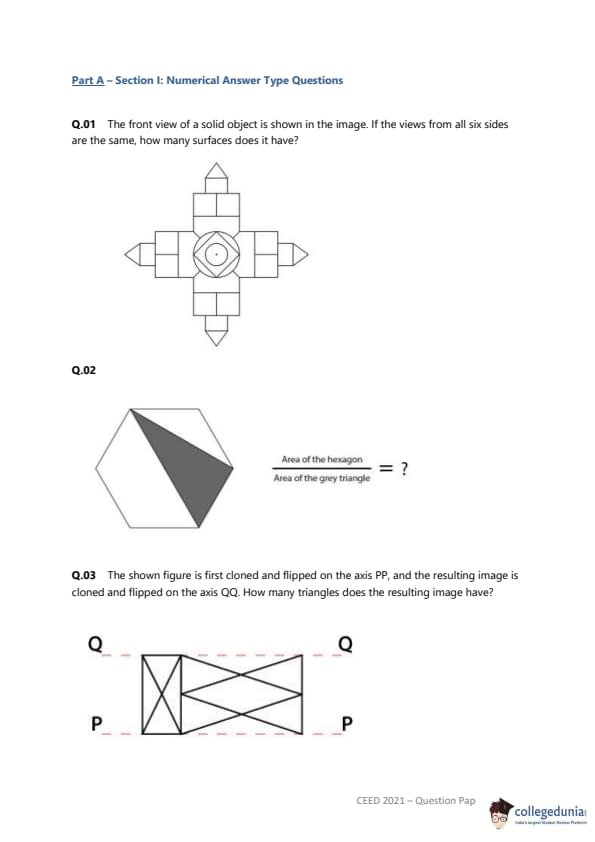
The front view of a solid object is shown in the image. If the views from all six sides are the same, how many surfaces does it have?
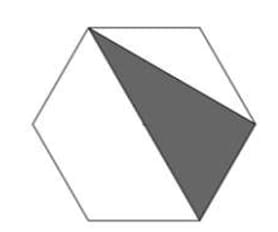
What is the value of the ratio \(\frac{Area of the hexagon}{Area of the grey triangle}\)?
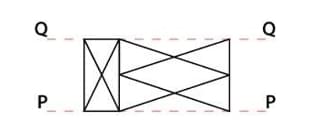
The shown figure is first cloned and flipped on the axis PP, and the resulting image is cloned and flipped on the axis QQ. How many triangles does the resulting image have?
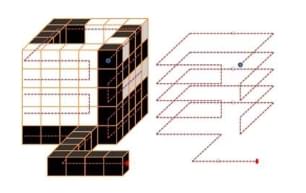
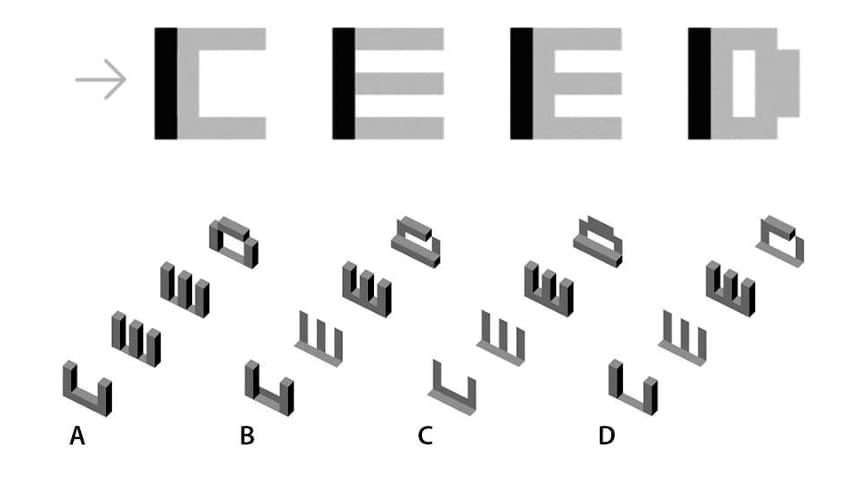
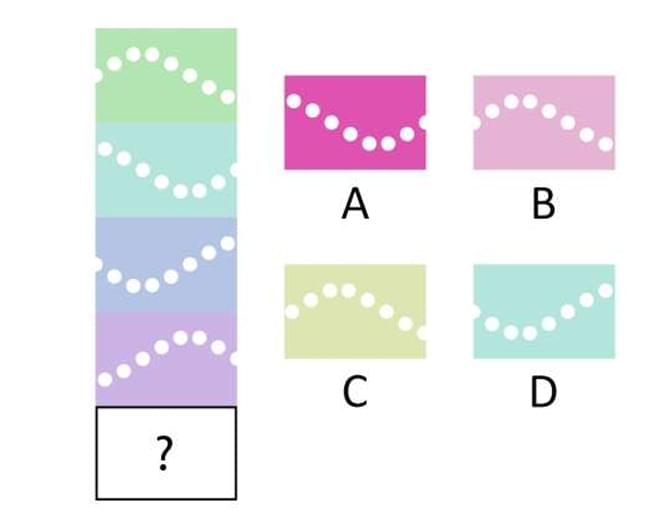
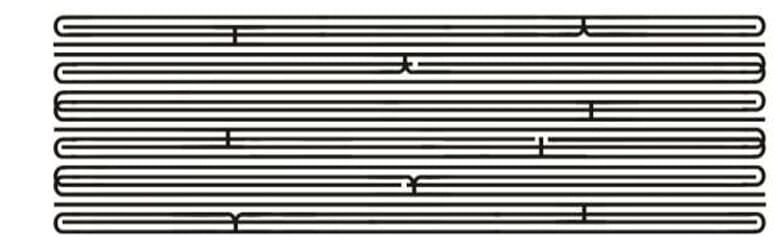
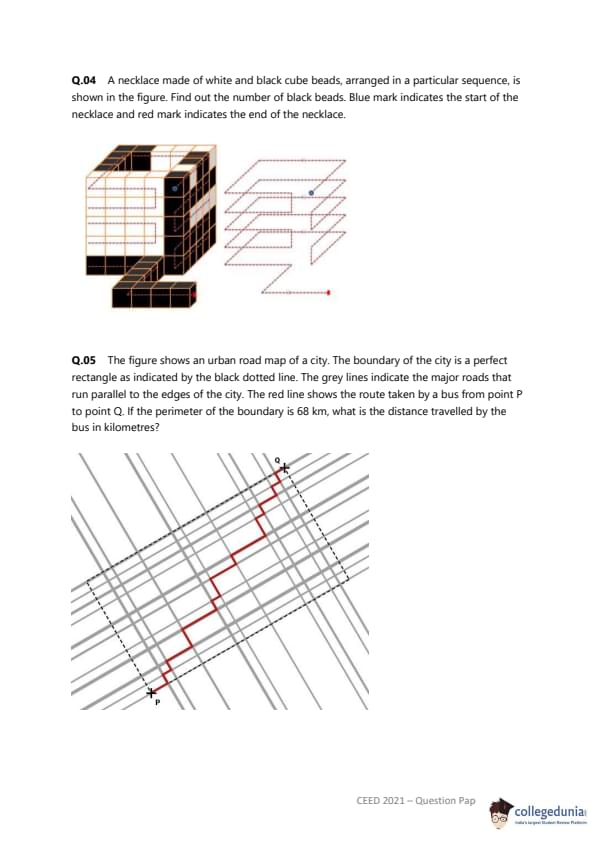
A necklace made of white and black cube beads, arranged in a particular sequence, is shown in the figure. Find out the number of black beads. Blue mark indicates the start of the necklace and red mark indicates the end of the necklace.
The figure shows an urban road map of a city. The boundary of the city is a perfect rectangle as indicated by the black dotted line. The grey lines indicate the major roads that run parallel to the edges of the city. The red line shows the route taken by a bus from point P to point Q. If the perimeter of the boundary is 68 km, what is the distance travelled by the bus in kilometres?

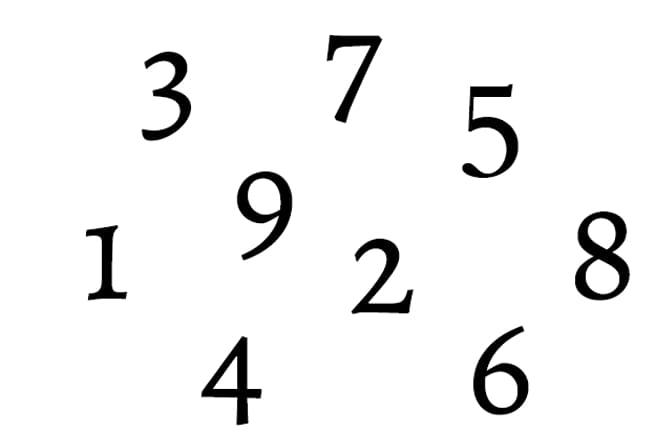
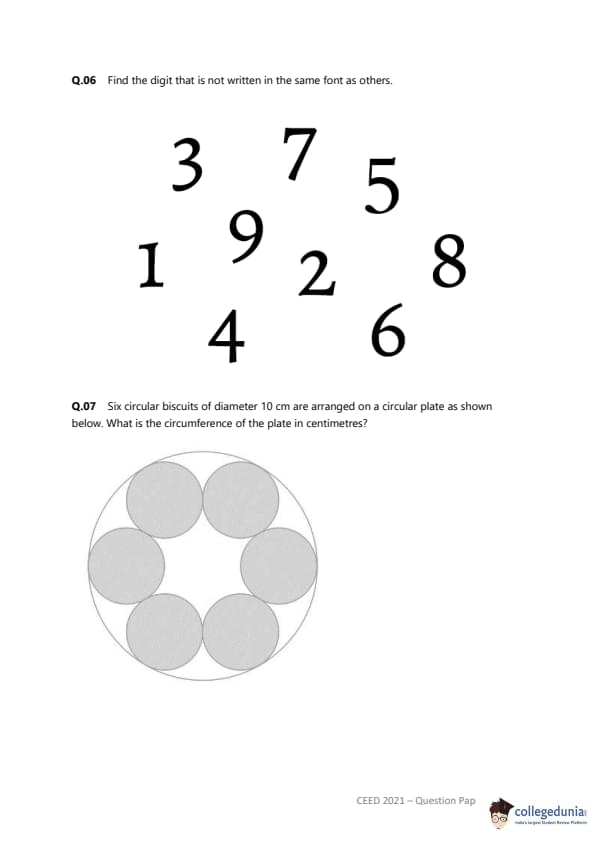
Find the digit that is not written in the same font as others.
Six circular biscuits of diameter 10 cm are arranged on a circular plate as shown below. What is the circumference of the plate in centimetres?

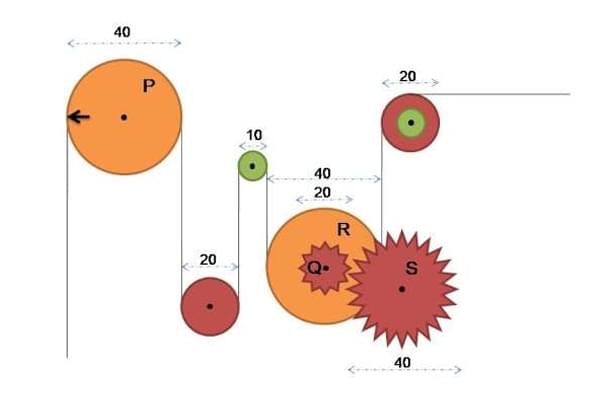
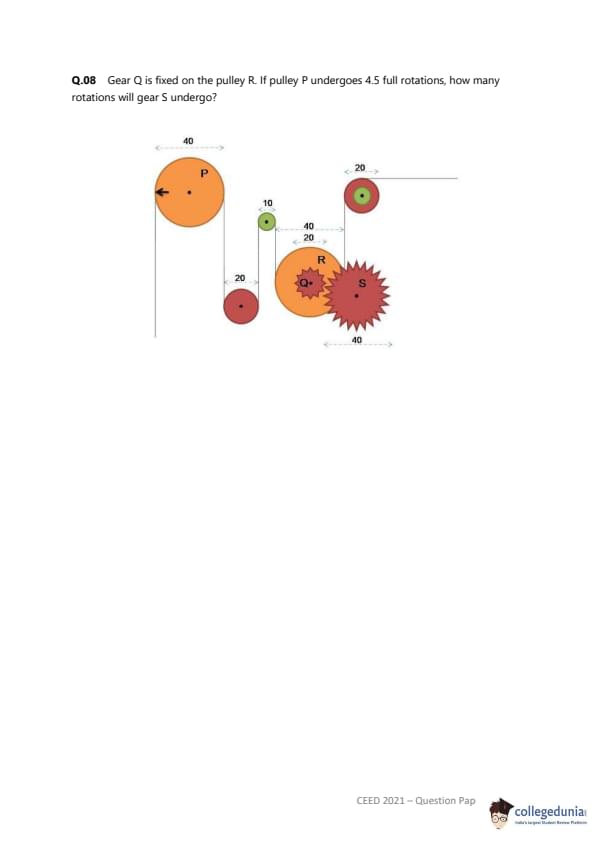
Gear Q is fixed on the pulley R. If pulley P undergoes 4.5 full rotations, how many rotations will gear S undergo?
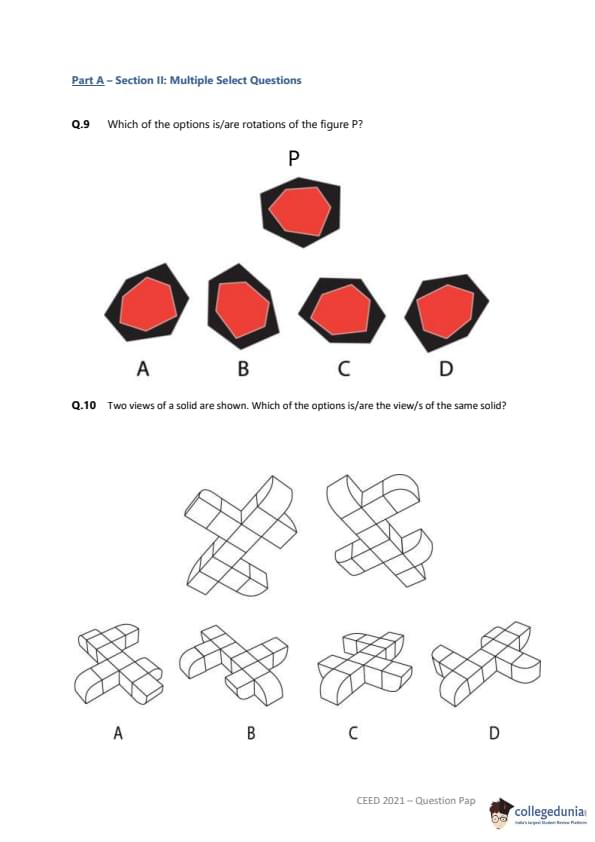
Which of the options is/are rotations of the figure P?
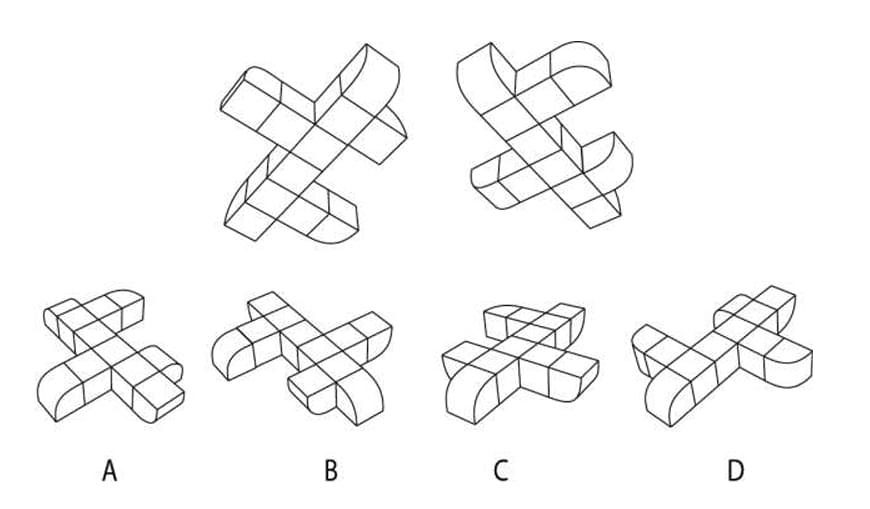
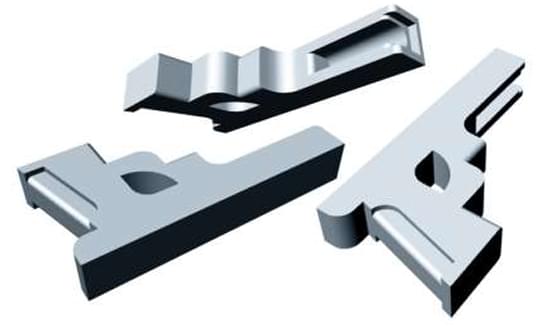
Two views of a solid are shown. Which of the options is/are the view/s of the same solid?
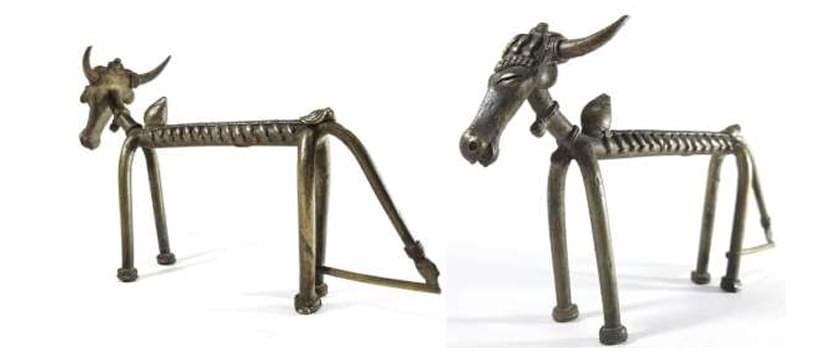
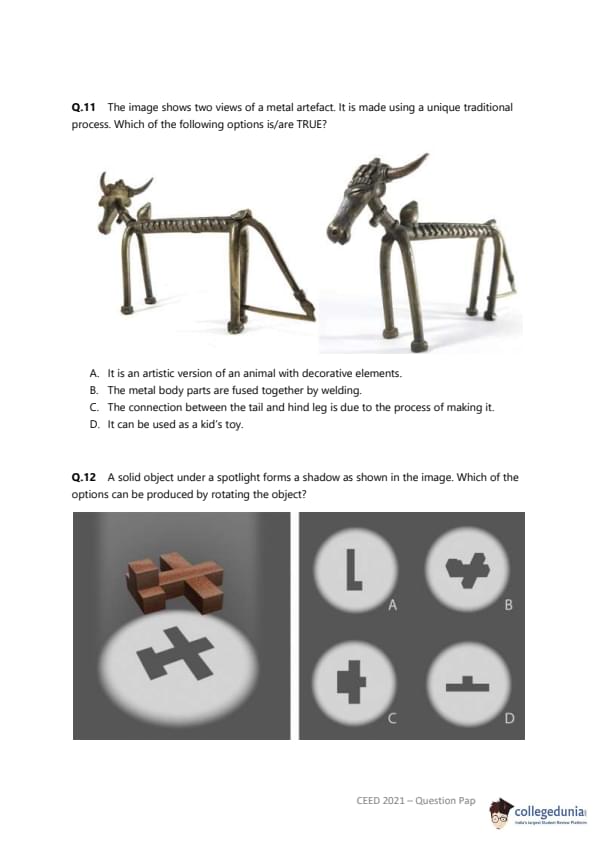
The image shows two views of a metal artefact. It is made using a unique traditional process. Which of the following options is/are TRUE?
A solid object under a spotlight forms a shadow as shown in the image. Which of the options can be produced by rotating the object?

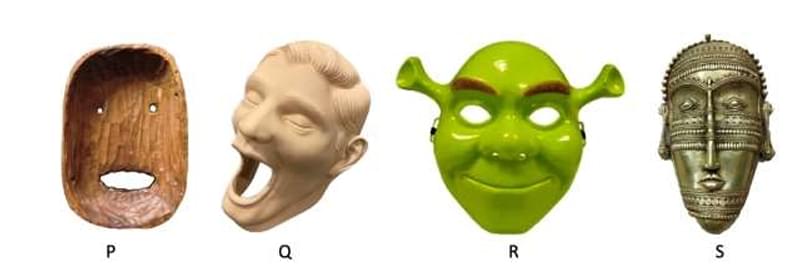
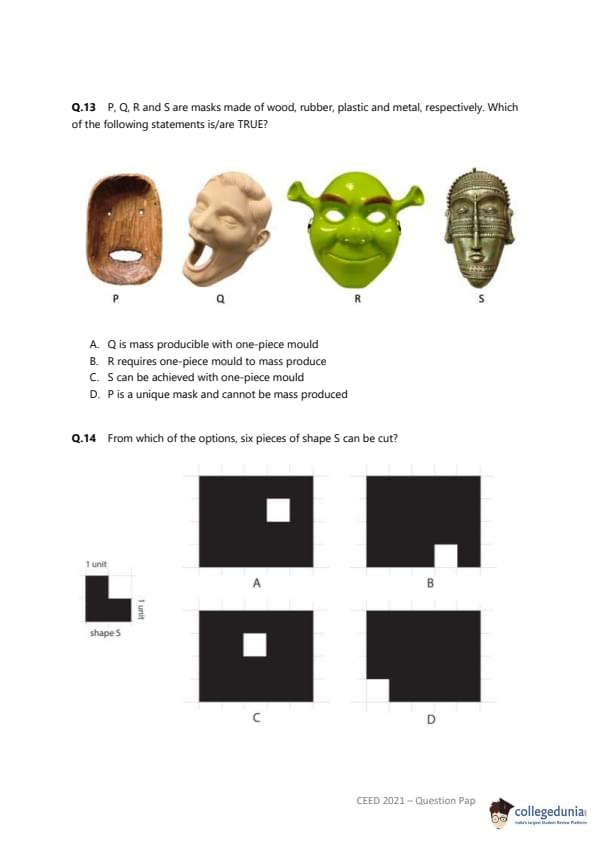
P, Q, R and S are masks made of wood, rubber, plastic and metal, respectively. Which of the following statements is/are TRUE?
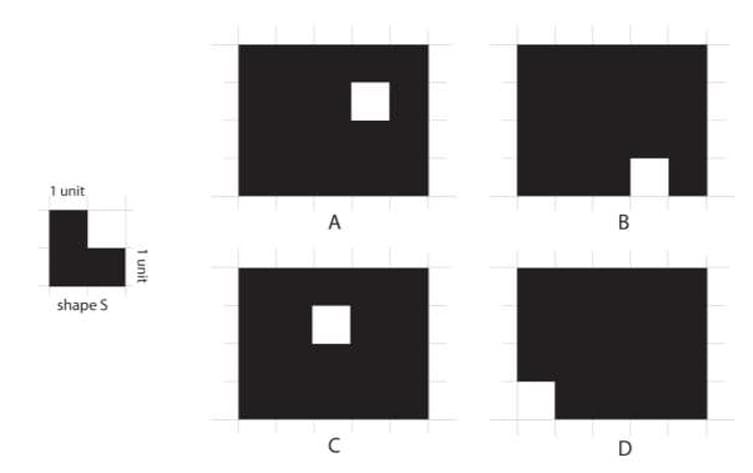
From which of the options, six pieces of shape S can be cut?
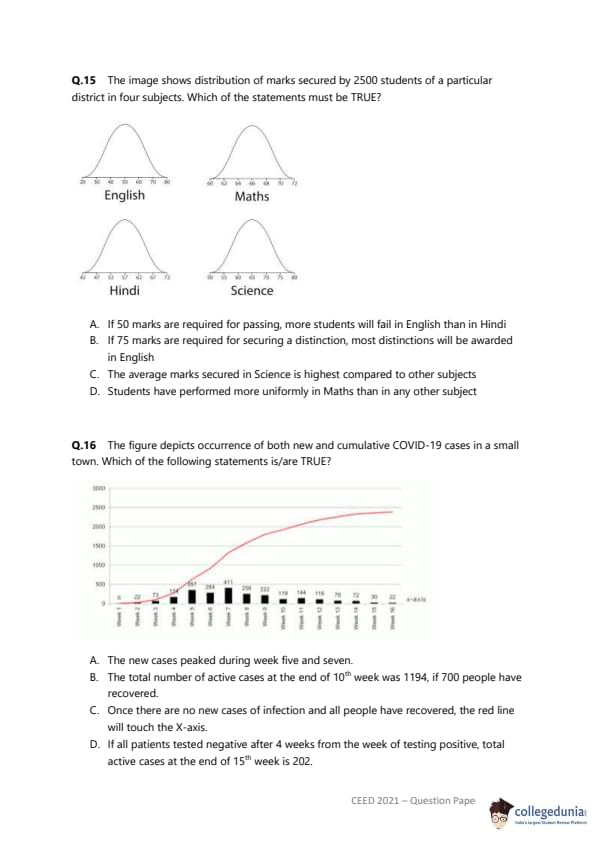
The image shows distribution of marks secured by 2500 students of a particular district in four subjects. Which of the statements must be TRUE?

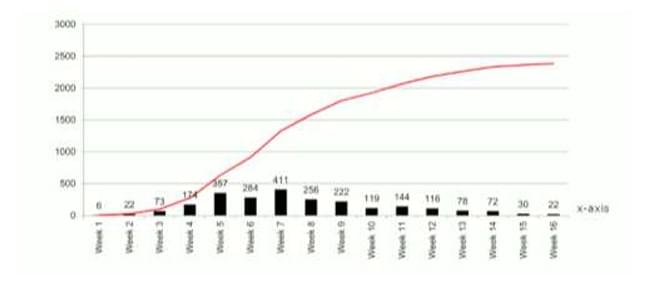
The figure depicts occurrence of both new and cumulative COVID-19 cases in a small town. Which of the following statements is/are TRUE?
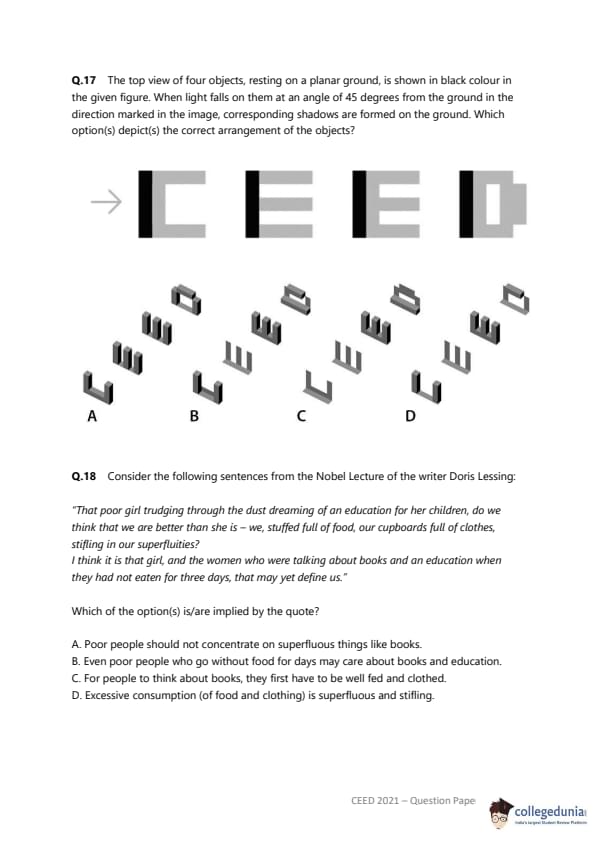
The top view of four objects, resting on a planar ground, is shown in black colour in the given figure. When light falls on them at an angle of 45 degrees from the ground in the direction marked in the image, corresponding shadows are formed on the ground. Which option(s) depict(s) the correct arrangement of the objects?
Consider the following sentences from the Nobel Lecture of the writer Doris Lessing:
"That poor girl trudging through the dust dreaming of an education for her children, do we think that we are better than she is - we, stuffed full of food, our cupboards full of clothes, stifling in our superfluities?
I think it is that girl, and the women who were talking about books and an education when they had not eaten for three days, that may yet define us."
Which of the option(s) is/are implied by the quote?
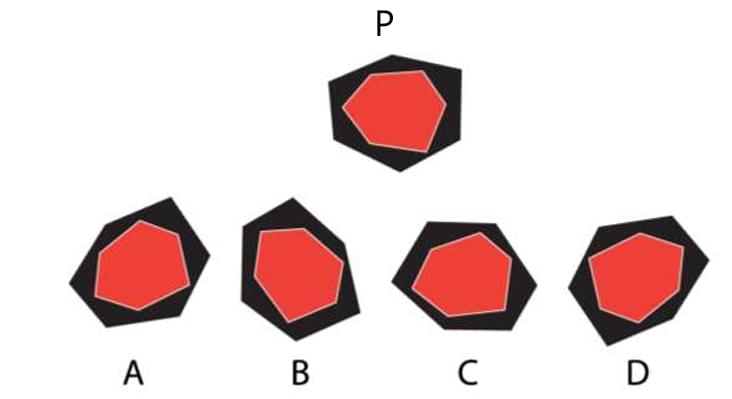
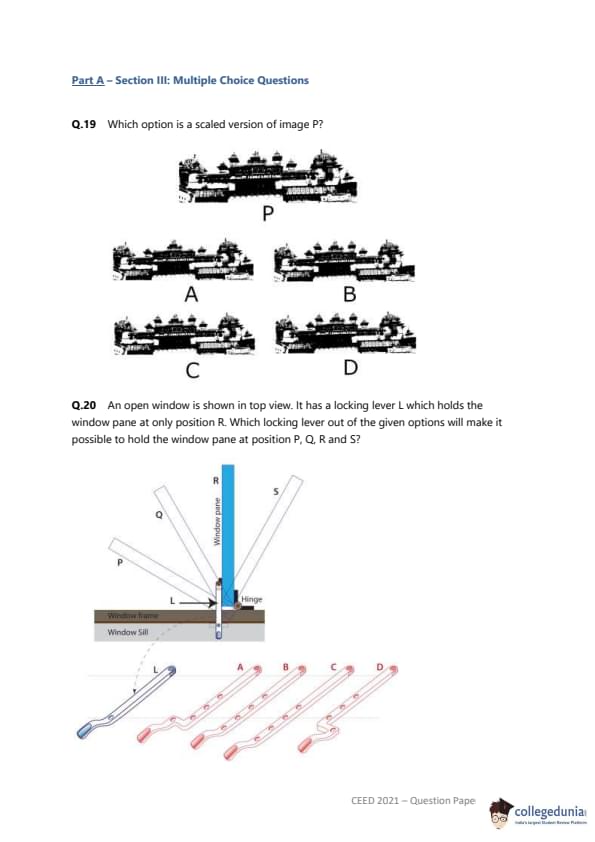
Which option is a scaled version of image P?

An open window is shown in top view. It has a locking lever L which holds the window pane at only position R. Which locking lever out of the given options will make it possible to hold the window pane at position P, Q, R and S?
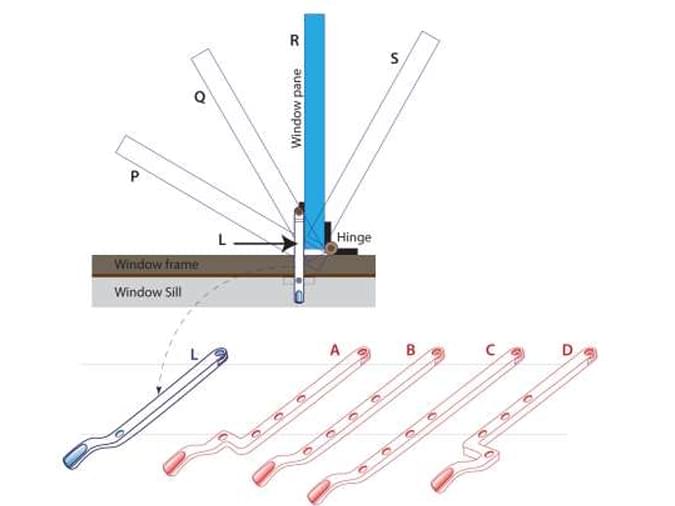
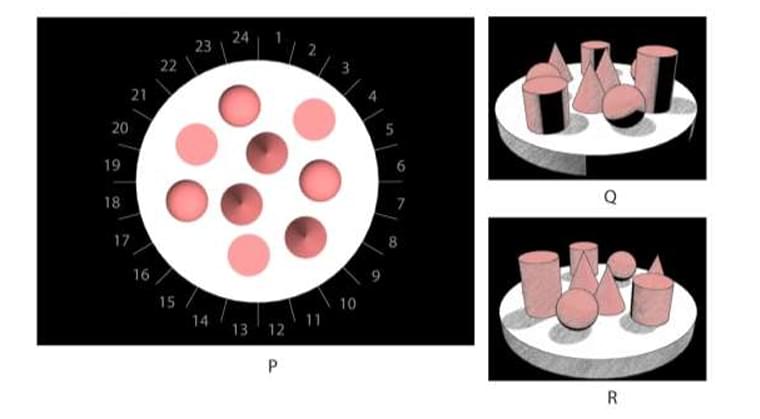
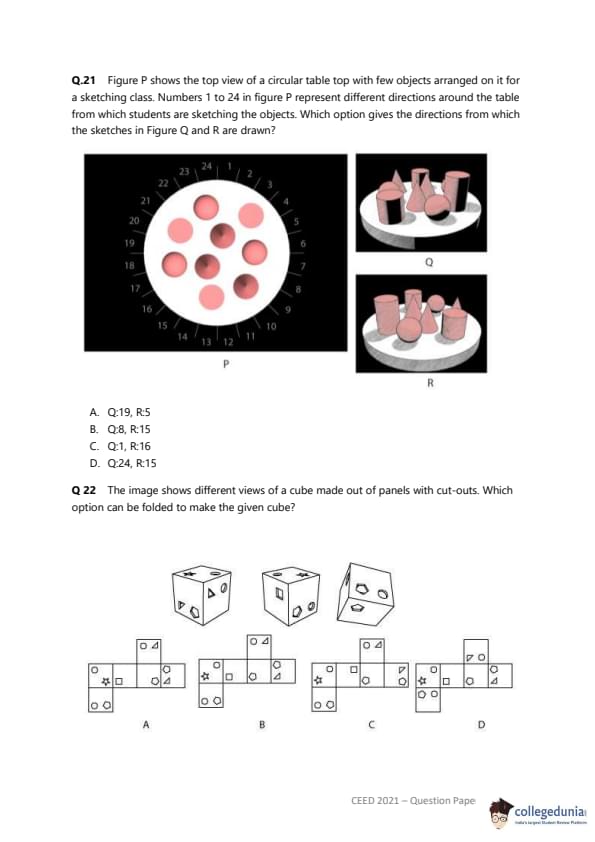
Figure P shows the top view of a circular table top with few objects arranged on it for a sketching class. Numbers 1 to 24 in figure P represent different directions around the table from which students are sketching the objects. Which option gives the directions from which the sketches in Figure Q and R are drawn?
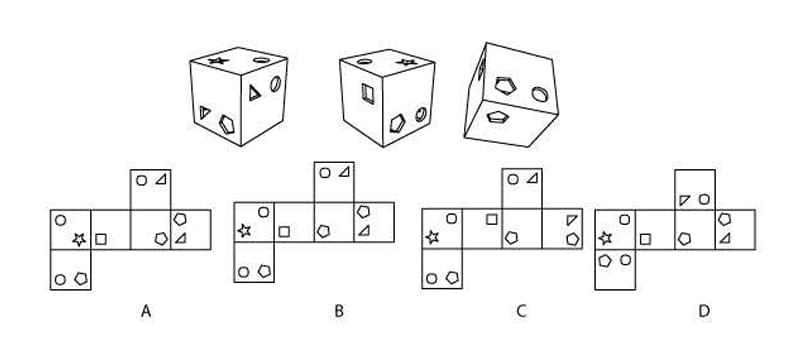
The image shows different views of a cube made out of panels with cut-outs. Which option can be folded to make the given cube?
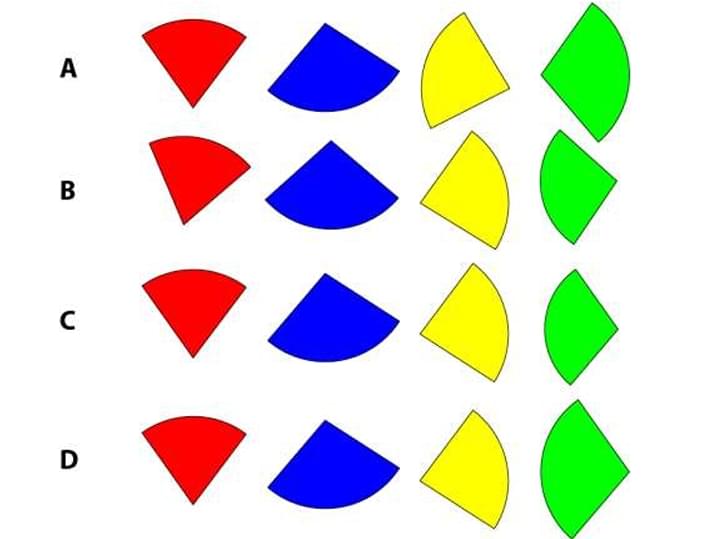
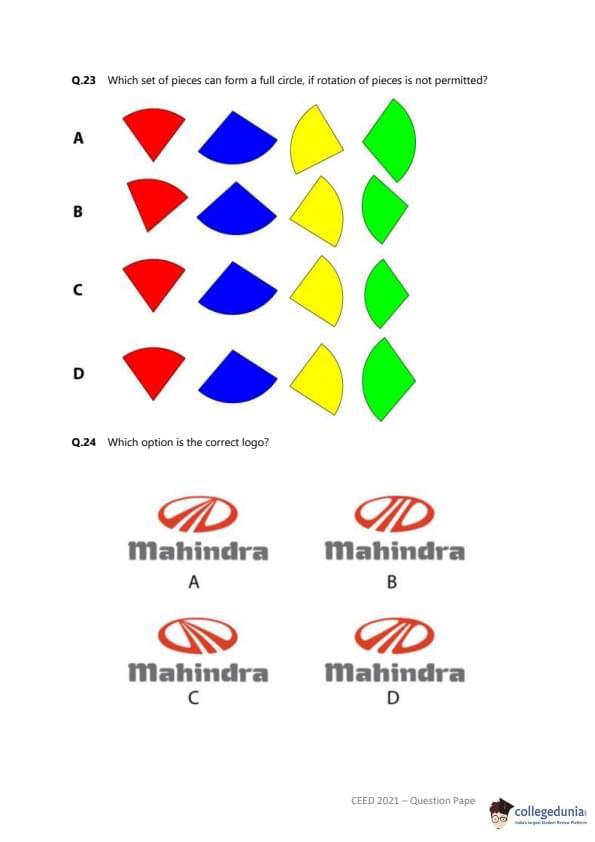
Which set of pieces can form a full circle, if rotation of pieces is not permitted?
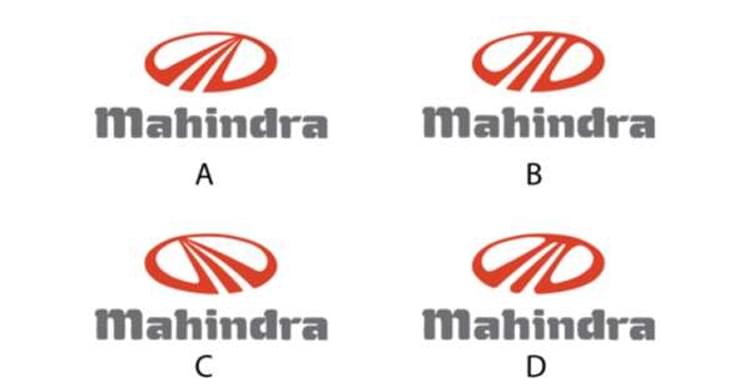
Which option is the correct logo?
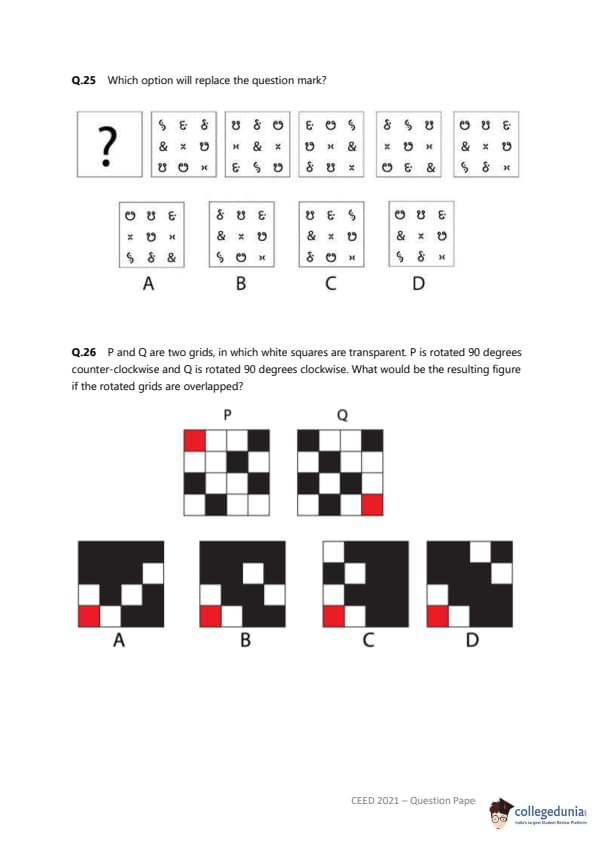
Which option will replace the question mark?

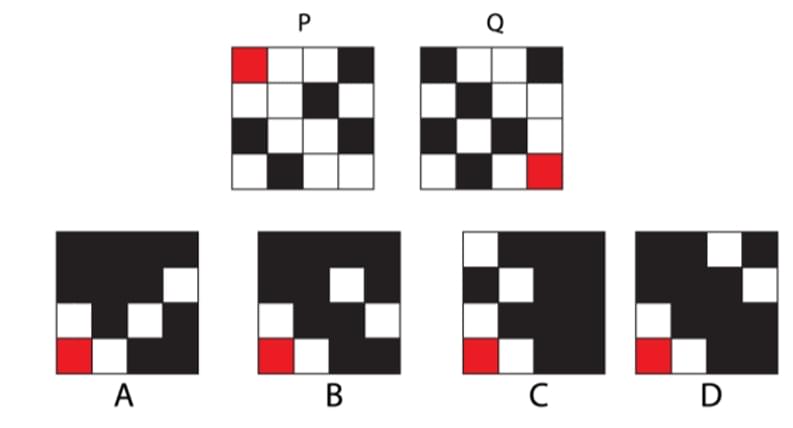
P and Q are two grids, in which white squares are transparent. P is rotated 90 degrees counter-clockwise and Q is rotated 90 degrees clockwise. What would be the resulting figure if the rotated grids are overlapped?
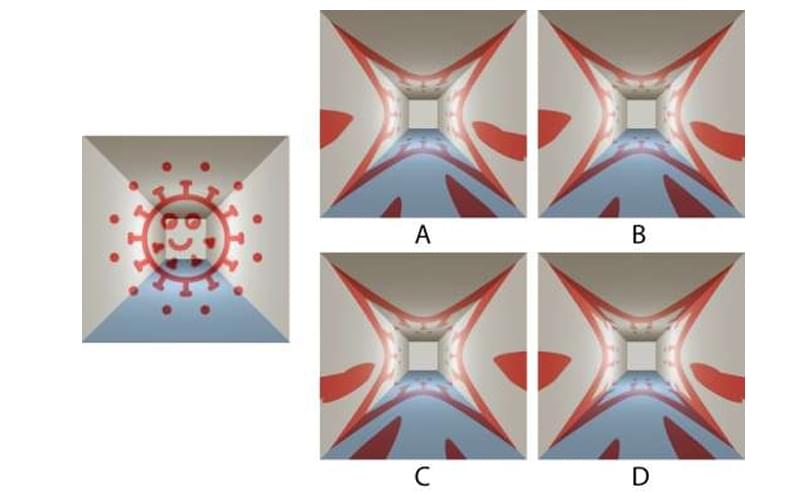
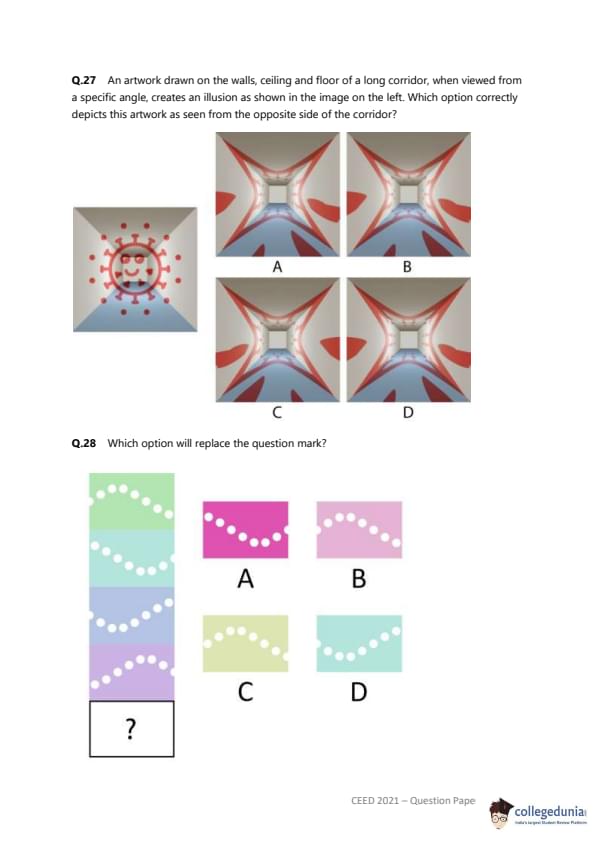
An artwork drawn on the walls, ceiling and floor of a long corridor, when viewed from a specific angle, creates an illusion as shown in the image on the left. Which option correctly depicts this artwork as seen from the opposite side of the corridor?
Which option will replace the question mark?
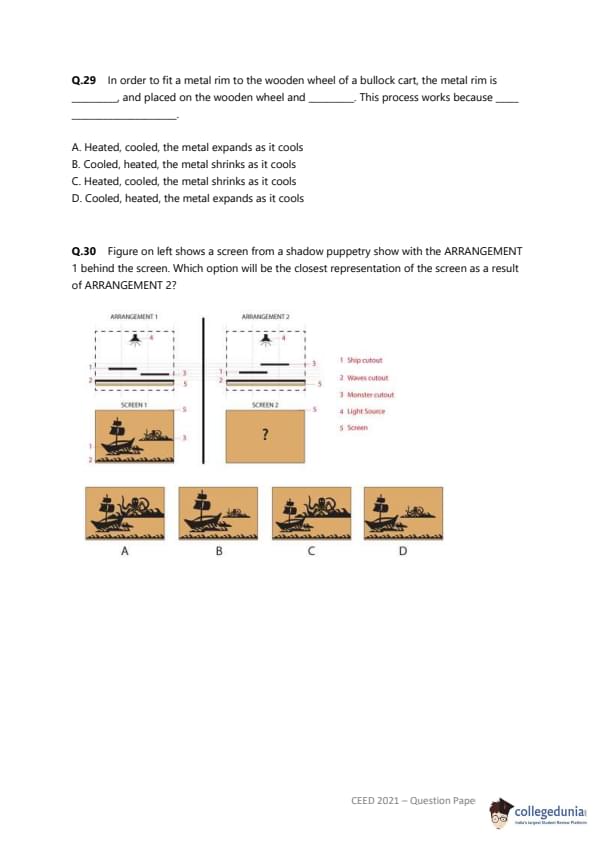
In order to fit a metal rim to the wooden wheel of a bullock cart, the metal rim is ___________________ and placed on the wooden wheel and ___________________. This process works because ___________________.
Figure on left shows a screen from a shadow puppetry show with the ARRANGEMENT 1 behind the screen. Which option will be the closest representation of the screen as a result of ARRANGEMENT 2?

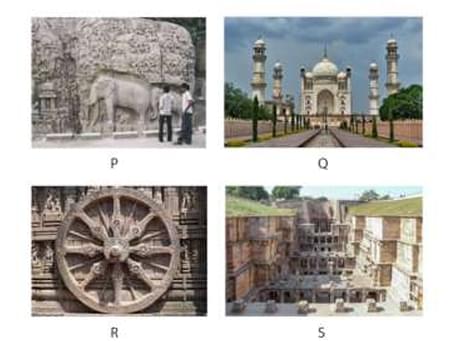
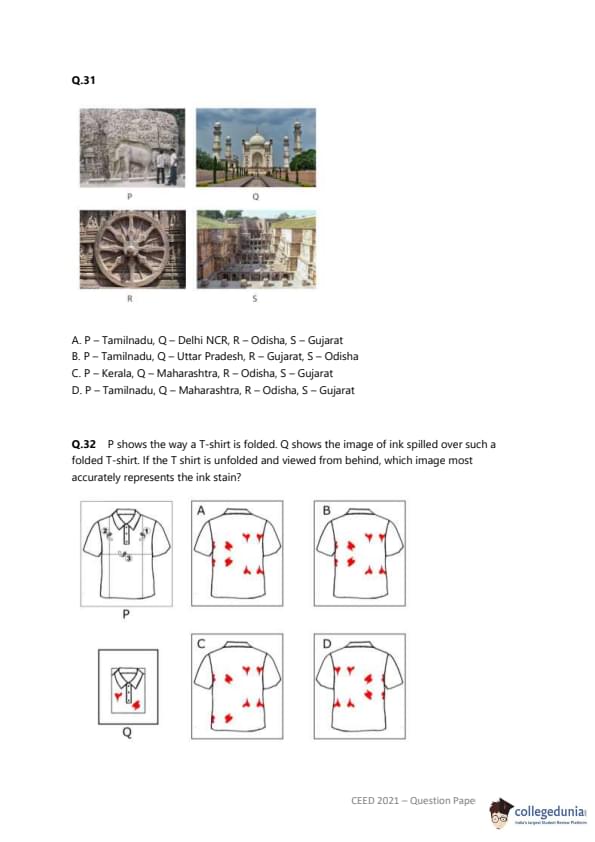
Identify the monuments and their locations.
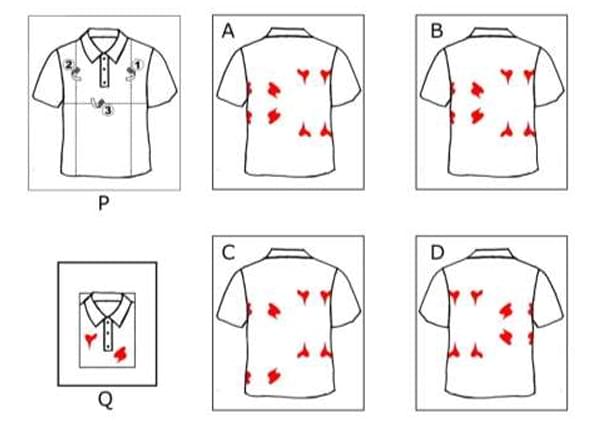
P shows the way a T-shirt is folded. Q shows the image of ink spilled over such a folded T-shirt. If the T shirt is unfolded and viewed from behind, which image most accurately represents the ink stain?
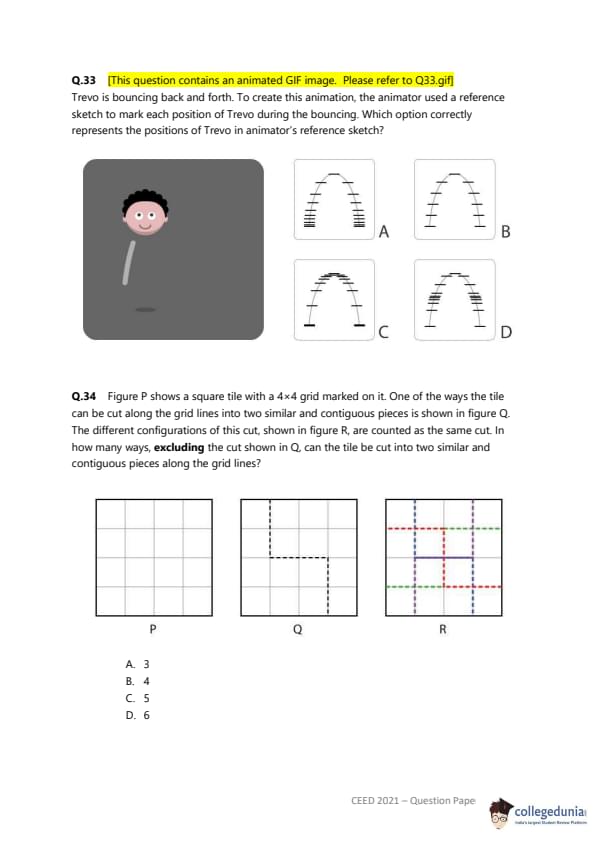
Trevo is bouncing back and forth. To create this animation, the animator used a reference sketch to mark each position of Trevo during the bouncing. Which option correctly represents the positions of Trevo in animator's reference sketch?

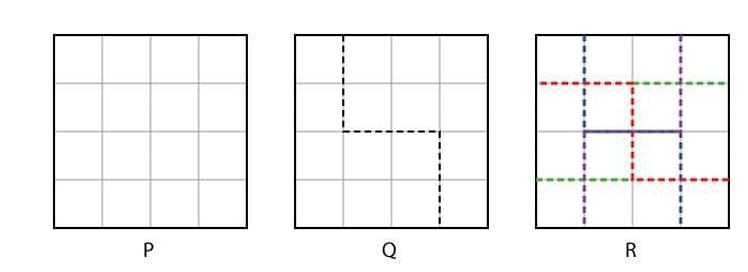
Figure P shows a square tile with a 4×4 grid marked on it. One of the ways the tile can be cut along the grid lines into two similar and contiguous pieces is shown in figure Q. The different configurations of this cut, shown in figure R, are counted as the same cut. In how many ways, excluding the cut shown in Q, can the tile be cut into two similar and contiguous pieces along the grid lines?
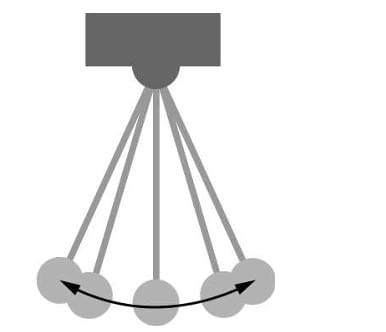
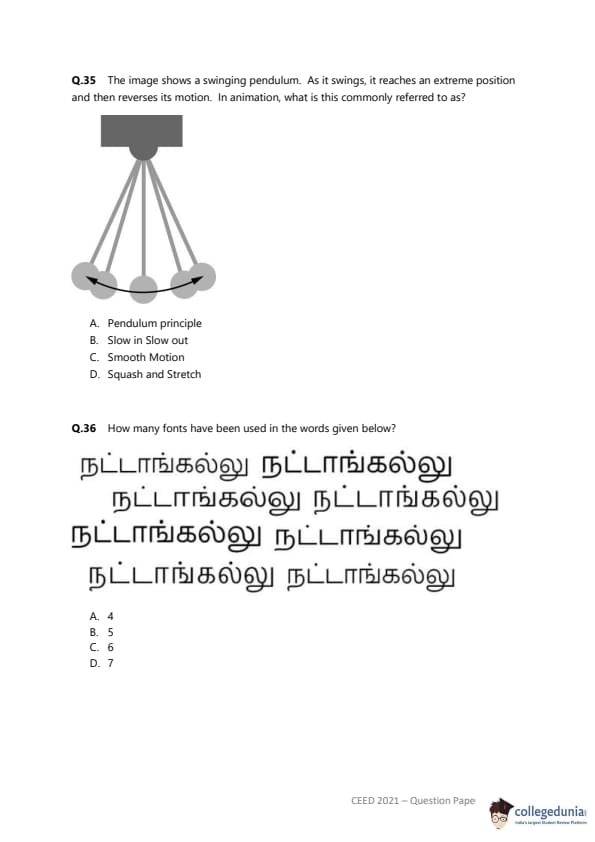
The image shows a swinging pendulum. As it swings, it reaches an extreme position and then reverses its motion. In animation, what is this commonly referred to as?
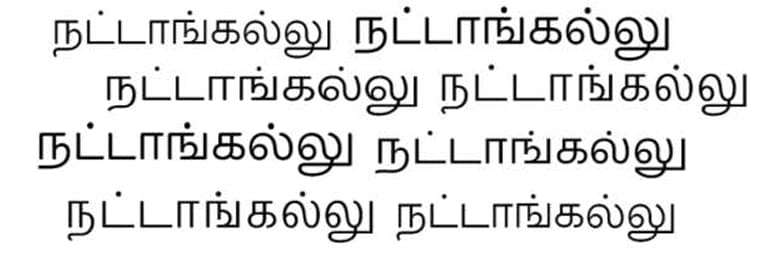
How many fonts have been used in the words given below?
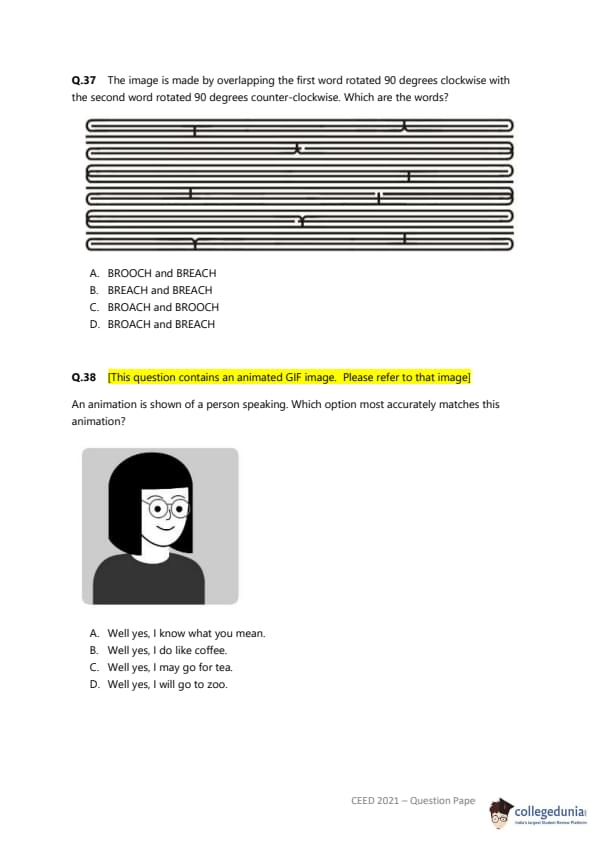
The image is made by overlapping the first word rotated 90 degrees clockwise with the second word rotated 90 degrees counter-clockwise. Which are the words?
An animation is shown of a person speaking. Which option most accurately matches this animation?
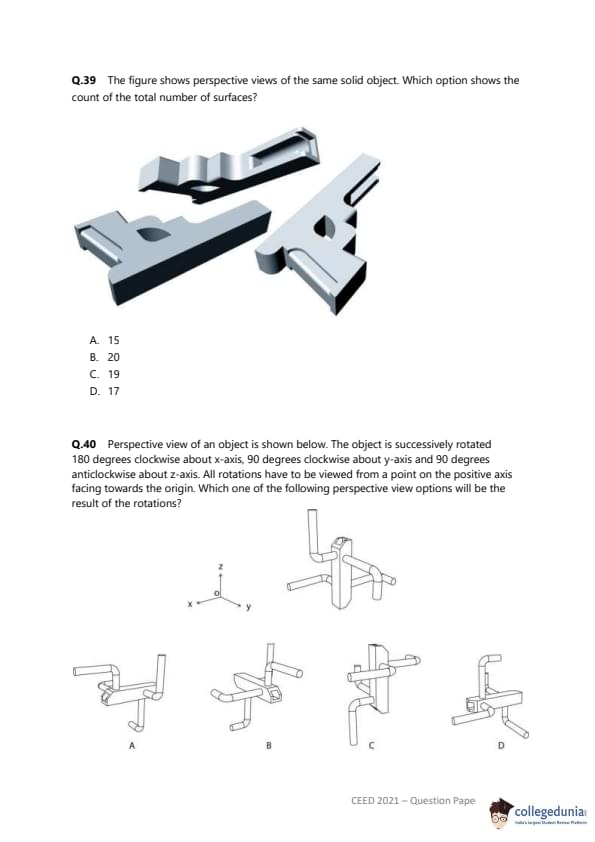
The figure shows perspective views of the same solid object. Which option shows the count of the total number of surfaces?
Perspective view of an object is shown below. The object is successively rotated 180 degrees clockwise about x-axis, 90 degrees clockwise about y-axis and 90 degrees anticlockwise about z-axis. All rotations have to be viewed from a point on the positive axis facing towards the origin. Which one of the following perspective view options will be the result of the rotations?

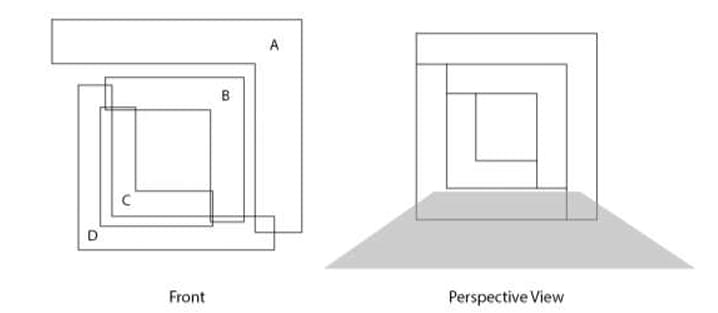
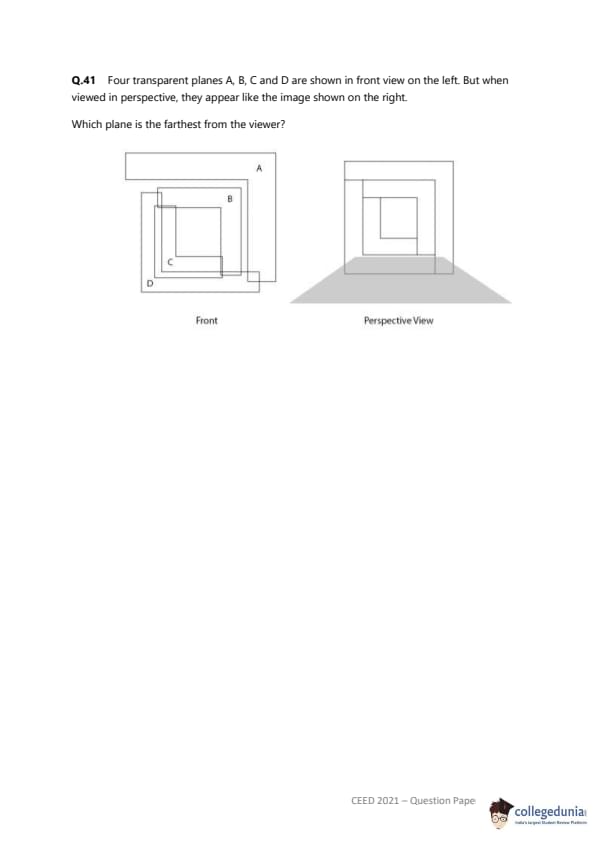
Four transparent planes A, B, C and D are shown in front view on the left. But when viewed in perspective, they appear like the image shown on the right. Which plane is the farthest from the viewer?
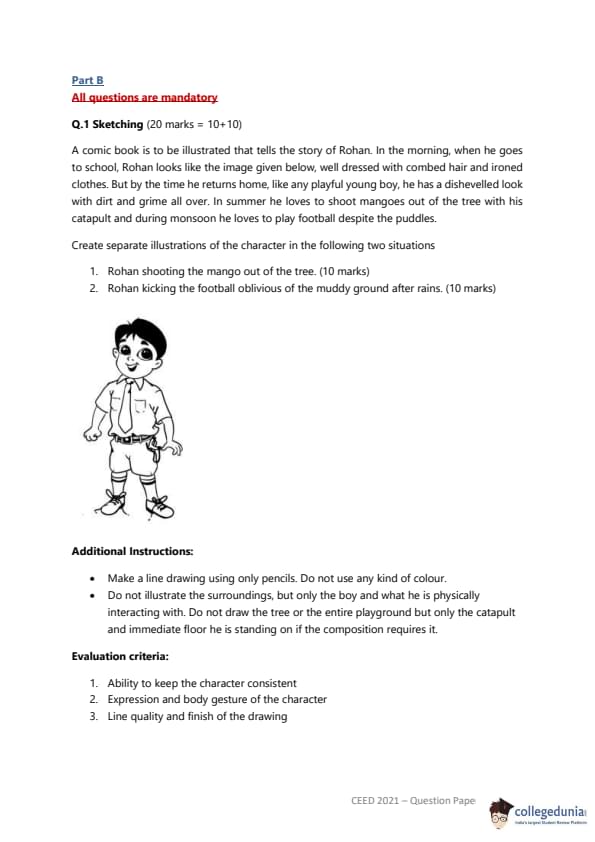
Sketching (20 marks = 10+10)
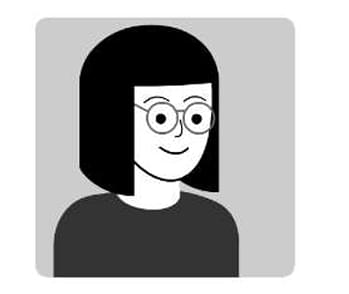
A comic book is to be illustrated that tells the story of Rohan. In the morning, when he goes to school, Rohan looks like the image given below, well dressed with combed hair and ironed clothes. But by the time he returns home, like any playful young boy, he has a dishevelled look with dirt and grime all over. In summer he loves to shoot mangoes out of the tree with his catapult and during monsoon he loves to play football despite the puddles.
Create separate illustrations of the character in the following two situations:
1. Rohan shooting the mango out of the tree. (10 marks)
2. Rohan kicking the football oblivious of the muddy ground after rains. (10 marks)
Additional Instructions:
Make a line drawing using only pencils. Do not use any kind of colour.
Do not illustrate the surroundings, but only the boy and what he is physically interacting with. Do not draw the tree or the entire playground but only the catapult and immediate floor he is standing on if the composition requires it.
Evaluation criteria:
Ability to keep the character consistent
Expression and body gesture of the character
Line quality and finish of the drawing
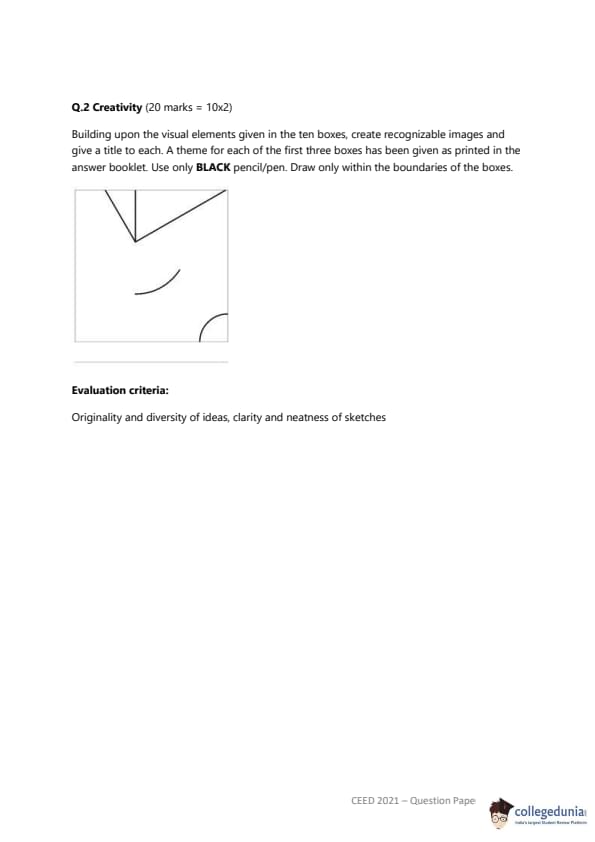
Creativity (20 marks = 10x2)
Building upon the visual elements given in the ten boxes, create recognizable images and give a title to each. A theme for each of the first three boxes has been given as printed in the answer booklet. Use only BLACK pencil/pen. Draw only within the boundaries of the boxes.
Evaluation criteria:
Originality and diversity of ideas, clarity and neatness of sketches
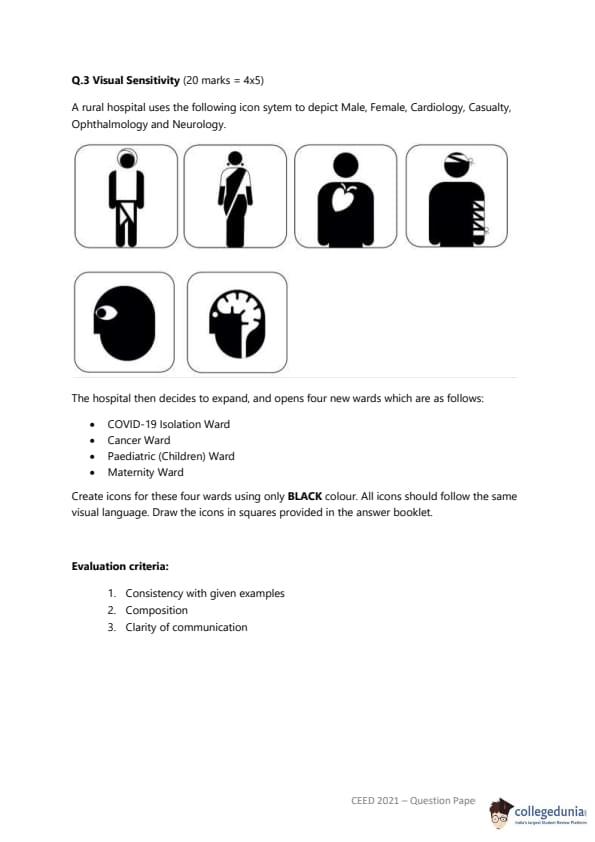
Visual Sensitivity (20 marks = 4x5)
A rural hospital uses the following icon system to depict Male, Female, Cardiology, Casualty, Ophthalmology and Neurology. The hospital then decides to expand, and opens four new wards which are as follows:
COVID-19 Isolation Ward
Cancer Ward
Paediatric (Children) Ward
Maternity Ward
Create icons for these four wards using only BLACK colour. All icons should follow the same visual language. Draw the icons in squares provided in the answer booklet.
Evaluation criteria:
Consistency with given examples
Composition
Clarity of communication
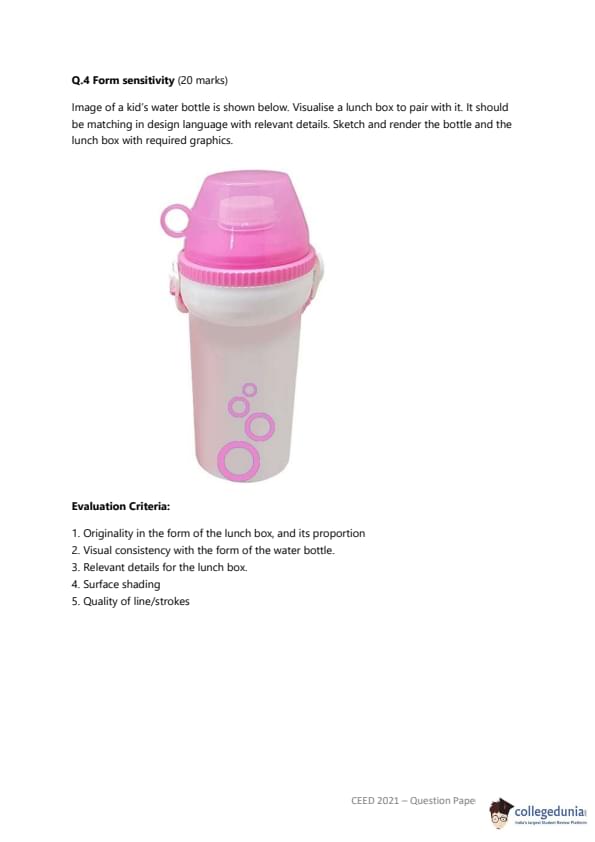
Form sensitivity (20 marks)
Image of a kid's water bottle is shown below. Visualise a lunch box to pair with it. It should be matching in design language with relevant details. Sketch and render the bottle and the lunch box with required graphics.
Evaluation Criteria:
Originality in the form of the lunch box, and its proportion
Visual consistency with the form of the water bottle.
Relevant details for the lunch box.
Surface shading
Quality of line/strokes
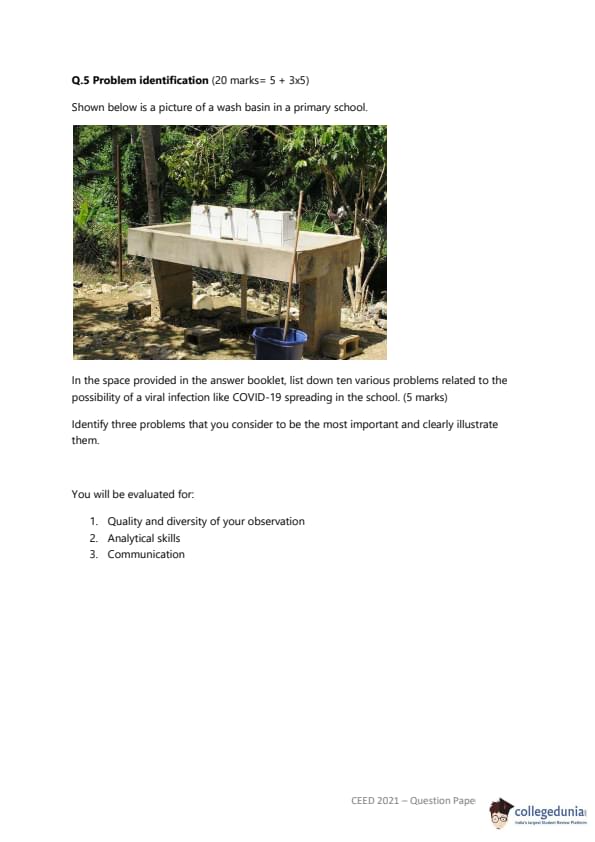
Problem identification (20 marks = 5 + 3x5)
Shown below is a picture of a wash basin in a primary school.
In the space provided in the answer booklet, list down ten various problems related to the possibility of a viral infection like COVID-19 spreading in the school. (5 marks)
Identify three problems that you consider to be the most important and clearly illustrate them.
You will be evaluated for:
Quality and diversity of your observation
Analytical skills
Communication
Comments