


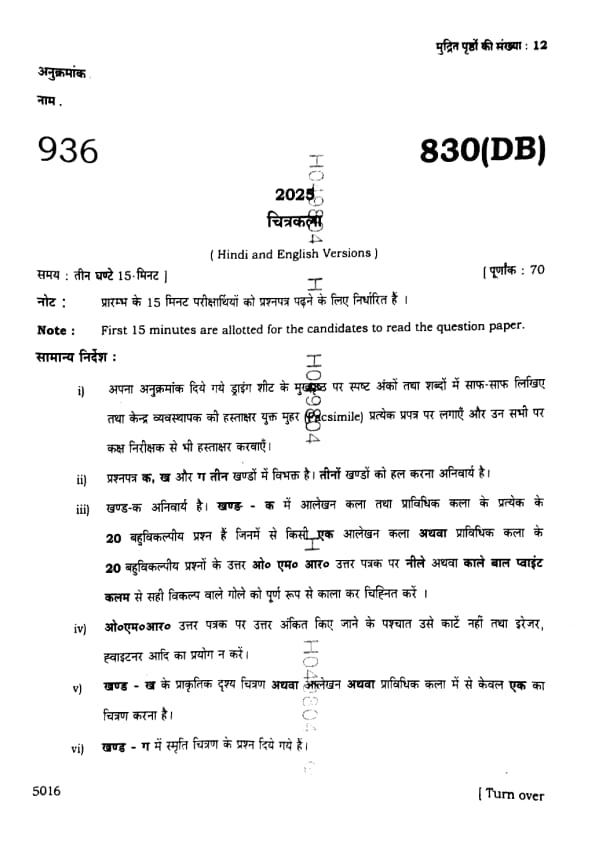
UP Board Class 10 Chitrakala Question Paper 2025 PDF (Code 830 DD) with Answer Key and Solutions PDF is available for download here. UP Board Class 10 exams were conducted between February 24th to March 12th 2025. The total marks for the theory paper were 70. Students reported the paper to be easy to moderate.
UP Board Class 10 Chitrakala Question Paper 2025 (Code 830 DD) with Solutions
| UP Board Class 10 Chitrakala (830 DD) Question Paper with Answer Key | Check Solutions |

What is a line?
View Solution
Step 1: Definition of a line in geometry
A line in geometry is defined as the shortest distance between two points. It extends infinitely in both directions but has no thickness.
Step 2: Checking the given options
- (A) To be drawn by scale → Incorrect, this describes a method, not the definition.
- (B) Picture maker → Incorrect, unrelated to the concept of a line.
- (C) Distance between two points → Correct, this matches the proper definition.
- (D) Shape maker → Incorrect, shapes are formed from multiple lines, but a line itself is not a shape maker.
Step 3: Conclusion
Thus, a line is defined as the distance between two points.
\[ \boxed{Distance between two points} \] Quick Tip: Always remember: two points determine a line, and a line can extend infinitely in both directions.
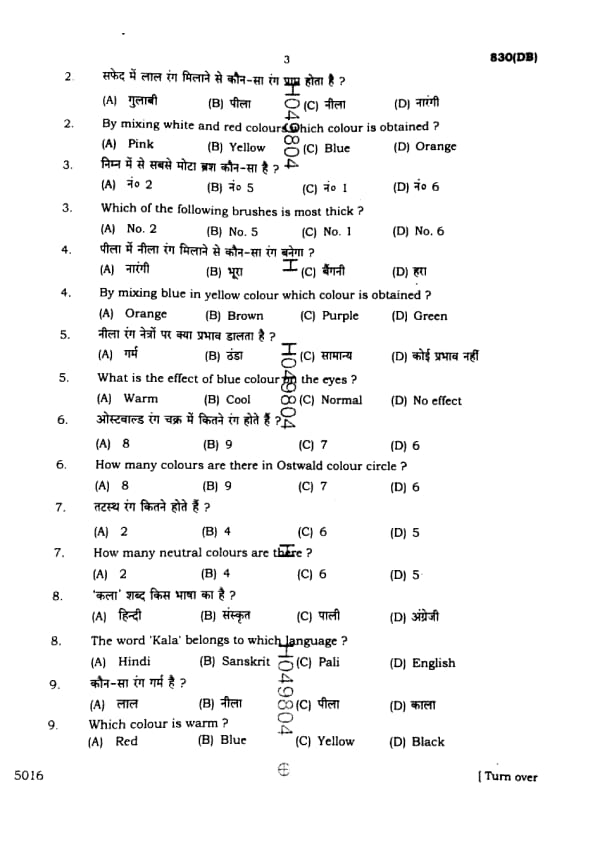
How many colours are there in rainbow?
View Solution
Step 1: Formation of rainbow
A rainbow is formed due to dispersion of sunlight by raindrops, which split white light into its constituent colours.
Step 2: Colours of rainbow
The rainbow has seven colours, often remembered using the acronym VIBGYOR:
1. Violet
2. Indigo
3. Blue
4. Green
5. Yellow
6. Orange
7. Red
Step 3: Checking the options
- (A) 3 → Incorrect, too few.
- (B) 5 → Incorrect, incomplete.
- (C) 4 → Incorrect, not the correct division.
- (D) 7 → Correct, the rainbow always has seven distinct colours.
Step 4: Conclusion
Therefore, the rainbow contains:
\[ \boxed{7} \] Quick Tip: Remember VIBGYOR: Violet, Indigo, Blue, Green, Yellow, Orange, Red — the seven colours of the rainbow.
What is the effect of green colour on the eyes?
View Solution
Step 1: Nature of green colour
Green is considered one of the cool colours in colour theory. Cool colours like green and blue provide a sense of calmness and relaxation.
Step 2: Psychological effect on eyes
When viewed, green produces a soothing, refreshing, and cold effect on the eyes. It reduces strain and is often associated with nature, peace, and restfulness.
Step 3: Elimination of incorrect options
- (A) Normal → Green has a noticeable calming effect, not just neutral.
- (B) Warm → Warm colours include red, orange, yellow, not green.
- (D) None of these → Incorrect, because option (C) is correct.
Conclusion:
Thus, green colour produces a cold effect on the eyes.
\[ \boxed{Cold} \] Quick Tip: Green and blue are cool colours, giving cold and calming effects. Red, orange, and yellow are warm colours.
Which number of pencil draws dark lines?
View Solution
Step 1: Pencil grading system
Pencils are graded based on hardness (H) and blackness (B).
- H pencils → hard lead, light lines.
- B pencils → soft lead, dark lines.
- HB → medium grade, average darkness.
Step 2: Analyzing the options
- (A) 2H → hard pencil, makes lighter lines.
- (B) 2B → softer pencil, produces darker and thicker lines.
- (C) HB → medium-dark, not the darkest.
- (D) H → hard pencil, lighter marks.
Step 3: Conclusion
Therefore, the pencil that produces dark lines is 2B.
\[ \boxed{2B} \] Quick Tip: In drawing: Higher “B” = Darker line, Higher “H” = Lighter line. Example: 6B is very dark, 6H is very light.
Which of the following is a secondary colour?
View Solution
Step 1: Primary vs Secondary colours
Primary colours are the basic colours that cannot be created by mixing others: Red, Blue, and Yellow.
Secondary colours are made by mixing two primary colours.
Step 2: Secondary colours examples
- Red + Yellow = Orange
- Blue + Yellow = Green
- Blue + Red = Purple
Step 3: Checking the given options
- Red → Primary colour
- Blue → Primary colour
- Yellow → Primary colour
- Orange → Secondary colour (Red + Yellow)
Step 4: Conclusion
Thus, the secondary colour among the given options is:
\[ \boxed{Orange} \] Quick Tip: Secondary colours are created by mixing two primary colours. Example: Red + Yellow = Orange.
What is charcoal?
View Solution
Step 1: Understanding charcoal in art
Charcoal is a black, carbon-based drawing material made by burning wood or organic material in the absence of oxygen. It is widely used in sketching and shading.
Step 2: Checking the options
- Graphite → Closely related to charcoal as a black carbon-based medium. Correct answer here.
- Red colour → Incorrect, charcoal is black, not red.
- Oil colour → Incorrect, charcoal is dry and powdery, not oil-based.
- None of these → Incorrect, since (A) is correct.
Step 3: Conclusion
Thus, charcoal is best classified as:
\[ \boxed{Graphite (carbon-based material)} \] Quick Tip: Charcoal is used for bold sketches and shading because it creates deep, dark lines and can be easily smudged for artistic effects.
Which colour, if mixed with Red colour, makes it orange?
View Solution
Step 1: Basic colour mixing rule
In subtractive colour mixing (used in paints and pigments), mixing two primary colours produces a secondary colour.
Step 2: Applying to Red colour
- Red (primary) + Yellow (primary) = Orange (secondary).
Thus, mixing Red with Yellow produces Orange.
Step 3: Elimination of incorrect options
- (A) Green → Mixing with red gives brownish shade, not orange.
- (C) Blue → Mixing with red gives purple.
- (D) Black → Darkens the red but does not make orange.
Step 4: Conclusion
Hence, Red + Yellow = Orange.
\[ \boxed{Yellow} \] Quick Tip: Primary + Primary = Secondary. Red + Yellow = Orange, Red + Blue = Purple, Blue + Yellow = Green.
According to the Ostwald cycle the main colours are
View Solution
Step 1: Understanding Ostwald’s colour theory
Wilhelm Ostwald, a Nobel Prize-winning chemist, developed a scientific colour system. His model was based on a balanced arrangement of hues in a circular form.
Step 2: Main colours in Ostwald cycle
According to Ostwald’s cycle, there are 4 primary hues:
- Red
- Yellow
- Green
- Blue
Step 3: Elimination of wrong options
- (A) 5 → Incorrect, Ostwald did not define 5 primaries.
- (B) 6 → Incorrect, not part of his model.
- (D) 7 → Refers to rainbow (VIBGYOR), not Ostwald’s theory.
Step 4: Conclusion
Thus, Ostwald’s cycle identifies 4 main colours.
\[ \boxed{4} \] Quick Tip: Rainbow has 7 colours, but Ostwald’s colour cycle is based on 4 primaries: Red, Yellow, Green, Blue.
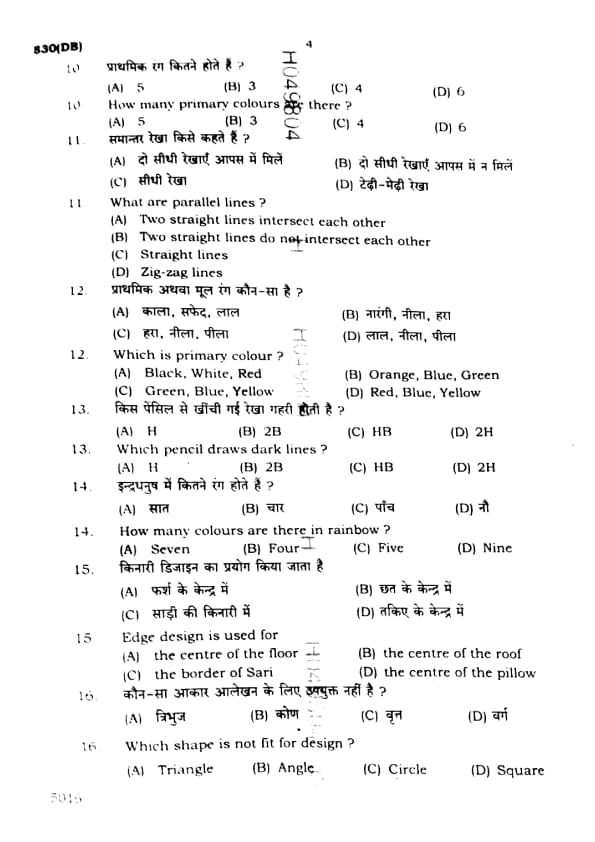
How many types of primary colour are there?
View Solution
Step 1: Definition of primary colours
Primary colours are the base colours that cannot be obtained by mixing other colours. They are the foundation for all other shades.
Step 2: The three primary colours
The three primary colours are:
1. Red
2. Blue
3. Yellow
Step 3: Eliminating incorrect options
- (A) 4 → Incorrect, there are not four primaries in art colour theory.
- (B) 3 → Correct, Red, Blue, and Yellow.
- (C) 2 → Incorrect, two cannot make all other colours.
- (D) 5 → Incorrect, too many.
Step 4: Conclusion
Therefore, there are:
\[ \boxed{3 primary colours} \] Quick Tip: Red, Blue, and Yellow are the three primary colours. All other colours come from mixing them.
Which number of brush is used to draw fine lines?
View Solution
Step 1: Understanding brush numbers
Brushes are numbered according to their thickness. Smaller numbers indicate thinner brushes suitable for detail, while larger numbers are thicker and used for broad strokes.
Step 2: Fine lines requirement
Fine lines need a very thin brush. Brush No. 1 is one of the thinnest and is ideal for precise detailing.
Step 3: Checking the options
- (A) 6 → Too thick, used for broader strokes.
- (B) 4 → Medium thickness, not for fine lines.
- (C) 1 → Correct, thin brush for fine detailing.
- (D) 2 → Slightly thicker than No. 1, not the best for the finest lines.
Step 4: Conclusion
Thus, the brush used for drawing fine lines is:
\[ \boxed{No. 1 brush} \] Quick Tip: For detailing work, always use smaller brush numbers like 0 or 1. Larger brushes are for filling or background strokes.
Which language does the word ‘art’ belong to?
View Solution
Step 1: Origin of the word ‘Art’
The term “art” is derived from the Latin word ‘ars’, which means skill, craft, or technique. Over time, the word passed into Old French and later into English.
Step 2: Use in English language
In the English language, the word ‘art’ is widely used to describe creative expression through painting, sculpture, music, dance, and literature.
Step 3: Elimination of wrong options
- (A) Hindi → The Hindi equivalent is ‘Kala’, not ‘art’.
- (C) Sanskrit → The Sanskrit term is also ‘Kala’.
- (D) Urdu → Uses different terms for creativity, not ‘art’.
Step 4: Conclusion
Hence, the word ‘art’ belongs to the English language.
\[ \boxed{English} \] Quick Tip: Remember: ‘Art’ is English; ‘Kala’ is its equivalent in Sanskrit and Hindi.
Which of the following colours is neutral?
View Solution
Step 1: Understanding neutral colours
Neutral colours are those which do not appear on the traditional colour wheel and are not strongly associated with hue. They are used to balance bright colours.
Step 2: Examples of neutral colours
The most common neutral colours are Black, White, Grey, and Brown. These colours act as background or blending shades.
Step 3: Checking each option
- (A) Black → Neutral colour.
- (B) Brown → Neutral colour.
- (C) Red → A primary warm colour, not neutral.
- (D) White → Neutral colour.
Step 4: Conclusion
Among the given options, the neutral colours are Black, Brown, and White.
\[ \boxed{Black, Brown, White} \] Quick Tip: Neutral colours include Black, White, Grey, and Brown. They go well with almost all other colours in design.
Which of the following is the thickest brush?
View Solution
Step 1: Understanding brush numbering
Brushes are numbered according to their thickness. The higher the number, the thicker the brush. Lower numbers (like No. 1 or 2) are for fine work, while higher numbers (like 5 or 6) are for bold strokes.
Step 2: Checking the options
- No. 2 → Thin, for fine details.
- No. 3 → Slightly thicker, still relatively thin.
- No. 4 → Medium thickness.
- No. 6 → Thickest among the given choices.
Step 3: Conclusion
Therefore, the thickest brush among the given options is:
\[ \boxed{No. 6} \] Quick Tip: Remember: Larger brush numbers mean thicker brushes, while smaller numbers mean finer brushes.
Which colour medium is most transparent?
View Solution
Step 1: Understanding transparency in colour mediums
Transparency means that the surface underneath the paint is visible. Transparent mediums allow layering and light effects.
Step 2: Checking the options
- Oil colour → Usually opaque, though can be thinned but not naturally transparent.
- Pastel colour → Soft and opaque, not transparent.
- Watercolour → Known for its transparency, as the white of the paper shows through.
- Pencil colour → Mostly opaque, not transparent.
Step 3: Conclusion
Thus, the most transparent colour medium is:
\[ \boxed{Watercolour} \] Quick Tip: Watercolours are ideal for transparent washes and layering effects, unlike oils or pastels which are opaque.
How many warm colours are there?
View Solution
Step 1: Understanding warm colours
Warm colours are those that give a feeling of heat, energy, and brightness. They are associated with the sun, fire, and warmth.
Step 2: List of warm colours
The main warm colours are: Red, Orange, Yellow, and Pink. These colours are considered warm because they evoke warmth and liveliness.
Step 3: Elimination of incorrect options
- (B) Three → Too few, as there are more than three warm colours.
- (C) Six → Too many, not standard in colour theory.
- (D) Five → Incorrect, only four are considered primary warm colours.
Step 4: Conclusion
Hence, the number of warm colours is Four.
\[ \boxed{4} \] Quick Tip: Warm colours include Red, Orange, Yellow, and Pink. They bring energy and are often used in lively designs.
Which design will be appropriate for room ceiling?
View Solution
Step 1: Understanding ceiling designs
The ceiling is usually decorated in a way that focuses attention on the centre of the room. A central design balances the entire space and enhances the beauty of the ceiling.
Step 2: Analyzing the options
- (A) Corner design → Used for wall corners, not suitable for ceilings.
- (B) Central design → Best for ceilings, as it creates focus and symmetry.
- (C) Border design → Suitable for walls, saris, or fabrics, not ceiling centres.
- (D) None of these → Incorrect, since central design is appropriate.
Step 3: Conclusion
Therefore, the design most appropriate for room ceilings is Central design.
\[ \boxed{Central design} \] Quick Tip: Ceilings are decorated with central designs (like chandeliers, mandalas, or floral motifs) to draw focus and give balance to the room.
Which paper is used for repetition of figures?
View Solution
Step 1: Purpose of tracing paper
Tracing paper is a thin, semi-transparent paper used for copying or repeating drawings. By placing it over an original figure, the artist can trace the design accurately.
Step 2: Checking the options
- Normal paper → Opaque, cannot be used for repetition.
- Chart paper → Thick and opaque, used for displays and posters.
- Tracing paper → Correct, specifically used for repetition of figures.
- Cartridge paper → Thick drawing paper, not transparent.
Step 3: Conclusion
Thus, the paper used for repeating figures is:
\[ \boxed{Tracing paper} \] Quick Tip: Tracing paper is best for duplicating designs and patterns quickly with accuracy.
How many colours are there in Ostwald colour chart?
View Solution
Step 1: Understanding Ostwald colour chart
Wilhelm Ostwald, a German chemist and Nobel laureate, created a systematic colour chart for scientific study of colours. His chart is different from the Newtonian spectrum.
Step 2: Colours in Ostwald system
The Ostwald chart is based on 8 basic colours arranged in a circular form to show relationships and contrasts. These colours form the basis for further mixing and combinations.
Step 3: Checking the options
- Seven → Refers to Newton’s rainbow (VIBGYOR), not Ostwald.
- Eight → Correct, Ostwald colour circle has 8 colours.
- Nine → Incorrect.
- Six → Too few, not accurate.
Step 4: Conclusion
Therefore, the Ostwald colour chart has:
\[ \boxed{8 colours} \] Quick Tip: Newton’s rainbow has 7 colours, but Ostwald’s chart is based on 8 scientific colours. Don’t confuse the two systems.
What is the meaning of varna?
View Solution
Step 1: Understanding the term ‘Varna’
The Sanskrit word ‘Varna’ has multiple meanings in different contexts. In art and aesthetics, however, it primarily means colour.
Step 2: Usage in artistic context
In painting, design, and visual representation, ‘Varna’ refers to the use of colour to create beauty and symbolic meaning.
Step 3: Elimination of incorrect options
- (B) Sound → Sanskrit uses the word ‘Shabda’ for sound, not varna.
- (C) Picture → The word for picture is ‘Chitra’, not varna.
- (D) Fair colour → Too specific, while varna means all colours in general.
Step 4: Conclusion
Thus, the meaning of ‘Varna’ in the context of art is Colour.
\[ \boxed{Colour} \] Quick Tip: In Sanskrit aesthetics: ‘Varna’ = Colour, ‘Chitra’ = Picture, and ‘Shabda’ = Sound.
How many types of drafting are there in terms of structure?
View Solution
Step 1: Understanding drafting
Drafting in art and design refers to the preparation of outlines or structural layouts of drawings. It is a basic method to create accuracy in designs.
Step 2: Types of drafting
In terms of structure, drafting is generally divided into four main types:
1. Structural drafting
2. Civil drafting
3. Electrical drafting
4. Mechanical drafting
Step 3: Elimination of incorrect options
- (B) Six → Incorrect, more than standard four.
- (C) Two → Too few.
- (D) Three → Not complete, as there are four types.
Step 4: Conclusion
Thus, in terms of structure, there are four types of drafting.
\[ \boxed{4} \] Quick Tip: Drafting is the backbone of technical drawing. Structural, civil, electrical, and mechanical drafting are its four main types.
What is the fourth part of a circle called?
View Solution
Step 1: Parts of a circle
- A semicircle is half of a circle.
- A quarter (fourth) part of a circle is called a quarter circle, also sometimes referred to as a foot circle in traditional terminology.
Step 2: Checking the options
- Large circle → Incorrect, does not indicate a fourth part.
- Foot circle → Correct, means a quarter part of the circle.
- Small circle → Incorrect, does not specifically mean one-fourth.
- Semicircle → Incorrect, represents half, not one-fourth.
Step 3: Conclusion
Thus, the fourth part of a circle is:
\[ \boxed{Foot circle (Quarter Circle)} \] Quick Tip: A full circle = 360°. A semicircle = 180°. A quarter circle = 90°.
How many continuous measurements can be shown on diagonal scale?
View Solution
Step 1: Purpose of diagonal scale
A diagonal scale is a type of scale used in engineering drawing to measure small lengths with high accuracy. It works by dividing units into smaller parts using diagonals.
Step 2: Measurements possible
On a diagonal scale, three measurements can be read continuously:
1. Units
2. Tenths of units
3. Hundredths of units
Step 3: Checking the options
- Four → Incorrect, diagonal scale shows up to three levels.
- Five → Incorrect, not possible.
- Two → Incorrect, more than two are possible.
- Three → Correct, diagonal scale provides three continuous measurements.
Step 4: Conclusion
Therefore, the number of continuous measurements shown on a diagonal scale is:
\[ \boxed{3} \] Quick Tip: Remember: Diagonal scale gives three readings — units, tenths, and hundredths — making it very accurate in engineering drawing.
What are parallel lines?
View Solution
Step 1: Definition of parallel lines
Parallel lines are defined as two lines that are always the same distance apart and never intersect, no matter how far they are extended.
Step 2: Examples in real life
- Railway tracks are a good example of parallel lines.
- Opposite sides of a rectangle are parallel.
Step 3: Elimination of incorrect options
- (B) Intersecting lines are not parallel.
- (C) Zig-zag lines change direction and are not parallel.
- (D) Straight lines is too general; not all straight lines are parallel.
Step 4: Conclusion
Therefore, parallel lines are two straight lines that do not intersect each other.
\[ \boxed{Two straight lines do not intersect each other} \] Quick Tip: Always remember: Parallel lines never meet, no matter how far you extend them.
The unit of representative fraction is
View Solution
Step 1: Meaning of Representative Fraction (RF)
Representative Fraction (RF) is a ratio that shows the relationship between a distance on a map and the actual distance on the ground. Example: RF = 1:50,000 means 1 unit on the map = 50,000 units on the ground.
Step 2: Unit concept
Since RF is expressed as a ratio (e.g., 1:100), it is a pure number. The units cancel out (cm/cm, m/m, etc.), so it does not have a unit.
Step 3: Elimination of options
- (A) Metre → Wrong, RF is not measured in metres.
- (B) Kilometre → Wrong, not applicable.
- (C) Millimetre → Wrong, not applicable.
- (D) Does not exist → Correct, RF has no unit.
Step 4: Conclusion
Thus, the unit of representative fraction does not exist.
\[ \boxed{Does not exist} \] Quick Tip: Representative Fraction (RF) is always unitless because it is a ratio of two distances in the same unit.
How many centimetres are there in one metre?
View Solution
Step 1: Metric conversion rule
The metric system is based on powers of 10. In this system: \[ 1 \ metre = 100 \ centimetres \]
Step 2: Checking the given options
- (A) 10 cm → Incorrect, too small.
- (B) 1000 cm → Incorrect, 1000 cm = 10 metres.
- (C) 80 cm → Incorrect, less than 1 metre.
- (D) 100 cm → Correct, matches the metric definition.
Step 3: Conclusion
Thus, one metre equals:
\[ \boxed{100 \ cm} \] Quick Tip: Remember the basic metric conversions: 1 m = 100 cm, 1 cm = 10 mm, 1 km = 1000 m.
Which of the following is a simple angle?
View Solution
Step 1: Types of angles
- Acute angle → less than 90°
- Right angle → exactly 90°
- Obtuse angle → between 90° and 180°
- Straight angle → exactly 180°
- Reflex angle → between 180° and 360°
- Complete angle → exactly 360°
Step 2: Definition of a simple angle
A simple angle is any angle that is less than 180°. Hence, it can be acute, right, or obtuse.
Step 3: Checking the options
- 180° → Straight angle, not considered simple.
- 360° → Complete angle, not simple.
- 190° → Reflex angle, not simple.
- 120° → Obtuse angle, and since it is less than 180°, it is a simple angle.
Step 4: Conclusion
Therefore, the simple angle among the options is:
\[ \boxed{120^\circ} \] Quick Tip: Simple angles are always less than 180°. Any angle greater than 180° is called a reflex angle.
Which of the following shapes is pentagonal?
View Solution
Step 1: Definition of Pentagon
A pentagon is a closed two-dimensional polygon with five sides and five angles.
Step 2: Analyzing options
- (A) Square/Rectangle → 4 sides (not pentagon).
- (B) Pentagon → Exactly 5 sides, correct.
- (C) Hexagon → 6 sides (not pentagon).
- (D) Diamond → Usually 4 sides, not pentagon.
Step 3: Conclusion
The correct pentagonal shape is option (B).
\[ \boxed{Pentagon (5-sided figure)} \] Quick Tip: Always count the number of sides: 3 = Triangle, 4 = Quadrilateral, 5 = Pentagon, 6 = Hexagon.
In scale what is written on the left side first?
View Solution
Step 1: Understanding scales in drawing
In engineering drawing and geometry, a scale is a ratio that shows the relation between the drawing and the actual object. It is marked in divisions (like a ruler).
Step 2: Starting point of a scale
On a scale (measuring line), the leftmost mark always begins with 0. This represents the starting point of measurement.
Step 3: Elimination of wrong options
- (A) 6 → This would appear later on the scale, not at the start.
- (B) 1 → The first division after 0, not the beginning.
- (D) None of these → Incorrect, since 0 is the correct answer.
Step 4: Conclusion
Thus, in scale measurement, the left side is always marked with 0.
\[ \boxed{0} \] Quick Tip: In any measuring scale or ruler, always remember: the first point starts with 0.
How many faces are there in a cube?
View Solution
Step 1: Structure of a cube
A cube is a 3-dimensional solid shape where all sides are equal. It is made up of squares.
Step 2: Faces of a cube
A cube has:
- 6 faces (all squares),
- 12 edges,
- 8 vertices.
Step 3: Checking the options
- Four → Incorrect, too few.
- Eight → Incorrect, this is the number of vertices, not faces.
- Six → Correct, a cube has six faces.
- Five → Incorrect, less than actual.
Step 4: Conclusion
Thus, the number of faces in a cube is:
\[ \boxed{6} \] Quick Tip: Remember: A cube = 6 faces, 12 edges, 8 vertices.
How many lines can be drawn by joining two points?
View Solution
Step 1: Fundamental property of geometry
In geometry, two distinct points determine exactly one straight line. No matter how you place two points, there will always be one and only one line joining them.
Step 2: Checking the options
- 3 → Incorrect, only one unique line is possible.
- 1 → Correct, exactly one line can be drawn between two points.
- 4 → Incorrect, not possible.
- Many → Incorrect, multiple lines cannot pass through the same two distinct points.
Step 3: Conclusion
Therefore, the number of lines that can be drawn by joining two points is:
\[ \boxed{1} \] Quick Tip: Two points always determine one unique straight line in geometry.
How many rectangular faces does a square prism have?
View Solution
Step 1: Understanding square prism
A square prism (also called a cuboid with square base) is a 3D solid that has:
- Two square faces (top and bottom).
- Four rectangular faces (sides).
Step 2: Counting the rectangular faces
The four side faces of the prism are all rectangles.
Step 3: Elimination of wrong options
- (A) 1 → Too few.
- (B) 5 → Incorrect, only 4 are rectangular.
- (D) 3 → Too few.
Step 4: Conclusion
Thus, a square prism has 4 rectangular faces.
\[ \boxed{4} \] Quick Tip: A square prism = 2 square faces + 4 rectangular faces = total 6 faces.
If one end of a cylinder is circular, then the other end will be
View Solution
Step 1: Properties of a cylinder
A cylinder is a 3D solid with two flat ends (bases) that are parallel and congruent circles, connected by a curved surface.
Step 2: Identifying the shape of the other end
If one end of a cylinder is circular, the other end must also be circular because cylinders have two equal circular bases.
Step 3: Elimination of wrong options
- (A) Rectangular → Incorrect, that would make it a prism.
- (B) Conical → Cone has one circular base and a pointed tip, not a cylinder.
- (C) Triangular → Would make it a triangular prism, not a cylinder.
Step 4: Conclusion
Therefore, if one end of a cylinder is circular, the other end will also be circular.
\[ \boxed{Circular} \] Quick Tip: A cylinder always has two equal circular bases and one curved surface.
How many degrees is each angle of a rectangle?
View Solution
Step 1: Definition of a rectangle
A rectangle is a quadrilateral with opposite sides equal and all interior angles equal.
Step 2: Measuring the angles
Since a rectangle has four right angles, each interior angle is: \[ 90^\circ \]
Step 3: Checking the options
- 90° → Correct, each angle of a rectangle is a right angle.
- 60° → Incorrect, belongs to an equilateral triangle.
- 30° → Incorrect, not related.
- 45° → Incorrect, belongs to half of a right angle.
Step 4: Conclusion
Thus, each angle of a rectangle is:
\[ \boxed{90^\circ} \] Quick Tip: All rectangles have right angles (90°). This property distinguishes them from general parallelograms.
What is the shape of a circle?
View Solution
Step 1: Definition of a circle
A circle is a closed 2D shape where all points are equidistant from a fixed point called the centre.
Step 2: Checking the options
- Triangle → Incorrect, has 3 sides, not curved.
- Circle → Correct, it is itself a circle.
- Rectangle → Incorrect, has 4 sides and right angles.
- Pentagon → Incorrect, has 5 sides.
Step 3: Conclusion
Thus, the shape of a circle is:
\[ \boxed{Circle} \] Quick Tip: A circle is the only 2D shape with continuous curvature and no straight sides.
How many degrees is a right angle?
View Solution
Step 1: Definition of a right angle
A right angle is formed when two lines meet and create an exact quarter turn.
Step 2: Measuring in degrees
A complete circle is 360°. A quarter of a circle is \(\dfrac{360}{4} = 90^\circ\).
Step 3: Elimination of wrong options
- (B) 60° → Angle of an equilateral triangle, not a right angle.
- (C) 30° → An acute angle, not a right angle.
- (D) 45° → Also acute, not right.
Conclusion: A right angle measures exactly 90°.
\[ \boxed{90^\circ} \] Quick Tip: Right angle = 90°, Straight angle = 180°, Complete angle = 360°.
Each angle of an equilateral triangle is
View Solution
Step 1: Sum of angles in a triangle
The sum of all interior angles of any triangle = \(180^\circ\).
Step 2: Equilateral triangle property
In an equilateral triangle, all three sides and all three angles are equal.
\[ Each angle = \dfrac{180^\circ}{3} = 60^\circ \]
Step 3: Elimination of wrong options
- (B) 45° → Belongs to isosceles right triangle, not equilateral.
- (C) 30° → Incorrect, too small.
- (D) 90° → Right angle triangle, not equilateral.
Step 4: Conclusion
Thus, each angle of an equilateral triangle is 60°.
\[ \boxed{60^\circ} \] Quick Tip: Remember: Equilateral triangle → 3 equal sides, 3 equal angles of 60° each.
Which of the following is an obtuse angle?
View Solution
Step 1: Definition of obtuse angle
An obtuse angle is one that is greater than 90° but less than 180°.
Step 2: Checking the given options
- 200° → Incorrect, this is a reflex angle (>180°).
- 270° → Incorrect, reflex angle (>180°).
- 120° → Correct, because 120° lies between 90° and 180°.
- 180° → Incorrect, this is a straight angle, not obtuse.
Step 3: Conclusion
Thus, the obtuse angle among the given options is:
\[ \boxed{120^\circ} \] Quick Tip: Remember: Acute (<90°), Right (=90°), Obtuse (90°–180°), Straight (=180°), Reflex (>180°).
How many vertical faces does a rectangular room have?
View Solution
Step 1: Structure of a rectangular room
A rectangular room is like a cuboid. A cuboid has 6 faces in total:
- 2 are the horizontal faces (floor and ceiling).
- 4 are the vertical faces (the walls).
Step 2: Checking the options
- 4 → Correct, these are the walls (vertical faces).
- 6 → Incorrect, that counts all faces of the cuboid, not just vertical ones.
- 2 → Incorrect, too few.
- 8 → Incorrect, refers to vertices, not faces.
Step 3: Conclusion
Thus, a rectangular room has:
\[ \boxed{4 \ vertical faces (walls)} \] Quick Tip: Think of a rectangular room as a cuboid: 6 faces total, with 4 vertical (walls) and 2 horizontal (floor & ceiling).
The measure of a complete angle is
View Solution
Step 1: Types of angles
- Right angle = 90°
- Straight angle = 180°
- Reflex angle = Between 180° and 360°
- Complete angle = Full rotation = 360°
Step 2: Explanation
When a line rotates fully around a point, it covers a complete angle. This equals 360°.
Step 3: Elimination of incorrect options
- (A) 60° → Acute angle, not complete.
- (C) 180° → Straight angle, not complete.
- (D) 90° → Right angle, not complete.
Conclusion: The measure of a complete angle is 360°.
\[ \boxed{360^\circ} \] Quick Tip: Remember: Full rotation = 360°. It is called a complete angle.
At what degree of angle is the pole placed for fixing a flag?
View Solution
Step 1: Standard pole placement
When a flag is fixed on a pole, the pole must be perpendicular to the ground to keep the flag upright.
Step 2: Perpendicular relation
Perpendicular means forming a right angle with the base. A right angle measures 90°.
Step 3: Elimination of incorrect options
- (B) 30° → Too slanted.
- (C) 60° → Also slanted.
- (D) 120° → Greater than right angle, incorrect.
Step 4: Conclusion
Thus, a pole is placed at a 90° angle to the ground for fixing a flag.
\[ \boxed{90^\circ} \] Quick Tip: For stability, flagpoles are always installed at 90° (perpendicular) to the ground.
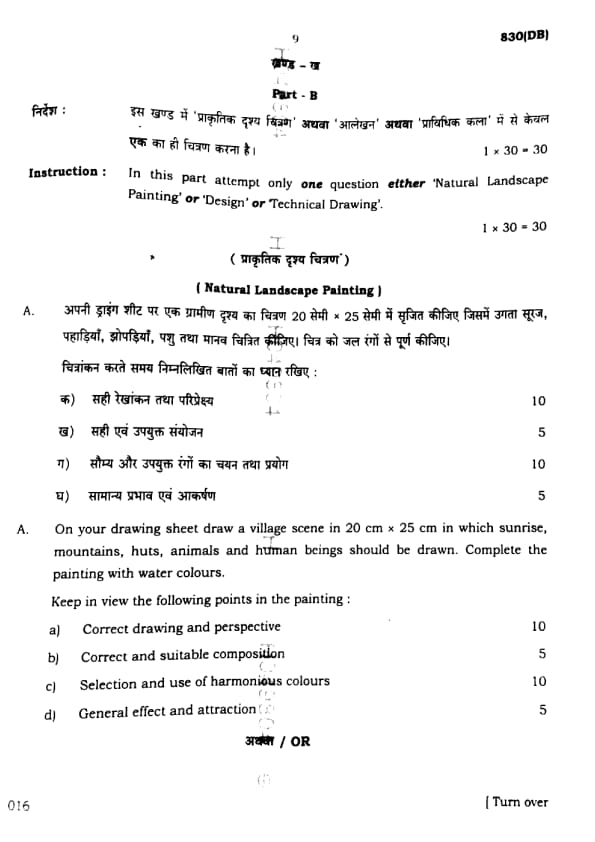
(Natural Landscape Painting)
On the given drawing sheet draw a rectangle of size \(20\,cm \times 25\,cm\) in which draw any one of the following scenes with human figure and complete with watercolour or pastel colour:
(a) Scene of village at sunrise
(b) Temple campus
(c) Panchayat scene
Pay special attention to the following points in the painting:
(a) Correct drawing and perspective
(b) Correct and appropriate colour scheme
(c) Correct and suitable composition
(d) General impression and attraction
View Solution

Step 1: Canvas Preparation
Draw a neat rectangle of \(20\,cm \times 25\,cm\) using a scale and pencil. Keep the outline light, as this will be the boundary of your painting.
Step 2: Selection of Scene
Choose one of the three given options:
- If you pick Village at Sunrise: sketch huts, trees, the rising sun, birds, and human figures.
- If you pick Temple Campus: show a temple tower, courtyard, trees, devotees, and steps.
- If you pick Panchayat Scene: draw people gathered under a large tree, a small platform or chabutra, and the panchayat in session.
Step 3: Composition Layout
- Ensure balance by arranging objects across foreground, middle ground, and background.
- Place the main subject (temple, huts, or panchayat) in the center or slightly off-center.
- Add at least one or two human figures to create life and activity in the scene.
Step 4: Colour Application
- Use watercolours or pastel colours neatly.
- For sunrise: warm tones (orange, pink, yellow) with green trees and brown huts.
- For temple campus: soft stone colours, saffron, and natural surroundings.
- For panchayat: earthy colours for tree, brown/grey clothing, with green grass.
- Ensure harmony and avoid clashing colours.
Step 5: Detailing and Perspective
- Use shading to show sunlight direction and shadows.
- Keep proportions correct: huts smaller than trees, human figures realistic.
- Show depth by overlapping objects and fading colours in the background.
Step 6: Final Touches
- Outline lightly with pencil or thin brush strokes.
- Highlight human activity (walking, praying, talking, etc.).
- Ensure the painting looks attractive and complete.
Quick Tip: Choose a scene that inspires you the most. Always begin with light sketching, maintain perspective, and build colours gradually to achieve harmony and depth.
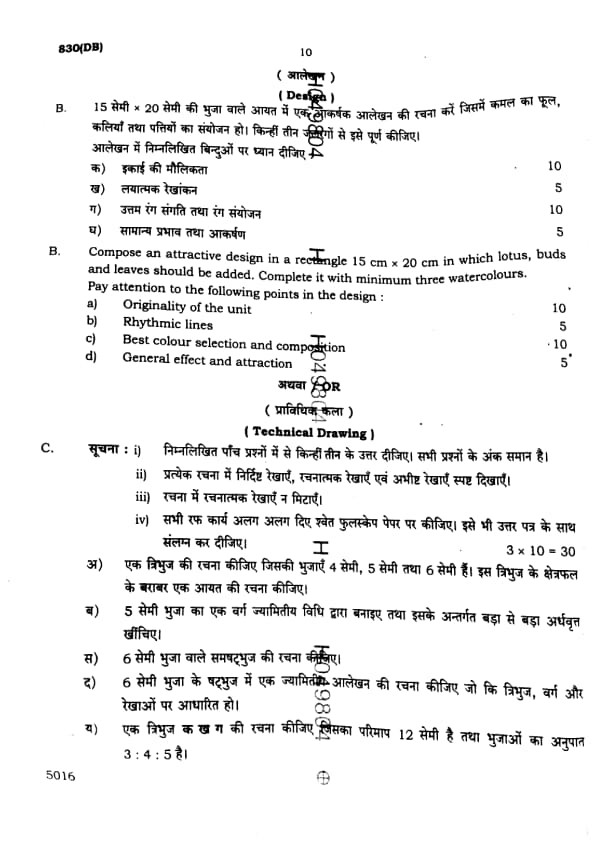
Compose an ornamental design in a rectangle of \(16\,cm \times 12\,cm\) sides with any Indian flower, leaves, buds, and duck. Complete it by using three watercolours. Tracing is prohibited.
Pay special attention to the following points in the design:
(a) Originality of the unit
(b) Rhythmic lines
(c) Attractive colour composition
(d) General effect and impression
View Solution

Step 1: Canvas Preparation
Draw a rectangle of \(16\,cm \times 12\,cm\) neatly on your drawing sheet. This will be the boundary for your ornamental design. Keep the outline light and accurate.
Step 2: Unit Selection
- Select a central motif inspired by an Indian flower (such as lotus, marigold, or hibiscus).
- Add supporting elements like leaves and buds around the main flower.
- Incorporate a stylized duck to balance the floral composition.
- Ensure that the design is ornamental and not realistic — use symmetry, repetition, and decorative curves.
Step 3: Rhythmic Lines
- Draw smooth and flowing outlines for flowers and leaves.
- Arrange buds and leaves in curves that repeat rhythmically.
- Place the duck in such a way that it aligns with the flow of the design (e.g., swimming among lotus flowers).
Step 4: Colour Composition
- Use only three watercolours for harmony. Suggested palette: red (for flower), green (for leaves and buds), and yellow (for duck and highlights).
- Blend colours softly to give a decorative appeal.
- Maintain balance by repeating colours across different elements.
Step 5: Final Effect
- Add borders or stylized patterns around the rectangle for attraction.
- Ensure neatness and proportion in all elements.
- Give shading and highlights to make the design ornamental and lively.
Quick Tip: While creating ornamental designs, think in terms of symmetry, repetition, and decoration rather than realistic drawing. Limit your colour palette for harmony and ensure that all elements follow a rhythmic flow.
Make a geometrical design in a square of side \(6\,cm\), based on triangles, squares and lines.
View Solution
Step 1: Draw a Circle
Draw a circle of radius \(5\,cm\) using a compass. Mark its centre as \(O\).
Step 2: Mark First Point on Circle
Choose any point \(A\) on the circumference of the circle. This will be the first vertex of the hexagon.
Step 3: Step Off Arcs
With the compass set at radius \(5\,cm\), place the needle on \(A\) and mark an arc on the circumference. Name this point \(B\).
Repeat the same process by stepping the compass around the circle to locate successive points \(C\), \(D\), \(E\), and \(F\).
Step 4: Join Vertices
Join \(A, B, C, D, E,\) and \(F\) consecutively using a ruler. Finally, join \(F\) to \(A\) to close the figure.
Step 5: Final Hexagon
The figure \(ABCDEF\) is the required regular hexagon with side length \(5\,cm\).
\[ \boxed{Regular hexagon constructed successfully.} \]
\begin{tikzpicture[scale=0.8]
% Circle
\draw[dashed] (0,0) circle (5);
\fill (0,0) circle(1pt) node[below]{\(O\);
% Hexagon vertices
\foreach \i in {0,60,...,300{
\coordinate (P\i) at ({5*cos(\i),{5*sin(\i));
\draw[thick] (P0)--(P60)--(P120)--(P180)--(P240)--(P300)--cycle;
% Labels
\node[below right] at (P0) {\(A\);
\node[above right] at (P60) {\(B\);
\node[above left] at (P120) {\(C\);
\node[left] at (P180) {\(D\);
\node[below left] at (P240) {\(E\);
\node[below right] at (P300) {\(F\);
\end{tikzpicture Quick Tip: Keep line weights even and preserve symmetry. Colour or hatch alternate triangular regions to enhance contrast while maintaining a clean geometric rhythm.
Comments